ラベル Apache の投稿を表示しています。 すべての投稿を表示

2014年6月21日土曜日

Basic認証とDigest認証の比較

Basic認証とDigest認証を比較するために環境を作成する手順をまとめます。
パケットキャプチャによりパスワードが取得できるかできないかについては
こちらの記事でまとめたいと思います。


■安全性
Basic認証とは、ユーザ名とパスワードをBase64でエンコードしてAuthorizationヘッダを付加してサーバにリクエストする方式です。
base64エンコードは暗号化ではなくただの符号化ですので、簡単に復号できてしまいます。
一方、Digest認証はユーザ名と暗号化したパスワードを利用するため、ネットワーク上を生パスワードが流れることはありません。
サーバ側に生パスワードを保存する必要がないのもポイントです。盗聴に対してBasic認証よりかはマシと考えられます。
Digest認証はMD5などの脆弱なアルゴリズムを使用します。SSLを使用した通信の暗号化の方が、資格証明の傍受を防ぐには好ましい方法です。


■認証設定ディレクトリ準備
[root@centos65 ~]# mkdir /var/www/html/basic
[root@centos65 ~]# mkdir /var/www/html/digest
[root@centos65 ~]# echo "<h1>/var/www/html/basic/index.html</h1>" > /var/www/html/basic/index.html
[root@centos65 ~]# echo "<h1>/var/www/html/digest/index.html</h1>" > /var/www/html/digest/index.html
[root@centos65 ~]#


■htpasswdファイル準備
## Basic認証用
[root@centos65 ~]# mkdir /etc/httpd/htpasswd
[root@centos65 ~]# htpasswd -bc /etc/httpd/htpasswd/basic.htpasswd basic secret
Adding password for user basic
[root@centos65 ~]# cat /etc/httpd/htpasswd/basic.htpasswd
basic:TrttZUUoY6iEE
[root@centos65 ~]#
※"-b"はパスワードを指定するオプション。

## Digest認証用
[root@centos65 ~]# htdigest -c /etc/httpd/htpasswd/digest.htpasswd DigestAuth digest
Adding password for digest in realm DigestAuth.
New password: ←secret
Re-type new password:
[root@centos65 ~]# cat /etc/httpd/htpasswd/digest.htpasswd
digest:DigestAuth:9d5ce11731e1e06d88aaa030476b5447
[root@centos65 ~]#
realm(領域名)を指定する必要がある。今回は"DigestAuth"とした。


■認証設定ファイル準備
[root@centos65 ~]# vi /etc/httpd/conf.d/auth.conf
[root@centos65 ~]# cat /etc/httpd/conf.d/auth.conf
## for Basic Authentication
<Directory "/var/www/html/basic">
    AuthType Basic
    AuthName "Basic Authentication"
    AuthUserFile /etc/httpd/htpasswd/basic.htpasswd
    Require valid-user
</Directory>

## for Digest Authentication
<Directory "/var/www/html/digest">
    AuthType Digest
    AuthName "DigestAuth"
    AuthUserFile /etc/httpd/htpasswd/digest.htpasswd
    Require valid-user
</Directory>
[root@centos65 ~]#
Digest認証はAuthNameにrealmで指定した値を設定する必要がある。


■httpd.confにモジュールがロードされているか確認
[root@centos65 ~]# grep -e auth_basic -e auth_digest /etc/httpd/conf/httpd.conf
LoadModule auth_basic_module modules/mod_auth_basic.so
LoadModule auth_digest_module modules/mod_auth_digest.so
[root@centos65 ~]#

## httpd再起動
[root@centos65 ~]# /etc/init.d/httpd restart
httpd を停止中:                                            [  OK  ]
httpd を起動中:                                            [  OK  ]
[root@centos65 ~]#


■認証確認
## Basic認証
http://192.168.77.149/basic/


## Digest認証
http://192.168.77.149/digest/

Basic認証と同じような手順および使い勝手であるので、パスワードをとりあえず暗号化できるDigest認証の方がお勧めかも。


この情報が何かのお役にたてれば幸いです。m(_ _)m

2014年5月5日月曜日

Amazon LinuxにWordPressをインストールする手順

AWSのEC2(Amazon Linux)にWordPressをインストールする手順です。必要パッケージ(Apache、MySQL、PHP等)を準備して、データベースを作成してからWordPressをドキュメントルートに展開後、コンフィグ設定すれば、だいたい完了です。
後は画面にてインストールプロセスに必要な項目を入力し、ログインしてダッシュボードを表示するところまでまとめます。
パーマリンク設定をデフォルト以外に設定しても404エラーを出さない方法については、別途記載できればと思います。

Amazon Linux AMI release 2014.03
WordPress 3.9 日本語版
ドメイン(仮): lnx-cms.linuxnow.com


■既存パッケージの確認

[root@lnx-cms ~]# rpm -qa | grep -e httpd -e mysql -e php | sort
[root@lnx-cms ~]#
何も入っていません。Amazon Linuxは本当にシンプル。


■必要パッケージの準備

[root@lnx-cms ~]# yum install httpd mysql-server php php-mysql php-mbstring
(中略)
===============================================================================
 Package                   Arch      Version              Repository      Size
===============================================================================
Installing:
 httpd                     x86_64    2.2.27-1.2.amzn1     amzn-updates   1.2 M
 mysql-server              noarch    5.5-1.6.amzn1        amzn-main      2.8 k
 php                       x86_64    5.3.28-1.5.amzn1     amzn-updates   2.8 M
 php-mbstring              x86_64    5.3.28-1.5.amzn1     amzn-updates   2.3 M
 php-mysql                 x86_64    5.3.28-1.5.amzn1     amzn-updates   178 k
Installing for dependencies:
 apr                       x86_64    1.5.0-2.11.amzn1     amzn-updates   115 k
 apr-util                  x86_64    1.4.1-4.14.amzn1     amzn-main       87 k
 apr-util-ldap             x86_64    1.4.1-4.14.amzn1     amzn-main       17 k
 generic-logos             noarch    17.0.0-2.5.amzn1     amzn-main      589 k
 httpd-tools               x86_64    2.2.27-1.2.amzn1     amzn-updates    79 k
 mailcap                   noarch    2.1.31-2.7.amzn1     amzn-main       27 k
 mysql55                   x86_64    5.5.37-1.46.amzn1    amzn-updates   7.5 M
 mysql55-common            x86_64    5.5.37-1.46.amzn1    amzn-updates    48 k
 mysql55-libs              x86_64    5.5.37-1.46.amzn1    amzn-updates   812 k
 mysql55-server            x86_64    5.5.37-1.46.amzn1    amzn-updates    13 M
 perl-Compress-Raw-Bzip2   x86_64    2.061-1.10.amzn1     amzn-main       33 k
 perl-Compress-Raw-Zlib    x86_64    2.061-1.10.amzn1     amzn-main       60 k
 perl-DBD-MySQL            x86_64    4.023-2.16.amzn1     amzn-main      148 k
 perl-DBI                  x86_64    1.627-1.7.amzn1      amzn-main      854 k
 perl-Data-Dumper          x86_64    2.145-1.4.amzn1      amzn-main       49 k
 perl-IO-Compress          noarch    2.061-1.1.11.amzn1   amzn-main      298 k
 perl-Net-Daemon           noarch    0.48-4.4.amzn1       amzn-main       58 k
 perl-PlRPC                noarch    0.2020-12.5.amzn1    amzn-main       38 k
 php-cli                   x86_64    5.3.28-1.5.amzn1     amzn-updates   2.6 M
 php-common                x86_64    5.3.28-1.5.amzn1     amzn-updates   1.0 M
 php-pdo                   x86_64    5.3.28-1.5.amzn1     amzn-updates   170 k

Transaction Summary
================================================================================
Install  5 Packages (+21 Dependent packages)
(以下略)

## インストールしたパッケージの確認
[root@lnx-cms ~]# rpm -qa | grep -e httpd -e mysql -e php | sort
httpd-2.2.27-1.2.amzn1.x86_64
httpd-tools-2.2.27-1.2.amzn1.x86_64
mysql55-5.5.37-1.46.amzn1.x86_64
mysql55-common-5.5.37-1.46.amzn1.x86_64
mysql55-libs-5.5.37-1.46.amzn1.x86_64
mysql55-server-5.5.37-1.46.amzn1.x86_64
mysql-server-5.5-1.6.amzn1.noarch
php-5.3.28-1.5.amzn1.x86_64
php-cli-5.3.28-1.5.amzn1.x86_64
php-common-5.3.28-1.5.amzn1.x86_64
php-mbstring-5.3.28-1.5.amzn1.x86_64
php-mysql-5.3.28-1.5.amzn1.x86_64
php-pdo-5.3.28-1.5.amzn1.x86_64
[root@lnx-cms ~]#


■phpinfoで状況確認

[root@lnx-cms ~]# echo "<?php phpinfo(); ?>" > /var/www/html/phpinfo.php
[root@lnx-cms ~]# /etc/init.d/httpd start
[root@lnx-cms ~]# /etc/init.d/mysqld start

## ブラウザにて確認
http://lnx-cms.linuxnow.com/phpinfo.php


■MySQLのrootパスワード設定

[root@lnx-cms ~]# mysqladmin -u root -h localhost password "naisyo"
[root@lnx-cms ~]#


■データベースとユーザの作成

データベース名: wp_db
管理ユーザ名: wp_admin
管理ユーザパスワード: secret
[root@lnx-cms ~]# mysql -u root -pnaisyo
(中略)
mysql> create database wp_db;
Query OK, 1 row affected (0.00 sec)

mysql> grant all privileges on wp_db.* to wp_admin@localhost identified by 'secret';
Query OK, 0 rows affected (0.00 sec)

mysql> flush privileges;
Query OK, 0 rows affected (0.01 sec)

mysql> quit
Bye
[root@lnx-cms ~]#


■自動起動設定

[root@lnx-cms ~]# chkconfig httpd on; chkconfig --list httpd
httpd           0:off   1:off   2:on    3:on    4:on    5:on    6:off
[root@lnx-cms ~]# chkconfig mysqld on; chkconfig --list mysqld
mysqld          0:off   1:off   2:on    3:on    4:on    5:on    6:off
[root@lnx-cms ~]#


■WordPressインストーラ取得

[root@lnx-cms ~]# cd /usr/local/src/
[root@lnx-cms src]# wget http://ja.wordpress.org/latest-ja.tar.gz
--2014-05-05 22:41:13--  http://ja.wordpress.org/latest-ja.tar.gz
(中略)
2014-05-05 22:41:18 (1.37 MB/s) - ‘latest-ja.tar.gz’ saved [6250676/6250676]

[root@lnx-cms src]# ll
total 6108
-rw-r--r-- 1 root root 6250676 Apr 17 17:26 latest-ja.tar.gz
[root@lnx-cms src]#


■WordPressの配置

[root@lnx-cms src]# tar -zxf latest-ja.tar.gz -C /var/www/html/
[root@lnx-cms src]# ll /var/www/html/wordpress/
total 192
-rw-r--r--  1 nobody 65534   418 Sep 25  2013 index.php
-rw-r--r--  1 nobody 65534 19930 Apr 10 08:50 license.txt
-rw-r--r--  1 nobody 65534 10163 Apr 17 11:58 readme.html
-rw-r--r--  1 nobody 65534  3293 Apr 17 11:58 readme-ja.html
-rw-r--r--  1 nobody 65534  4896 Dec 25 03:57 wp-activate.php
drwxr-xr-x  9 nobody 65534  4096 Apr 17 11:58 wp-admin
-rw-r--r--  1 nobody 65534   271 Jan  9  2012 wp-blog-header.php
-rw-r--r--  1 nobody 65534  4818 Feb 19 06:45 wp-comments-post.php
-rw-r--r--  1 root   root   4230 May  5 23:26 wp-config.php
-rw-r--r--  1 nobody 65534  4255 Apr 17 11:58 wp-config-sample.php
drwxr-xr-x  5 nobody 65534  4096 Apr 17 11:58 wp-content
-rw-r--r--  1 nobody 65534  2932 Sep 25  2013 wp-cron.php
drwxr-xr-x 12 nobody 65534  4096 Apr 17 11:58 wp-includes
-rw-r--r--  1 nobody 65534  2380 Oct 25  2013 wp-links-opml.php
-rw-r--r--  1 nobody 65534  2359 Oct 25  2013 wp-load.php
-rw-r--r--  1 nobody 65534 32671 Apr 14 01:06 wp-login.php
-rw-r--r--  1 nobody 65534  8235 Nov 13 20:58 wp-mail.php
-rw-r--r--  1 nobody 65534 11070 Apr  8 05:15 wp-settings.php
-rw-r--r--  1 nobody 65534 25665 Nov 13 12:23 wp-signup.php
-rw-r--r--  1 nobody 65534  4026 Oct 25  2013 wp-trackback.php
-rw-r--r--  1 nobody 65534  3032 Feb 10 05:39 xmlrpc.php
[root@lnx-cms src]#


■wp-config.phpの設定

先ほど作成したデータベース名、ユーザー名、パスワードを設定します。
[root@lnx-cms src]# cd /var/www/html/wordpress/
[root@lnx-cms wordpress]# cp wp-config-sample.php wp-config.php
[root@lnx-cms wordpress]# vi wp-config.php
[root@lnx-cms wordpress]# grep -A 12 "MySQL 設定" wp-config.php
// ** MySQL 設定 - この情報はホスティング先から入手してください。 ** //
/** WordPress のためのデータベース名 */
define('DB_NAME', 'wp_db');

/** MySQL データベースのユーザー名 */
define('DB_USER', 'wp_admin');

/** MySQL データベースのパスワード */
define('DB_PASSWORD', 'secret');

/** MySQL のホスト名 */
define('DB_HOST', 'localhost');

[root@lnx-cms wordpress]#

## ファイル所有者変更
[root@lnx-cms wordpress]# chown -R apache: /var/www/html/wordpress


■WordPressの初期設定

http://lnx-cms.linuxnow.com/wordpress/ (←実在はしませんのであしからず。)

画面の入力項目に従って進みます。

ダッシュボード画面を表示するところまでできました。今回の作業は以上で終了です。
次回は、 パーマリンク設定をデフォルト以外に設定しても404エラーを出さない方法を記載したいと思います。


こちらの情報が何かのお役に立てましたら幸いです。ちょこっと右サイドも見ていただければ幸いです。m(_ _)m

2014年4月2日水曜日

直リンク(直接URL入力でのアクセス)を禁止するhttpd.conf設定

Webサイトの内容によってはブラウザに直接URLを入力してアクセスされたくないページや外部のサイトからリンクされたくないページが存在する場合があります。

SetEnvIf Referer を設定すると指定ディレクトリ以下のページ(画像等を含む)への直リンクを禁止することが可能です。

OS: RedHat EL 6.5(64-bit)
Apache: 2.2.15


■httpd.confの最下行に追加
[root@centos65 ~]# tail /etc/httpd/conf/httpd.conf
# Direct Link ban
<Directory "/var/www/html/direct_ng">
    SetEnvIf Referer "^http://192.168.77.149/" allow_ref
    # External Links ban
    # SetEnvIf Referer "^$" allow_ref
    order deny,allow
    deny from all
    allow from env=allow_ref
    ErrorDocument 403 /403.html
</Directory>
[root@centos65 ~]#
SetEnvIf Referer の URLは「http://」から書き、先頭には半角で「^」(ハット)記号を加えた方が、アクセス制御レベルが高まります。
今回はコメントアウトしていますが、URL直入力は許可し外部サイトからのリンクを禁止する場合は、URLの部分を "^$" と記述します。
直リンクされた場合はステータスコード403が返るので、それに対応するページを準備します。

■動作確認
ブラウザに直接URLを入力して http://192.168.77.149/direct_ng/ にアクセスすると 403.html ページが表示されます。

403.html は5秒後に direct_ok ページに自動遷移するように設定しています。

http://192.168.77.149/direct_ok/ ページからリンクすれば http://192.168.77.149/direct_ng/ ページが表示されます。


■直リンクされたときのアクセスログ
[root@centos65 ~]# tail -f /var/log/httpd/access_log

192.168.77.13 - - [02/Apr/2014:23:33:04 +0900] "GET /direct_ng/ HTTP/1.1" 403 370 "-" "Mozilla/5.0 (Windows NT 6.1; WOW64) AppleWebKit/537.36 (KHTML, like Gecko) Chrome/33.0.1750.154 Safari/537.36"
192.168.77.13 - - [02/Apr/2014:23:33:09 +0900] "GET /direct_ok/ HTTP/1.1" 200 338 "http://192.168.77.149/direct_ng/" "Mozilla/5.0 (Windows NT 6.1; WOW64) AppleWebKit/537.36 (KHTML, like Gecko) Chrome/33.0.1750.154 Safari/537.36"
192.168.77.13 - - [02/Apr/2014:23:33:37 +0900] "GET /direct_ng/ HTTP/1.1" 200 284 "http://192.168.77.149/direct_ok/" "Mozilla/5.0 (Windows NT 6.1; WOW64) AppleWebKit/537.36 (KHTML, like Gecko) Chrome/33.0.1750.154 Safari/537.36"

■テストページhtmlサンプル
## 直リンクOKページ
[root@centos65 ~]# cat /var/www/html/direct_ok/index.html
<html lang="ja">
<head>
<meta http-equiv="content-type" content="text/html; charset=utf-8">
<title>Direct Link OK</title>
</head>
<body bgcolor="#33ffcc">
  <h1>Direct Link OK</h1>
  <h2>/var/www/html/direct_ok/index.html</h2>
  <a href="/direct_ng/">direct_ng</a><br />
</body>
</html>
[root@centos65 ~]#

## 直リンクNGページ
[root@centos65 ~]# cat /var/www/html/direct_ng/index.html
<html lang="ja">
<head>
<meta http-equiv="content-type" content="text/html; charset=utf-8">
<title>Direct Link NG</title>
</head>
<body bgcolor="#ff6699">
  <h1>Direct Link NG</h1>
  <h2>/var/www/html/direct_ng/index.html</h2>
  <a href="/direct_ok/">direct_ok</a><br />
</body>
</html>
[root@centos65 ~]#

## 403ページ
[root@centos65 ~]# cat /var/www/html/403.html
<html lang="ja">
<head>
<meta http-equiv="content-type" content="text/html; charset=utf-8">
<meta http-equiv="refresh" content="5; url=/direct_ok/">
<title>Forbidden</title>
</head>
<body bgcolor="#cccccc">
  <h1>Forbidden</h1>
  <p>/var/www/html/403.html</p>
  <p>This page is not allowed to be Direct Link.</p>
  <a href="/direct_ok/">direct_ok</a><br />
</body>
</html>
[root@centos65 ~]#

こちらの情報が何かのお役に立てましたら幸いです。サイト継続ご協力のほどお願い申し上げます。m(_ _)m

2014年3月16日日曜日

Webサイトリニューアル時によくあるURL変更への対処法

Webサイトリニューアル等でURLが変更になった場合、(DNS切替後も)検索エンジンの結果はしばらくは
旧URLを表示する可能性が高いため、旧URLでアクセスされても新URLへRedirectする設定が必要と
なります。

Apacheのmod_rewrite機能を利用してURLの変更内容に応じてRedirect設定する方法を記載します。
正規表現の利用が可能です。

OS: RedHat EL 6.4(64-bit)
Apache: 2.2.15


1) ディレクトリ変更

旧URL → 新URL
/products → /services
    RewriteRule ^/products/(.*)\.html$ /services/$1.html [R=301,L]
(.*)は0文字以上の文字列にマッチする正規表現。$1に代入される。
例)
http://redirect-test.com/products/aaa/index.html → http://redirect-test.com/services/aaa/index.html
http://redirect-test.com/products/bbb/index.html → http://redirect-test.com/services/bbb/index.html


2) 階層変更(深くなる場合)

/info → /about/info
    RewriteRule ^/info/(.*)\.html$ /about/info/$1.html [R=301,L]
例)
http://redirect-test.com/info/index.html → http://redirect-test.com/about/info/index.html
http://redirect-test.com/info/guide.html → http://redirect-test.com/about/info/guide.html


3) ファイルパス変更(正規表現使用せず)

/info/map.html → /main/map/index.html
/info/img/map.gif → /main/map/img/map.gif
    RewriteRule ^/info/map.html$ /main/map/index.html [R=301,L]
例)
http://redirect-test.com/info/map.html → http://redirect-test.com/main/map/index.html
※RewriteRule設定は上の行から評価されるので2)の設定より先に記載する必要がある。
※画像(http://redirect-test.com/info/img/map.gif)は直接リンクされることは少ないので一般的にはリダイレクト不要。


4) 階層変更(浅くなる場合)

/main/csr → /csr
    RewriteRule ^/main/csr/(.*)$ /csr/$1 [R=301,L]
例)
http://redirect-test.com/main/csr/index.html → http://redirect-test.com/csr/index.html


5) ディレクトリ統合

/download/doc → /about/library
/download/pdf → /about/library
    RewriteRule ^/download/(doc|pdf)/(.*)$ /about/library/$2 [R=301,L]
(doc|pdf)⇒$1、(.*)⇒$2に代入される。$1を使用しない記述方法も可能。
例)
http://redirect-test.com/download/doc/catalog.doc → http://redirect-test.com/about/library/catalog.doc
http://redirect-test.com/download/pdf/catalog.pdf → http://redirect-test.com/about/library/catalog.pdf


6) 中間ディレクトリ追加

/news/201*****.html → /news/201*/201*****.html
    RewriteRule ^/news/2011([0-9][0-9][0-9][0-9])\.html$ /news/2011/2011$1.html [R=301,L]
    RewriteRule ^/news/2012([0-9]{4})\.html$ /news/2012/2012$1.html [R=301,L]
    RewriteRule ^/news/2013(\d{4})\.html$ /news/2013/2013$1.html [R=301,L]
([0-9][0-9][0-9][0-9])と([0-9]{4})と(\d{4})は同じ処理内容となる。
例)
http://redirect-test.com/news/20110912.html → http://redirect-test.com/news/2011/20110912.html
http://redirect-test.com/news/20120307.html → http://redirect-test.com/news/2012/20120307.html
http://redirect-test.com/news/20130423.html → http://redirect-test.com/news/2013/20130423.html
※年別にディレクトリでまとめる場合など


リダイレクトループに要注意!!

上記の6)の設定として安易に下記のようにRewriteRuleを設定すると、リダイレクトループが発生してしまいます。
    RewriteRule ^/news/(.*)\.html$ /news/2013/$1.html [R=301,L]

くれぐれも気をつけましょう。

■テスト用Webサイトコンテンツの確認

[root@rhel-web ~]# find /var/www/html/ -type f
/var/www/html/csr/index.html
/var/www/html/about/info/guide.html
/var/www/html/about/info/index.html
/var/www/html/about/library/catalog.doc
/var/www/html/about/library/catalog.pdf
/var/www/html/index.html
/var/www/html/main/map/img/map.gif
/var/www/html/main/map/index.html
/var/www/html/news/2012/20120830.html
/var/www/html/news/2012/20120307.html
/var/www/html/news/2012/20120715.html
/var/www/html/news/2012/20121129.html
/var/www/html/news/2013/20130423.html
/var/www/html/news/2013/20130613.html
/var/www/html/news/2011/20111026.html
/var/www/html/news/2011/20110912.html
/var/www/html/news/2011/20111127.html
/var/www/html/services/bbb/index.html
/var/www/html/services/services.html
/var/www/html/services/aaa/index.html
[root@rhel-web ~]#
※DocumentRootは/var/www/html です。

■mod_rewriteを有効にする

[root@rhel-web ~]# grep -n mod_rewrite /etc/httpd/conf/httpd.conf
190:LoadModule rewrite_module modules/mod_rewrite.so
[root@rhel-web ~]#
httpd.confの190行目あたり。上記行がコメントアウトされていないこと。(環境により行数は異なる)

■redirect.conf

httpd.confに記述してもよいが、リダイレクト設定を別ファイル(redirect.conf)にまとめる。
[root@rhel-web ~]# cat /etc/httpd/conf.d/redirect.conf
    RewriteEngine on
    RewriteRule ^/products/(.*)\.html$ /services/$1.html [R=301,L]
    RewriteRule ^/info/map.html$ /main/map/index.html [R=301,L]
    RewriteRule ^/info/(.*)\.html$ /about/info/$1.html [R=301,L]
    RewriteRule ^/main/csr/(.*)$ /csr/$1 [R=301,L]
    RewriteRule ^/download/(doc|pdf)/(.*)$ /about/library/$2 [R=301,L]
    RewriteRule ^/news/2011([0-9][0-9][0-9][0-9])\.html$ /news/2011/2011$1.html [R=301,L]
    RewriteRule ^/news/2012([0-9]{4})\.html$ /news/2012/2012$1.html [R=301,L]
    RewriteRule ^/news/2013([0-9]{4})\.html$ /news/2013/2013$1.html [R=301,L]
[root@rhel-web ~]#

★(参考)旧URLの表示はそのままでディレクトリ階層だけ変更したい場合

この場合、上述のredirect.confファイルはincludeさせない。
[root@rhel-web ~]# cat /etc/httpd/conf.d/alias.conf
    Alias /products /var/www/html/services
    Alias /info/map.html /var/www/html/main/map/index.html
    Alias /info/img/map.gif /var/www/html/main/map/img/map.gif
    Alias /info /var/www/html/about/info
    Alias /main/csr /var/www/html/csr
    Alias /download/doc /var/www/html/about/library
    Alias /download/pdf /var/www/html/about/library
    AliasMatch ^/news/2011([0-9]{4})\.html$ /var/www/html/news/2011/2011$1.html
    AliasMatch ^/news/2012([0-9]{4})\.html$ /var/www/html/news/2012/2012$1.html
    AliasMatch ^/news/2013([0-9]{4})\.html$ /var/www/html/news/2013/2013$1.html
[root@rhel-web ~]#
※redirect.confとalias.confを両方includeさせた場合は、redirect.confの設定が優先されました。


redirect.confとalias.confは別名でもかまいません。この情報がお役にたてれば幸いです。

2014年3月13日木曜日

Apacheのログ出力先を変更し日次でrotateする設定

Apacheのログはデフォルトでは、/etc/logrotate.conf と /etc/logrotate.d/httpd の
設定により週次でローテートされ4世代のバックアップを保持します。およそ1か月以上前のログは
参照できなくなります。大規模サイト等では長期間のログを保持する必要があるためこの設定は
不都合になることがあります。

一般的にApacheのログ出力先とWebサイトコンテンツは別ボリュームに分けたほうがよいと
考えられます。Apacheのログ出力先を変更(/log/ 以下)して日次で出力する設定をまとめます。

また、ログは削除せず、任意のタイミングでアーカイブするシェルスクリプトも準備します。

OS: RedHat EL 6.4(64-bit)
Apache: 2.2.15
仮ドメイン名: domain1.com、domain2.com


■Apacheのログを日次で出力
httpd.confの下記個所を変更します。
ログファイル名に日付を付与し、1日(=86400秒)ごとに出力します。
VirtualHost別のログ出力先を考慮して /log/httpd/[ドメイン名]/ 以下に変更します。
[root@dcf-web ~]# grep -B 1 rotatelogs /etc/httpd/conf/httpd.conf
#ErrorLog logs/error_log
ErrorLog "| /usr/sbin/rotatelogs -l /log/httpd/domain1.com/error_log-%Y%m%d 86400"
--
#CustomLog logs/access_log combined
CustomLog "| /usr/sbin/rotatelogs -l /log/httpd/domain1.com/access_log-%Y%m%d 86400" combined
[root@dcf-web ~]#
※domain2.comの設定は省略。
※/log/httpd/domain1.com-access_log-%Y%m%d と /log/httpd/domain2.com-access_log-%Y%m%d
 のようにして、ファイル名でドメインを区別する方法もアリです。

⇒ログ出力状況(以下のhttpdlog_archive.shを実行済み)
[root@dcf-web ~]# ll /log/httpd/domain1.com/ | head
合計 1045260
-rw-r--r-- 1 root root    40813  1月  1 23:59 2014 access_log-20140101
-rw-r--r-- 1 root root    40698  1月  2 23:59 2014 access_log-20140102
-rw-r--r-- 1 root root    43786  1月  3 23:59 2014 access_log-20140103
-rw-r--r-- 1 root root    40418  1月  4 23:59 2014 access_log-20140104
-rw-r--r-- 1 root root    52147  1月  5 23:59 2014 access_log-20140105
-rw-r--r-- 1 root root    40623  1月  6 23:59 2014 access_log-20140106
-rw-r--r-- 1 root root    40426  1月  7 23:59 2014 access_log-20140107
-rw-r--r-- 1 root root    42826  1月  8 23:59 2014 access_log-20140108
-rw-r--r-- 1 root root    40254  1月  9 23:59 2014 access_log-20140109
[root@dcf-web ~]#

■3ヵ月前のhttpdログをアーカイブするシェルスクリプト
シェルスクリプトファイル名: httpdlog_archive.sh
#!/bin/sh
#######################################################################
# << 機能概要 >>
# 3ヵ月前のApacheのログファイル1か月分をアーカイブ後、生ログ削除
# ログ出力先: /log/httpd/domain1.com/
#           /log/httpd/domain2.com/
#
# << 変更履歴 >>
# Version  変更日       変更者        変更内容
# --------+------------+-----------+----------------------------------
#     1.0  2014/03/06   tanyao    New
#
#######################################################################

# 対象月を取得(yyyymm)
TARGET_MONTH=`date -d '3 months ago' '+%Y%m'`

# ログ保存先ディレクトリパス
LOG_DIR=/log/httpd

# 対象ディレクトリへ移動
cd ${LOG_DIR}

# 出力対象ファイルが既に存在する場合は終了
if [ -f domain1.com_${TARGET_MONTH}.tar.gz ] || [ -f domain2.com_${TARGET_MONTH}.tar.gz ]; then
    echo "tar file already exit."
    exit 1
fi

# 対象ログファイルアーカイブ
tar -zcf domain1.com_${TARGET_MONTH}.tar.gz domain1.com/*_log-${TARGET_MONTH}*
tar -zcf domain2.com_${TARGET_MONTH}.tar.gz domain2.com/*_log-${TARGET_MONTH}*

# 生ログは削除
rm -rf domain1.com/*_log-${TARGET_MONTH}*
rm -rf domain2.com/*_log-${TARGET_MONTH}*

cd -

exit 0

■crontabに登録
[root@dcf-web ~]# crontab -l | tail -2
# httpd log archive
22 2 2 * * (/opt/private/batch/httpdlog_archive.sh > /dev/null 2>&1)
[root@dcf-web ~]#
⇒ログアーカイブ状況
[root@dcf-web ~]# ll /log/httpd/
合計 272
drwxr-xr-x 2 root root  20480  3月 12 15:01 2014 domain1.com
-rw-r--r-- 1 root root     45  2月  2 22:00 2014 domain1.com_201311.tar.gz
-rw-r--r-- 1 root root 189336  3月  2 22:01 2014 domain1.com_201312.tar.gz
drwxr-xr-x 2 root root  20480  3月 12 14:59 2014 domain2.com
-rw-r--r-- 1 root root   8780  2月  2 22:01 2014 domain2.com_201311.tar.gz
-rw-r--r-- 1 root root  23253  3月  2 22:01 2014 domain2.com_201312.tar.gz
[root@dcf-web ~]#

こちらの情報が何かのお役に立てましたら幸いです。サイト継続のご協力ありがとうございます。m(_ _)m

2014年2月27日木曜日

複数の.htaccessと.htpasswdによるBasic認証

複数の.htaccessと.htpasswdを使用してWebサイトの複数個所にBasic認証を設定する手順です。
どこか1箇所のBasic認証を通過したユーザが他の個所に設定したBasic認証を認証なしで表示でき
ないようにアクセス制御できることを考慮しています。

.htpasswdはWebサイト管理者が管理する想定(CMSでは管理せず、変更は申請制)とし、
.htaccessはWebコンテンツの一部として扱う想定(CMS等で管理可能)とする。

OS: CentOS 6.4(64-bit)
Apache: 2.2.15
hostname: dcf-web
ip: 192.168.3.246


■.htpasswd作成
user10,user11 → ldap1.htpasswdで管理
user20,user21 → ldap2.htpasswdで管理
※ .htpasswdファイルはなるべくDocmentRoot以外のブラウザから直接アクセスできない場所に配置する。
[root@dcf-web ~]# mkdir /etc/httpd/htpasswd/
[root@dcf-web ~]# htpasswd -bc /etc/httpd/htpasswd/ldap1.htpasswd user10 10user
Adding password for user user10
[root@dcf-web ~]# htpasswd -b /etc/httpd/htpasswd/ldap1.htpasswd user11 11user
Adding password for user user11
[root@dcf-web ~]# cat /etc/httpd/htpasswd/ldap1.htpasswd
user10:iYP5xGnK32WPU
user11:lQXWHpaPkcB2c
[root@dcf-web ~]# htpasswd -bc /etc/httpd/htpasswd/ldap2.htpasswd user20 20user
Adding password for user user20
[root@dcf-web ~]# htpasswd -b /etc/httpd/htpasswd/ldap2.htpasswd user21 21user
Adding password for user user21
[root@dcf-web ~]# cat /etc/httpd/htpasswd/ldap2.htpasswd
user20:JQ0GxC.9s6Ips
user21:cwhMtpgo9dJOg
[root@dcf-web ~]#
htpasswd コマンドのオプション
-b: パスワードを直接指定
-c: .htpasswdを新規作成

■httpd.confに.htaccess使用許可設定
最下行に下記のような内容を追記する。
[root@dcf-web ~]# tail -6 /etc/httpd/conf/httpd.conf
<Directory "/var/www/html/ldap1">
    AllowOverride All
</Directory>
<Directory "/var/www/html/ldap2">
    AllowOverride All
</Directory>
[root@dcf-web ~]#
※ 上位階層のディレクティブに対してAllowOverride Allを設定するとWebサーバのパフォーマンスが落ちる可能性があるので注意。

■.htaccess作成
[root@dcf-web ~]# cat /var/www/html/ldap1/.htaccess
AuthType Basic
AuthName "Basic Authentication Area"
AuthUserFile /etc/httpd/htpasswd/ldap1.htpasswd
AuthGroupFile /dev/null
require valid-user
ErrorDocument 401 /401.html
[root@dcf-web ~]# cat /var/www/html/ldap2/.htaccess
AuthType Basic
AuthName "Basic Authentication Area"
AuthUserFile /etc/httpd/htpasswd/ldap2.htpasswd
AuthGroupFile /dev/null
require valid-user
ErrorDocument 401 /401.html
[root@dcf-web ~]#
"401"は認証エラー時のステータスコード。
認証エラーページとして /var/www/html/401.html を準備しておく。

■動作確認
                            user10 user11 user20 user21
http://192.168.3.246/ldap1/    ○      ○      ×      ×
http://192.168.3.246/ldap2/    ×      ×      ○      ○

## access_log
http://192.168.3.246/ldap1/ に user11 でアクセスしたときのログ。
[root@dcf-web ~]# tail -f /var/log/httpd/access_log
192.168.3.13 - - [21/Feb/2014:18:57:15 +0900] "GET /ldap1/ HTTP/1.1" 401 16262 "-" "Mozilla/4.0 (compatible; MSIE 7.0; Windows NT 6.1; WOW64; Trident/5.0; SLCC2; .NET CLR 2.0.50727; .NET CLR 3.5.30729; .NET CLR 3.0.30729; Media Center PC 6.0; .NET4.0C; .NET4.0E; InfoPath.3)"
192.168.3.13 - user11 [21/Feb/2014:18:57:20 +0900] "GET /ldap1/ HTTP/1.1" 200 16109 "-" "Mozilla/4.0 (compatible; MSIE 7.0; Windows NT 6.1; WOW64; Trident/5.0; SLCC2; .NET CLR 2.0.50727; .NET CLR 3.5.30729; .NET CLR 3.0.30729; Media Center PC 6.0; .NET4.0C; .NET4.0E; InfoPath.3)"

こちらの情報が何かのお役に立てましたら幸いです。サイト継続ご協力のほどお願い申し上げます。m(_ _)m

2013年2月9日土曜日

CentOS 6.3 yumでApacheを2.2.15→2.2.23にアップデート

IPAの情報によると
--------------------------------------------------------
Apache 2.2.19 およびそれ以前のすべてのバージョンにおいて、
サービス運用妨害(DoS)の脆弱性(CVE-2011-3192)が存在します。
この脆弱性が悪用されると、運用中のウェブサービスを提供でき
なくなるなどの被害にあう可能性があります。
--------------------------------------------------------
だそうなのでアップデートを試みます。

CentOS 6.3 標準バンドルのApacheのバージョンが未だに2.2.15系
としている理由が気になるところですが…。

OS: CentOS 6.3(64-bit)
Apache: 2.2.15 → 2.2.23


■バージョンアップ前の状況

[root@cent63 ~]# /usr/sbin/httpd -v Server version: Apache/2.2.15 (Unix) Server built: Feb 13 2012 22:31:42 [root@cent63 ~]# [root@cent63 ~]# rpm -qa | grep httpd httpd-2.2.15-15.el6.centos.1.x86_64 httpd-tools-2.2.15-15.el6.centos.1.x86_64 httpd-manual-2.2.15-15.el6.centos.1.noarch [root@cent63 ~]#

■EPELをyumリポジトリに追加

[root@cent63 ~]# wget http://ftp.riken.jp/Linux/fedora/epel/RPM-GPG-KEY-EPEL-6 [root@cent63 ~]# ll RPM-GPG-KEY-EPEL-6 -rw-r--r-- 1 root root 1649 5月 12 10:25 2010 RPM-GPG-KEY-EPEL-6 [root@cent63 ~]# rpm --import RPM-GPG-KEY-EPEL-6 [root@cent63 ~]# vi /etc/yum.repos.d/epel.repo [root@cent63 ~]# cat /etc/yum.repos.d/epel.repo [epel] name=EPEL RPM Repository for Red Hat Enterprise Linux baseurl=http://ftp.riken.jp/Linux/fedora/epel/6/$basearch/ gpgcheck=1 enabled=0 [root@cent63 ~]#
※CentALTリポジトリではEPELリポジトリを利用するようなので事前準備が必要。

■CentALTをyumリポジトリに追加

[root@cent63 ~]# vi /etc/yum.repos.d/centos.alt.ru.repo [root@cent63 ~]# cat /etc/yum.repos.d/centos.alt.ru.repo [CentALT] name=CentALT Packages for Enterprise Linux 6 - $basearch baseurl=http://centos.alt.ru/repository/centos/6/$basearch/ enabled=0 gpgcheck=0 [root@cent63 ~]#

■httpd停止

[root@cent63 ~]# /etc/init.d/httpd stop httpd を停止中: [ OK ] [root@cent63 ~]#

■httpdバージョンアップ

[root@cent63 ~]# yum --enablerepo=CentALT --skip-broken update httpd (中略) Packages skipped because of dependency problems: httpd-manual-2.2.15-26.el6.centos.noarch from base httpd-manual-2.2.23-1.el6.x86_64 from CentALT Dependencies Resolved ============================================================================ Package Arch Version Repository Size ============================================================================ Updating: httpd x86_64 2.2.23-1.el6 CentALT 883 k Updating for dependencies: httpd-manual x86_64 2.2.23-1.el6 CentALT 960 k httpd-tools x86_64 2.2.23-1.el6 CentALT 62 k mod_ssl x86_64 1:2.2.23-1.el6 CentALT 82 k Skipped (dependency problems): httpd-manual noarch 2.2.15-26.el6.centos base 783 k httpd-manual x86_64 2.2.23-1.el6 CentALT 960 k Transaction Summary ============================================================================ Upgrade 4 Package(s) Total download size: 1.9 M Is this ok [y/N]: y Downloading Packages: (1/4): httpd-2.2.23-1.el6.x86_64.rpm | 883 kB 00:03 (2/4): httpd-manual-2.2.23-1.el6.x86_64.rpm | 960 kB 00:03 (3/4): httpd-tools-2.2.23-1.el6.x86_64.rpm | 62 kB 00:00 (4/4): mod_ssl-2.2.23-1.el6.x86_64.rpm | 82 kB 00:00 ---------------------------------------------------------------------------- Total 233 kB/s | 1.9 MB 00:08 Running rpm_check_debug Running Transaction Test Transaction Test Succeeded Running Transaction Updating : httpd-tools-2.2.23-1.el6.x86_64 1/8 Updating : httpd-2.2.23-1.el6.x86_64 2/8 Updating : httpd-manual-2.2.23-1.el6.x86_64 3/8 Updating : 1:mod_ssl-2.2.23-1.el6.x86_64 4/8 Cleanup : httpd-manual-2.2.15-15.el6.centos.1.noarch 5/8 Cleanup : 1:mod_ssl-2.2.15-15.el6.centos.1.x86_64 6/8 Cleanup : httpd-2.2.15-15.el6.centos.1.x86_64 7/8 Cleanup : httpd-tools-2.2.15-15.el6.centos.1.x86_64 8/8 Verifying : httpd-manual-2.2.23-1.el6.x86_64 1/8 Verifying : httpd-tools-2.2.23-1.el6.x86_64 2/8 Verifying : 1:mod_ssl-2.2.23-1.el6.x86_64 3/8 Verifying : httpd-2.2.23-1.el6.x86_64 4/8 Verifying : 1:mod_ssl-2.2.15-15.el6.centos.1.x86_64 5/8 Verifying : httpd-manual-2.2.15-15.el6.centos.1.noarch 6/8 Verifying : httpd-2.2.15-15.el6.centos.1.x86_64 7/8 Verifying : httpd-tools-2.2.15-15.el6.centos.1.x86_64 8/8 Updated: httpd.x86_64 0:2.2.23-1.el6 Dependency Updated: httpd-manual.x86_64 0:2.2.23-1.el6 httpd-tools.x86_64 0:2.2.23-1.el6 mod_ssl.x86_64 1:2.2.23-1.el6 Skipped (dependency problems): httpd-manual.noarch 0:2.2.15-26.el6.centos httpd-manual.x86_64 0:2.2.23-1.el6 Complete! [root@cent63 ~]#

■バージョンアップ後の状況

[root@cent63 ~]# /usr/sbin/httpd -v Server version: Apache/2.2.23 (Unix) Server built: Oct 7 2012 09:11:32 [root@cent63 ~]# rpm -qa | grep httpd httpd-2.2.23-1.el6.x86_64 httpd-tools-2.2.23-1.el6.x86_64 httpd-manual-2.2.23-1.el6.x86_64 [root@cent63 ~]#

■httpd起動

[root@cent63 ~]# /etc/init.d/httpd start httpd を起動中: [ OK ] [root@cent63 ~]#

ブラウザからWebサーバにアクセスしたところアップデート前と同じように
サイトが表示されたので、問題はなさそう…。
以上です。

2013年2月2日土曜日

リポジトリ別にアクセス制御するSubversionの設定方法

プロジェクト別にSVNのリポジトリを分け、LDAPのグループとひも付けることにより、
他のプロジェクトのリポジトリへのアクセスができないように設定します。
※OpenLDAPの設定情報はこちらをご参照ください。


【OpenLDAPサーバ】
OS: CentOS 6.3(64-bit)
openldap-servers: 2.4.23-26.el6_3.2
IP: 192.168.77.146

【Webサーバ】
OS: CentOS 6.3(64-bit)
Apache: 2.2.15
Subversion: 1.6.11
IP: 192.168.77.147


■subversionインストール
[root@web03 ~]# yum -y install subversion (中略) Package subversion-1.6.11-7.el6.x86_64 already installed and latest version Nothing to do [root@web03 ~]#
※すでにインストール済み。

■mod_dav_svnインストール
[root@web03 ~]# yum -y install mod_dav_svn (中略) ====================================================================== Package Arch Version Repository Size ====================================================================== Installing: mod_dav_svn x86_64 1.6.11-7.el6 base 79 k Transaction Summary ====================================================================== Install 1 Package(s) (省略)
※/etc/httpd/conf.d/subversion.conf が自動生成された。

■svnリポジトリ格納ディレクトリ作成
[root@web03 ~]# mkdir /var/www/svn [root@web03 ~]# mkdir /var/www/svn/repos1 [root@web03 ~]# mkdir /var/www/svn/repos2

■svnリポジトリ作成
[root@web03 ~]# svnadmin create /var/www/svn/repos1/project_A [root@web03 ~]# svnadmin create /var/www/svn/repos1/project_B [root@web03 ~]# svnadmin create /var/www/svn/repos2/project_C [root@web03 ~]# svnadmin create /var/www/svn/repos2/project_D

■所有者変更および確認
[root@web03 ~]# chown -R apache: /var/www/svn/ [root@web03 ~]# ll /var/www/svn/repos2/project_D/ 合計 24 -rw-r--r-- 1 apache apache 229 2月 1 23:13 2013 README.txt drwxr-xr-x 2 apache apache 4096 2月 1 23:13 2013 conf drwxr-sr-x 6 apache apache 4096 2月 1 23:13 2013 db -r--r--r-- 1 apache apache 2 2月 1 23:13 2013 format drwxr-xr-x 2 apache apache 4096 2月 1 23:13 2013 hooks drwxr-xr-x 2 apache apache 4096 2月 1 23:13 2013 locks [root@web03 ~]#
※svnadminには削除するサブコマンドが用意されていなため、削除する場合はrmコマンドを利用する。

■subversion.conf設定
[root@web03 ~]# vi /etc/httpd/conf.d/subversion.conf [root@web03 ~]# grep -v "^#\|^$" /etc/httpd/conf.d/subversion.conf LoadModule dav_svn_module modules/mod_dav_svn.so LoadModule authz_svn_module modules/mod_authz_svn.so <Location /repos1> DAV svn SVNListParentPath on SVNParentPath /var/www/svn/repos1 AuthType Basic AuthName "subversion authentication" AuthBasicProvider ldap AuthzLDAPAuthoritative off AuthLDAPURL ldap://192.168.77.146:389/ou=unit01,dc=open_ldap,dc=com?cn?sub?(objectClass=person) Require valid-user </Location> <Location /repos2> DAV svn SVNListParentPath on SVNParentPath /var/www/svn/repos2 AuthType Basic AuthName "subversion authentication" AuthBasicProvider ldap AuthzLDAPAuthoritative off AuthLDAPURL ldap://192.168.77.146:389/ou=unit02,dc=open_ldap,dc=com?cn?sub?(objectClass=person) Require valid-user </Location> [root@web03 ~]# /etc/init.d/httpd restart
※表示の都合上タグを"<"と">"で記載。
※「SVNListParentPath on」とするとリポジトリ一覧を表示可能。


■ブラウザからアクセス
https://192.168.77.147/repos1/
Basic認証の画面が表示され、OpenLDAPに登録したユーザでアクセスできるはず。


その後、
https://192.168.77.147/repos2/
にアクセスすると再びBasic認証画面が表示される。


■TortoiseSVNおよび日本語パックをダウンロード
※以下の情報はググればいくらでも出てくるので説明を簡略化します。
http://sourceforge.jp/projects/tortoisesvn/releases/ からOSに適合するインストーラをダウンロードする。
TortoiseSVNをダウンロードしてインストールする。
日本語パックをダウンロードしてインストールする。

■TortoiseSVN設定
※以下の情報はググればいくらでも出てくるので説明を簡略化します。
⇒日本語化設定
デスクトップ上で右クリック⇒「TortoiseSVN」⇒「Settings」で「Settings」ウィンドウを開き、Language→日本語

⇒リポジトリチェックアウト(ダウンロード)
デスクトップ上で右クリック⇒「SVNチェックアウト」で「チェックアウト」ウィンドウを開き、
リポジトリのURL⇒リポジトリのURL(例→ https://192.168.77.147/repos1/project_A/)
チェックアウトディレクトリ⇒クライアントマシン上の任意のフォルダ
「OK」ボタン押下して、作成したリポジトリがダウンロードされることを確認

⇒リポジトリコミット(アップロード)
クライアント上のリポジトリ内に適当なフォルダやファイルを作成する
リポジトリ上で右クリック⇒「SVNコミット」で「コミット」ウィンドウを開き、
「全て選択/全て非選択」をチェックして「OK」ボタン押下
※ユーザー名/パスワード入力画面にて、OpenLDAPで登録したユーザー名/パスワードを入力。

いったんクライアント上のリポジトリを削除後再度リポジトリチェックアウトを実施し、
リポジトリコミットした内容が反映されていることを確認

2013年1月29日火曜日

ディレクトリ別Basic認証(OpenLDAP連携)


一度Basic認証が通ると本来アクセスさせたくない他のディレクトリにもアクセスできてしまう場合があります。
ディレクトリ別にアクセス可能なユーザ/グループを定義して、OpenLDAPを利用したBasic認証の設定手順をまとめます。

【OpenLDAPサーバ】
OS: CentOS 6.3(64-bit)
openldap-servers: 2.4.23-26.el6_3.2
hostname: openldap
IP: 192.168.77.146

【Webサーバ】
OS: CentOS 6.3(64-bit)
Apache: 2.2.15
hostname: web03
IP: 192.168.77.147


■アクセス制御
ユーザ:en2011001,en2011002 → unit01ディレクトリにアクセス可能
ユーザ:en2012001,en2012002 → unit02ディレクトリにアクセス可能

■OpenLDAPユーザ作成
Apache Directory Studio を利用してユーザをOpenLDAPに登録する。


■OpenLDAPサーバで作成状況確認
[root@openldap ~]# ldapsearch -x -h localhost -b "dc=open_ldap,dc=com" # extended LDIF # # LDAPv3 # base with scope subtree # filter: (objectclass=*) # requesting: ALL # # open_ldap.com dn: dc=open_ldap,dc=com dc: open_ldap o: open_ldap objectClass: dcObject objectClass: top objectClass: organization # unit01, open_ldap.com dn: ou=unit01,dc=open_ldap,dc=com ou: unit01 objectClass: organizationalUnit objectClass: top # en2011001, unit01, open_ldap.com dn: cn=en2011001,ou=unit01,dc=open_ldap,dc=com sn:: 56aP5rKi cn: en2011001 objectClass: inetOrgPerson objectClass: organizationalPerson objectClass: person objectClass: top givenName:: 6Kut5ZCJ userPassword:: e1NTSEF9UGN4eHNTakF4U0ltQXB2ZXdaZXNBeUp6cyt4TG5odHNBMXJNaFE9PQ= = mail: yukichi@open_ldap.com # en2011002, unit01, open_ldap.com dn: cn=en2011002,ou=unit01,dc=open_ldap,dc=com sn:: 5aSP55uu cn: en2011002 objectClass: inetOrgPerson objectClass: organizationalPerson objectClass: person objectClass: top userPassword:: e1NTSEF9S0dTTEdrWmt3VnN5SWhlbHRtV2dMb2NEV0JEY2R4clpzdWJiM2c9PQ= = givenName:: 5ryx55+z mail: soseki@open_ldap.com # unit02, open_ldap.com dn: ou=unit02,dc=open_ldap,dc=com ou: unit02 objectClass: organizationalUnit objectClass: top # en2012001, unit02, open_ldap.com dn: cn=en2012001,ou=unit02,dc=open_ldap,dc=com userPassword:: e1NTSEF9UGN4eHNTakF4U0ltQXB2ZXdaZXNBeUp6cyt4TG5odHNBMXJNaFE9PQ= = objectClass: inetOrgPerson objectClass: organizationalPerson objectClass: person objectClass: top cn: en2012001 sn:: 6YeO5Y+j givenName:: 6Iux5LiW mail: hideyo@open_ldap.com # en2012002, unit02, open_ldap.com dn: cn=en2012002,ou=unit02,dc=open_ldap,dc=com userPassword:: e1NTSEF9S0dTTEdrWmt3VnN5SWhlbHRtV2dMb2NEV0JEY2R4clpzdWJiM2c9PQ= = objectClass: inetOrgPerson objectClass: organizationalPerson objectClass: person objectClass: top cn: en2012002 sn:: 5qiL5Y+j givenName:: 5LiA6JGJ mail: ichiyo@open_ldap.com # search result search: 2 result: 0 Success # numResponses: 8 # numEntries: 7 [root@openldap ~]#

■WebサーバBasic認証設定
[root@web03 ~]# vi /etc/httpd/conf/httpd.conf [root@web03 ~]# tail -17 /etc/httpd/conf/httpd.conf <Directory "/var/www/html/unit01/"> AuthName "UserID/Password" AuthType Basic AuthBasicProvider ldap AuthzLDAPAuthoritative off AuthLDAPURL ldap://192.168.77.146:389/ou=unit01,dc=open_ldap,dc=com?cn?sub?(objectClass=person) Require valid-user </Directory> <Directory "/var/www/html/unit02/"> AuthName "UserID/Password" AuthType Basic AuthBasicProvider ldap AuthzLDAPAuthoritative off AuthLDAPURL ldap://192.168.77.146:389/ou=unit02,dc=open_ldap,dc=com?cn?sub?(objectClass=person) Require valid-user </Directory> [root@web03 ~]# /etc/init.d/httpd restart
※表示の都合上タグを"<"と">"で記載。

■ブラウザで確認
en2011002 で http://192.168.77.147/unit01/ にアクセスしてみる。


アクセス可能。

en2011002 で http://192.168.77.147/unit02/ にアクセスしてみる。


アクセス不可能。(ディレクトリ別の制御ができている)

en2012001 で http://192.168.77.147/unit02/ にアクセスしてみる。


アクセス可能。

■その時のWebサーバのログ
[root@web03 ~]# tail -f /var/log/httpd/access_log --- 192.168.77.21 - - [28/Jan/2013:01:32:29 +0900] "GET /unit01/ HTTP/1.1" 401 481 "-" "Mozilla/5.0 (compatible; MSIE 9.0; Windows NT 6.0; Trident/5.0)" 192.168.77.21 - en2011002 [28/Jan/2013:01:33:49 +0900] "GET /unit01/ HTTP/1.1" 200 235 "-" "Mozilla/5.0 (compatible; MSIE 9.0; Windows NT 6.0; Trident/5.0)" 192.168.77.21 - - [28/Jan/2013:01:33:49 +0900] "GET /favicon.ico HTTP/1.1" 404 289 "-" "Mozilla/5.0 (compatible; MSIE 9.0; Windows NT 6.0; Trident/5.0)" 192.168.77.21 - - [28/Jan/2013:01:42:25 +0900] "GET /unit02/ HTTP/1.1" 401 481 "http://192.168.77.147/unit01/" "Mozilla/5.0 (compatible; MSIE 9.0; Windows NT 6.0; Trident/5.0)" 192.168.77.21 - en2011002 [28/Jan/2013:01:42:25 +0900] "GET /unit02/ HTTP/1.1" 401 481 "http://192.168.77.147/unit01/" "Mozilla/5.0 (compatible; MSIE 9.0; Windows NT 6.0; Trident/5.0)" 192.168.77.21 - en2011002 [28/Jan/2013:01:42:31 +0900] "GET /unit02/ HTTP/1.1" 401 481 "http://192.168.77.147/unit01/" "Mozilla/5.0 (compatible; MSIE 9.0; Windows NT 6.0; Trident/5.0)" 192.168.77.21 - en2011002 [28/Jan/2013:01:42:34 +0900] "GET /unit02/ HTTP/1.1" 401 481 "http://192.168.77.147/unit01/" "Mozilla/5.0 (compatible; MSIE 9.0; Windows NT 6.0; Trident/5.0)" 192.168.77.21 - en2011002 [28/Jan/2013:01:42:37 +0900] "GET /unit02/ HTTP/1.1" 401 481 "http://192.168.77.147/unit01/" "Mozilla/5.0 (compatible; MSIE 9.0; Windows NT 6.0; Trident/5.0)" 192.168.77.21 - - [28/Jan/2013:01:43:54 +0900] "GET /unit02/ HTTP/1.1" 401 481 "http://192.168.77.147/unit01/" "Mozilla/5.0 (compatible; MSIE 9.0; Windows NT 6.0; Trident/5.0)" 192.168.77.21 - en2011002 [28/Jan/2013:01:43:54 +0900] "GET /unit02/ HTTP/1.1" 401 481 "http://192.168.77.147/unit01/" "Mozilla/5.0 (compatible; MSIE 9.0; Windows NT 6.0; Trident/5.0)" 192.168.77.21 - en2012001 [28/Jan/2013:01:44:51 +0900] "GET /unit02/ HTTP/1.1" 200 235 "http://192.168.77.147/unit01/" "Mozilla/5.0 (compatible; MSIE 9.0; Windows NT 6.0; Trident/5.0)"


2013年1月28日月曜日

mail属性を使用するためにinetOrgPersonでユーザ作成

Apache Directory Studio を利用してOpenLDAPに登録したユーザにmail属性を追加。→失敗。
objectClassに「inetOrgPerson」を指定すればmail属性を追加可能。
ユーザを再作成して、再びBasic認証できるまでの手順をまとめます。

【OpenLDAPサーバ】
OS: CentOS 6.3(64-bit)
openldap-servers: 2.4.23-26.el6_3.2
hostname: openldap
IP: 192.168.77.146

【Webサーバ】
OS: CentOS 6.3(64-bit)
Apache: 2.2.15
hostname: web03
IP: 192.168.77.147


■mail属性追加
Apache Directory Studioで前回作成したユーザにmail属性追加

警告発生!そのまま進めてみるも・・・。

エラー発生!!現在使用しているobjectClass(account、posixAccount)にはmail属性を定義できないようだ。
っということで、このユーザ(en2011001)はいったん削除。

■mail属性を使用するためにobjectClassにinetOrgPersonを指定してユーザ再作成

objectClassにinetOrgPersonを指定するとその他のobjectClassは自動的に追加される。


■OpenLDAPサーバで作成したユーザを確認
[root@openldap ~]# ldapsearch -x -h localhost -b "cn=en2011001,ou=unit01,dc=open_ldap,dc=com" # extended LDIF # # LDAPv3 # base with scope subtree # filter: (objectclass=*) # requesting: ALL # # en2011001, unit01, open_ldap.com dn: cn=en2011001,ou=unit01,dc=open_ldap,dc=com sn:: 56aP5rKi cn: en2011001 objectClass: inetOrgPerson objectClass: organizationalPerson objectClass: person objectClass: top givenName:: 6Kut5ZCJ userPassword:: e1NTSEF9UGN4eHNTakF4U0ltQXB2ZXdaZXNBeUp6cyt4TG5odHNBMXJNaFE9PQ= = mail: yukichi@open_ldap.com # search result search: 2 result: 0 Success # numResponses: 2 # numEntries: 1 [root@openldap ~]#

■WebサーバBasic認証設定変更
使用するobjectClassがaccount→personに変更、ユーザIDがuid→snに変更となるためhttpd.confを修正する。
[root@web03 ~]# vi /etc/httpd/conf/httpd.conf [root@web03 ~]# tail -8 /etc/httpd/conf/httpd.conf <Directory "/var/www/html/unit01/"> AuthName "UserID/Password" AuthType Basic AuthBasicProvider ldap AuthzLDAPAuthoritative off AuthLDAPURL ldap://192.168.77.146:389/ou=unit01,dc=open_ldap,dc=com?cn?sub?(objectClass=person) Require valid-user </Directory> [root@web03 ~]# /etc/init.d/httpd restart
※表示の都合上タグを"<"と">"で記載。

■ブラウザで確認
http://192.168.77.147/unit01/


2013年1月27日日曜日

ApacheのBasic認証にOpenLDAPを利用


Apache Directory Studio を利用してユーザをOpenLDAPに登録します。
OpenLDAPに登録されたユーザでApacheのBasic認証を行えるようにします。
ディレクトリ別の認証とか難しいことはまずは無視します。

【OpenLDAPサーバ】
OS: CentOS 6.3(64-bit)
openldap-servers: 2.4.23-26.el6_3.2
hostname: openldap
IP: 192.168.77.146

【Webサーバ】
OS: CentOS 6.3(64-bit)
Apache: 2.2.15
hostname: web03
IP: 192.168.77.147


■ApacheにLDAPモジュールがインストールされているか確認

[root@web03 ~]# grep ldap /etc/httpd/conf/httpd.conf LoadModule ldap_module modules/mod_ldap.so LoadModule authnz_ldap_module modules/mod_authnz_ldap.so [root@web03 ~]#
※ mod_authnz_ldap:Apache-2.2系でLDAP認証を実現する
※ mod_ldap:LDAPサーバとの接続プールやキャッシュ用に使用される(mod_authnz_ldapから利用される)

■Apache Directory Studio にてエントリー作成

ベースDN: dc=open_ldap,dc=com
Organization Unit(部署): unit01
ユーザID: en2011001
※ユーザIDの文字列はEmployee Numberの略のつもり。2011年度入社001番みたいな。

⇒ベースDN作成
objectClassは「dcObject」と「organization」を設定
※objectClassの「top」は自動的に追加される。


⇒Organization Unit(部署)作成
objectClassは「organizationalUnit」を設定


⇒ユーザ作成
objectClassは「account」と「posixAccount」を設定
※作成手順はobjectClassが異なるだけでouとほぼ同等のため省略


⇒ユーザにパスワードを設定する


■OpenLDAPサーバで作成状況確認

[root@openldap ~]# ldapsearch -x -h localhost -b "dc=open_ldap,dc=com" # extended LDIF # # LDAPv3 # base with scope subtree # filter: (objectclass=*) # requesting: ALL # # open_ldap.com dn: dc=open_ldap,dc=com dc: open_ldap o: open_ldap objectClass: dcObject objectClass: top objectClass: organization # unit01, open_ldap.com dn: ou=unit01,dc=open_ldap,dc=com ou: unit01 objectClass: organizationalUnit objectClass: top # en2011001, unit01, open_ldap.com dn: uid=en2011001,ou=unit01,dc=open_ldap,dc=com uid: en2011001 gidNumber: 1000 cn: en2011001 homeDirectory: /home/en2011001 objectClass: account objectClass: top objectClass: posixAccount uidNumber: 1001 userPassword:: e1NTSEF9RkdNenFHdzJlalExUFlYUHRHUllxQmtFWnJUNjJ5azltR20yRXc9PQ= = # search result search: 2 result: 0 Success # numResponses: 4 # numEntries: 3 [root@openldap ~]#

■Webサーバ確認用ページ準備

[root@web03 ~]# mkdir /var/www/html/unit01 [root@web03 ~]# vi /var/www/html/unit01/index.html [root@web03 ~]# cat /var/www/html/unit01/index.html <html lang="ja"> <head> <meta http-equiv="Content-Type" content="text/html; charset=utf-8"> </head> <body bgcolor="#dddddd"> <h2>unit01へログインしました。</h2> </body> </html> [root@web03 ~]#
※表示の都合上タグを"<"と">"で記載。(以下同様)

■WebサーバBasic認証設定

⇒httpd.confの最下行に下記を追加
[root@web03 ~]# tail -8 /etc/httpd/conf/httpd.conf <Directory "/var/www/html/unit01/"> AuthName "UserID/Password" AuthType Basic AuthBasicProvider ldap AuthzLDAPAuthoritative off AuthLDAPURL ldap://192.168.77.146:389/ou=unit01,dc=open_ldap,dc=com?uid?sub?(objectClass=account) Require valid-user </Directory> [root@web03 ~]#
※「AuthzLDAPAuthoritative off」→LDAP認証で失敗しても他の認証サービスを利用しない。
※ポート番号(389)の指定は省略可能。

⇒apache再起動
[root@web03 ~]# /etc/init.d/httpd restart

■ブラウザで確認

http://192.168.77.147/unit01/


⇒その時のWebサーバのログ
[root@web03 ~]# tail -f /var/log/httpd/access_log --- 192.168.77.21 - - [26/Jan/2013:04:04:21 +0900] "GET /unit01/ HTTP/1.1" 401 481 "-" "Mozilla/5.0 (compatible; MSIE 9.0; Windows NT 6.0; Trident/5.0)" 192.168.77.21 - en2011001 [26/Jan/2013:04:06:00 +0900] "GET /unit01/ HTTP/1.1" 200 187 "-" "Mozilla/5.0 (compatible; MSIE 9.0; Windows NT 6.0; Trident/5.0)" 192.168.77.21 - - [26/Jan/2013:04:06:01 +0900] "GET /favicon.ico HTTP/1.1" 404 289 "-" "Mozilla/5.0 (compatible; MSIE 9.0; Windows NT 6.0; Trident/5.0)"


最後までお読みいただきありがとうございます。この情報が何かのお役にたてれば幸いです。m(_ _)m

2013年1月26日土曜日

Apache Directory Studio インストール手順


AWS上のWindows Server に Apache Directory Studioをインストールして
先日作成したLinux上のOpenLDAPと接続する手順です。
いずれアカウント情報を作成し、Basic認証として利用したいとか考えています。
まぁ、そのうち…。

■構成情報
・OS: Windows_Server-2008-R2_SP1-Japanese-64Bit-Base-2012.12.12
・Apache Directory Studio: win32-x86_64-2.0.0.v20120224


■あらかじめjava(64-bit版)をインストール
http://www.java.com/ja/download/manual.jsp
上記からインストーラをダウンロード。
今回はインストーラ(jre-7u11-windows-x64.exe)を使用した。
※特に迷うところはないので画像は省略。

■インストーラダウンロード
http://directory.apache.org/studio/download/download-windows.html
上記から ApacheDirectoryStudio-win32-x86_64-2.0.0.v20120224.exe (約130MB)をダウンロード

■インストール実行
画面キャプチャを載せてみましたが、ほとんどNextボタンを押すだけです。
※Javaのパスが自動表示されない場合は32bit版のJavaがインストールされている可能性あり。

※Show datailsボタンをクリックすると上記のようにインストール結果が表示される。

これでインストール完了!!

■起動
スタートメニューに Apache Directory Studio が登録されているはず。
メニュー > LDAP > New Connection...

Connection name は適当でかまいません。とりあえずOpenLDAPサーバのホスト名にすれば管理しやすい?

Bind DN or user にはOpenLDApサーバの /etc/openldap/slapd.conf の
rootdn に設定した値を入力。
Bind passward には同じく、rootpw に設定した値を入力。

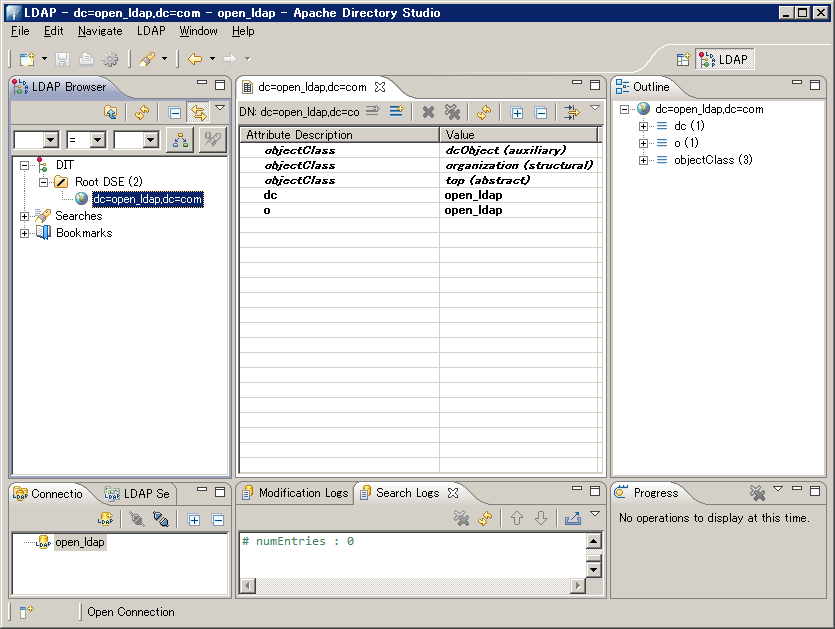
設定に問題がなければ上記のように接続できます。
※AWSの場合はセキュリティーグループの許可設定等忘れずに。