2014年3月31日月曜日

Linux rmコマンドで削除したファイルの復元方法

Linuxのrmコマンドで削除したファイルをextundeleteコマンドで復元(復活/復旧)する方法です。
ext3/ext4はジャーナリングファイルシステムに対応しているため今回の方法で復元できる可能性が
高いです。が、LVMを使用している場合など、完全に復元できない場合があることも念頭に置いて緊急
対応手段として活用ください。

OS: CentOS 6.5 (64-bit)
extundelete: 0.2.4


■extundelete インストーラをダウンロード
[root@centos65 ~]# wget -P /usr/local/src/ http://sourceforge.net/projects/extundelete/files/extundelete/0.2.4/extundelete-0.2.4.tar.bz2/download
(中略)
100%[===============================================================>] 108,472     --.-K/s 時間 0.07s
2014-03-30 19:00:29 (1.45 MB/s) - `/usr/local/src/extundelete-0.2.4.tar.bz2' へ保存完了 [108472/108472]
[root@centos65 ~]#
yum install extundelete したいところですが、CentOS6.5では対応していないようです。

■解凍&インストール
[root@centos65 ~]# tar -jxf /usr/local/src/extundelete-0.2.4.tar.bz2 -C /usr/local/src/
[root@centos65 ~]# cd /usr/local/src/extundelete-0.2.4
[root@centos65 extundelete-0.2.4]# ./configure --prefix=/usr/local/
Configuring extundelete 0.2.4
configure: error: Can't find ext2fs library
[root@centos65 extundelete-0.2.4]#
ext2fs library がないためconfigureに失敗。

■ext2fs library をインストール
[root@centos65 extundelete-0.2.4]# yum -y install e2fsprogs-devel
(中略)
=========================================================================
 Package                 Arch       Version           Repository    Size
=========================================================================
Installing:
 e2fsprogs-devel         x86_64     1.41.12-18.el6    base         160 k

Transaction Summary
=========================================================================
Install       1 Package(s)
(以下略)

■再びインストール
[root@centos65 extundelete-0.2.4]# ./configure --prefix=/usr/local/
Configuring extundelete 0.2.4
Writing generated files to disk
[root@centos65 extundelete-0.2.4]# make
make -s all-recursive
Making all in src
extundelete.cc:571: 警告: unused parameter 'flags'
[root@centos65 extundelete-0.2.4]# make install
Making install in src
  /usr/bin/install -c extundelete '/usr/local/bin'
[root@centos65 extundelete-0.2.4]#
## バージョン確認
[root@centos65 ~]# extundelete --version
extundelete version 0.2.4
libext2fs version 1.41.12
Processor is little endian.
[root@centos65 ~]#

■helpの確認
[root@centos65 ~]# extundelete --help
Usage: extundelete [options] [--] device-file
Options:
  --version, -[vV]       Print version and exit successfully.
  --help,                Print this help and exit successfully.
  --superblock           Print contents of superblock in addition to the rest.
                         If no action is specified then this option is implied.
  --journal              Show content of journal.
  --after dtime          Only process entries deleted on or after 'dtime'.
  --before dtime         Only process entries deleted before 'dtime'.
Actions:
  --inode ino            Show info on inode 'ino'.
  --block blk            Show info on block 'blk'.
  --restore-inode ino[,ino,...]
                         Restore the file(s) with known inode number 'ino'.
                         The restored files are created in ./RECOVERED_FILES
                         with their inode number as extension (ie, file.12345).
  --restore-file 'path'  Will restore file 'path'. 'path' is relative to root
                         of the partition and does not start with a '/'
                         The restored file is created in the current
                         directory as 'RECOVERED_FILES/path'.
  --restore-files 'path' Will restore files which are listed in the file 'path'.
                         Each filename should be in the same format as an option
                         to --restore-file, and there should be one per line.
  --restore-directory 'path'
                         Will restore directory 'path'. 'path' is relative to the
                         root directory of the file system.  The restored
                         directory is created in the output directory as 'path'.
  --restore-all          Attempts to restore everything.
  -j journal             Reads an external journal from the named file.
  -b blocknumber         Uses the backup superblock at blocknumber when opening
                         the file system.
  -B blocksize           Uses blocksize as the block size when opening the file
                         system.  The number should be the number of bytes.
  --log 0                Make the program silent.
  --log filename         Logs all messages to filename.
--log D1=0,D2=filename   Custom control of log messages with comma-separated
   Examples below:       list of options.  Dn must be one of info, warn, or
   --log info,error      error.  Omission of the '=name' results in messages
   --log warn=0          with the specified level to be logged to the console.
   --log error=filename  If the parameter is '=0', logging for the specified
                         level will be turned off.  If the parameter is
                         '=filename', messages with that level will be written
                         to filename.
   -o directory          Save the recovered files to the named directory.
                         The restored files are created in a directory
                         named 'RECOVERED_FILES/' by default.
[root@centos65 ~]# 

■extundelete コマンドで復元
今回は /etc のすべてのファイルを /data/ 以下にコピーして /data/etc/yum.repos.d/ を削除してから extundelete コマンドで復元してみます。 復元する条件は1日以内に削除されたファイルとしてみます。

## /etc のすべてのファイルを /data/ 以下にコピー
[root@centos65 ~]# cp -pr /etc /data/
[root@centos65 ~]# ll /data/
合計 28
drwxr-xr-x 122 root root 12288  3月 30 20:08 2014 etc
drwx------   2 root root 16384  3月 30 02:23 2014 lost+found
[root@centos65 ~]#

## /data/etc/yum.repos.d/ を削除
[root@centos65 ~]# ll /data/etc/yum.repos.d/
合計 16
-rw-r--r-- 1 root root 1926  3月 30 20:20 2014 CentOS-Base.repo
-rw-r--r-- 1 root root  638  3月 30 20:20 2014 CentOS-Debuginfo.repo
-rw-r--r-- 1 root root  630  3月 30 20:20 2014 CentOS-Media.repo
-rw-r--r-- 1 root root 3664  3月 30 20:20 2014 CentOS-Vault.repo
[root@centos65 ~]# rm -rf /data/etc/yum.repos.d
[root@centos65 ~]# ll /data/etc/yum.repos.d/
ls: cannot access /data/etc/yum.repos.d/: そのようなファイルやディレクトリはありません
[root@centos65 ~]#

## 復元対象ボリュームのデバイスファイル名を確認
[root@centos65 ~]# df -hT
Filesystem                      Type   Size  Used Avail Use% Mounted on
/dev/mapper/vg_centos65-lv_root ext4    27G  4.5G   21G  19% /
tmpfs                           tmpfs  940M   72K  940M   1% /dev/shm
/dev/sda1                       ext4   485M   39M  421M   9% /boot
/dev/sdb1                       ext4    16G  211M   15G   2% /data
[root@centos65 ~]#
/data のデバイスファイル名は /dev/sdb1 を確認。

## extundelete コマンドで1日以内に削除されたファイルを復元
[root@centos65 ~]# extundelete --restore-all --after $(date +%s -d '1 days ago') /dev/sdb1
Only show and process deleted entries if they are deleted on or after 1396092940 and before 9223372036854775807.
NOTICE: Extended attributes are not restored.
WARNING: EXT3_FEATURE_INCOMPAT_RECOVER is set.
The partition should be unmounted to undelete any files without further data loss.
If the partition is not currently mounted, this message indicates
it was improperly unmounted, and you should run fsck before continuing.
If you decide to continue, extundelete may overwrite some of the deleted
files and make recovering those files impossible.  You should unmount the
file system and check it with fsck before using extundelete.
Would you like to continue? (y/n)
y
Loading filesystem metadata ... 128 groups loaded.
Loading journal descriptors ... 310 descriptors loaded.
Searching for recoverable inodes in directory / ...
5 recoverable inodes found.
Looking through the directory structure for deleted files ...
0 recoverable inodes still lost.
[root@centos65 ~]#
※あらかじめ対象デバイスをマウント解除しておけば、前半の確認は聞かれない。

## 復元確認
RECOVERED_FILES ディレクトリが自動作成され、その配下に復元される。
[root@centos65 ~]# ll RECOVERED_FILES/etc/yum.repos.d/
合計 16
-rw-r--r-- 1 root root 1926  3月 30 20:35 2014 CentOS-Base.repo
-rw-r--r-- 1 root root  638  3月 30 20:35 2014 CentOS-Debuginfo.repo
-rw-r--r-- 1 root root  630  3月 30 20:35 2014 CentOS-Media.repo
-rw-r--r-- 1 root root 3664  3月 30 20:35 2014 CentOS-Vault.repo
[root@centos65 ~]#

■復元対象ディレクトリを指定して復元するパターン
## /data/etc/httpd/ を削除
[root@centos65 ~]# ll /data/etc/httpd/
合計 12
drwxr-xr-x 2 root root 4096  3月 21 15:18 2014 alias
drwxr-xr-x 2 root root 4096  3月 21 15:17 2014 conf
drwxr-xr-x 2 root root 4096  3月 21 15:28 2014 conf.d
lrwxrwxrwx 1 root root   19  3月 21 15:17 2014 logs -> ../../var/log/httpd
lrwxrwxrwx 1 root root   29  3月 21 15:17 2014 modules -> ../../usr/lib64/httpd/modules
lrwxrwxrwx 1 root root   19  3月 21 15:17 2014 run -> ../../var/run/httpd
[root@centos65 ~]# rm -rf /data/etc/httpd/
[root@centos65 ~]# ll /data/etc/httpd/
ls: cannot access /data/etc/httpd/: そのようなファイルやディレクトリはありません
[root@centos65 ~]#

## 今回は対象ボリュームをマウント解除してから実施
[root@centos65 ~]# umount /data

## extundelete コマンドで復元対象(マウントポイントからの相対パス)を指定
[root@centos65 ~]# extundelete --restore-directory etc/httpd/ /dev/sdb1
NOTICE: Extended attributes are not restored.
Loading filesystem metadata ... 128 groups loaded.
Loading journal descriptors ... 490 descriptors loaded.
Searching for recoverable inodes in directory etc/httpd/ ...
22 recoverable inodes found.
Looking through the directory structure for deleted files ...
1 recoverable inodes still lost.
[root@centos65 ~]# ll RECOVERED_FILES/etc/httpd/
合計 12
drwxr-xr-x 2 root root 4096  3月 30 22:56 2014 alias
drwxr-xr-x 2 root root 4096  3月 30 22:56 2014 conf
drwxr-xr-x 2 root root 4096  3月 30 22:56 2014 conf.d
[root@centos65 ~]#
シンボリックリンク、タイムスタンプまでは復元できない模様。

こちらの情報が何かのお役に立てましたら幸いです。サイト継続ご協力のほどお願い致します。m(_ _)m

2014年3月30日日曜日

ESXi 仮想ディスクをext4でフォーマット

VMware ESXi で仮想ディスクを作成し、LinuxOS上でext4でフォーマットして利用する手順です。
1) VIClientにて仮想ディスク追加
2) fdisk実行
3) ext4でフォーマット
4) ファイルシステムチェック
5) マウント

ESXi: 5.0.0
OS: CentOS 6.5 (64-bit)


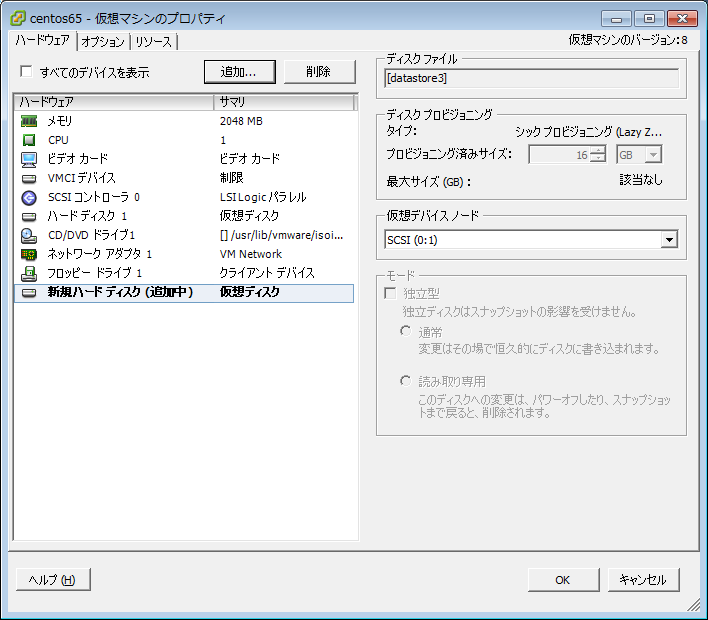
■仮想ディスク追加
追加ボタンをクリック。
参照ボタンからデータストアを指定。

## Linux上で確認
OS起動中にVIClienにて仮想ディスクを追加することは可能ですが、再起動するまでは認識されません。
[root@centos65 ~]# df -hT
Filesystem                      Type   Size  Used Avail Use% Mounted on
/dev/mapper/vg_centos65-lv_root ext4    27G  4.4G   21G  18% /
tmpfs                           tmpfs  940M   80K  940M   1% /dev/shm
/dev/sda1                       ext4   485M   39M  421M   9% /boot
[root@centos65 ~]# ll /dev/sd*
brw-rw----. 1 root disk 8, 0  3月 30 08:15 2014 /dev/sda
brw-rw----. 1 root disk 8, 1  3月 29 23:15 2014 /dev/sda1
brw-rw----. 1 root disk 8, 2  3月 30 08:15 2014 /dev/sda2
[root@centos65 ~]#
[root@centos65 ~]# reboot
※再起動すると追加した仮想ディスクのデバイスファイルが作成される。
[root@centos65 ~]# ll /dev/sd*
brw-rw---- 1 root disk 8,  0  3月 30 11:12 2014 /dev/sda
brw-rw---- 1 root disk 8,  1  3月 30 02:12 2014 /dev/sda1
brw-rw---- 1 root disk 8,  2  3月 30 11:12 2014 /dev/sda2
brw-rw---- 1 root disk 8, 16  3月 30 11:12 2014 /dev/sdb ←ココ
[root@centos65 ~]#

■fdisk実行
ヘルプを表示したり領域を確認したりしていますが、実際に行うことは、
   n   新たに領域を作成する
   p   基本パーティション (1-4) ←設定はデフォルト選択
   w   テーブルをディスクに書き込み、終了する
上記だけです。
[root@centos65 ~]# fdisk /dev/sdb
デバイスは正常な DOS 領域テーブルも、Sun, SGI や OSF ディスクラベルも
含んでいません
新たに DOS ディスクラベルをディスク識別子 0xb5139ff6 で作成します。
あなたが書き込みを決定するまで、変更はメモリ内だけに残します。
その後はもちろん以前の内容は修復不可能になります。
警告: 領域テーブル 4 の不正なフラグ 0x0000 は w(書き込み)によって
正常になります

警告: DOS互換モードは廃止予定です。このモード (コマンド 'c') を止めることを
      強く推奨します。 and change display units to
         sectors (command 'u').

コマンド (m でヘルプ): m
コマンドの動作
   a   ブート可能フラグをつける
   b   bsd ディスクラベルを編集する
   c   dos 互換フラグをつける
   d   領域を削除する
   l   既知の領域タイプをリスト表示する
   m   このメニューを表示する
   n   新たに領域を作成する
   o   新たに空の DOS 領域テーブルを作成する
   p   領域テーブルを表示する
   q   変更を保存せずに終了する
   s   空の Sun ディスクラベルを作成する
   t   領域のシステム ID を変更する
   u   表示/項目ユニットを変更する
   v   領域テーブルを照合する
   w   テーブルをディスクに書き込み、終了する
   x   特別な機能 (エキスパート専用)

コマンド (m でヘルプ): p

ディスク /dev/sdb: 17.2 GB, 17179869184 バイト
ヘッド 255, セクタ 63, シリンダ 2088
Units = シリンダ数 of 16065 * 512 = 8225280 バイト
セクタサイズ (論理 / 物理): 512 バイト / 512 バイト
I/O size (minimum/optimal): 512 bytes / 512 bytes
ディスク識別子: 0xb5139ff6

デバイス ブート      始点        終点     ブロック   Id  システム

コマンド (m でヘルプ): n
コマンドアクション
   e   拡張
   p   基本パーティション (1-4)
p
パーティション番号 (1-4): 1
最初 シリンダ (1-2088, 初期値 1):
初期値 1 を使います
Last シリンダ, +シリンダ数 or +size{K,M,G} (1-2088, 初期値 2088):
初期値 2088 を使います

コマンド (m でヘルプ): w
パーティションテーブルは変更されました!

ioctl() を呼び出してパーティションテーブルを再読込みします。
ディスクを同期しています。
[root@centos65 ~]#

■ext4でフォーマット
ext4の特徴は、
 ・最大1EBまでのボリュームサイズと、最大16TBまでのファイルサイズをサポート。
 ・日付範囲はext3より拡張され、1901年12月14日から2514年4月25日となった。
 ・タイムスタンプがナノ秒をサポート。
[root@centos65 ~]# mkfs -t ext4 /dev/sdb1
mke2fs 1.41.12 (17-May-2010)
Filesystem label=
OS type: Linux
Block size=4096 (log=2)
Fragment size=4096 (log=2)
Stride=0 blocks, Stripe width=0 blocks
1048576 inodes, 4192957 blocks
209647 blocks (5.00%) reserved for the super user
First data block=0
Maximum filesystem blocks=4294967296
128 block groups
32768 blocks per group, 32768 fragments per group
8192 inodes per group
Superblock backups stored on blocks:
        32768, 98304, 163840, 229376, 294912, 819200, 884736, 1605632, 2654208,
        4096000

Writing inode tables: done
Creating journal (32768 blocks): done
Writing superblocks and filesystem accounting information: done

This filesystem will be automatically checked every 24 mounts or
180 days, whichever comes first.  Use tune2fs -c or -i to override.
[root@centos65 ~]#

■ファイルシステムチェック
[root@centos65 ~]# fsck /dev/sdb1
fsck from util-linux-ng 2.17.2
e2fsck 1.41.12 (17-May-2010)
/dev/sdb1: clean, 11/1048576 files, 109841/4192957 blocks
[root@centos65 ~]#

■マウント
[root@centos65 ~]# mkdir /data
[root@centos65 ~]# mount /dev/sdb1 /data
[root@centos65 ~]# ll /data
合計 16
drwx------ 2 root root 16384  3月 30 02:23 2014 lost+found
[root@centos65 ~]# df -hT
Filesystem                      Type   Size  Used Avail Use% Mounted on
/dev/mapper/vg_centos65-lv_root ext4    27G  4.4G   21G  18% /
tmpfs                           tmpfs  940M   72K  940M   1% /dev/shm
/dev/sda1                       ext4   485M   39M  421M   9% /boot
/dev/sdb1                       ext4    16G  172M   15G   2% /data
[root@centos65 ~]#
※/etc/fstabに記載していないので再起動するとマウントは解除されます。
仮想ディスクをext4で追加することができました。お疲れ様でした。

■マウント解除
[root@centos65 ~]# umount /data
[root@centos65 ~]# df -hT
Filesystem                      Type   Size  Used Avail Use% Mounted on
/dev/mapper/vg_centos65-lv_root ext4    27G  4.4G   21G  18% /
tmpfs                           tmpfs  940M   72K  940M   1% /dev/shm
/dev/sda1                       ext4   485M   39M  421M   9% /boot
[root@centos65 ~]#


こちらの情報が何かのお役に立てましたら幸いです。サイト継続ご協力のほどお願いいたします。m(_ _)m

2014年3月29日土曜日

SSH over HTTPを利用してproxy経由でAmazon Linuxに接続


社内proxyサーバ経由でインターネットへ接続する場合、port制限されている場合が多々あります。
port80(http)とport443(https)が認証付で許可されている場合、SSH over HTTP(HTTPS)を利用して
インターネット上のサーバ(今回はAmazon Linux)に接続する回避策が考えられます。その手順をまとめます。
※実際に接続するかどうかは各社のセキュリティーポリシーを遵守してご検討ください。

Amazon Linux AMI release 2014.03
putty 0.63


■sshのportに443を指定

この作業に限ってはデフォルトのSSHのport(22番)で接続してください。
[root@neko-lnx-gw ~]# cp -p /etc/ssh/sshd_config /etc/ssh/sshd_config.org
[root@neko-lnx-gw ~]# vi /etc/ssh/sshd_config
[root@neko-lnx-gw ~]# tail -3 /etc/ssh/sshd_config
# add port
Port 22
Port 443
[root@neko-lnx-gw ~]# /etc/init.d/sshd restart
Stopping sshd:                                             [  OK  ]
Starting sshd:                                             [  OK  ]
[root@neko-lnx-gw ~]#
※別プロセス(httpd等というかそれしかないが…)で既にport 443を占有されている場合は競合するのであらかじめ停止しておくこと。

## 確認
[root@neko-lnx-gw ~]# netstat -anp | grep 443
tcp     0    0 0.0.0.0:443       0.0.0.0:*       LISTEN     1892/sshd
tcp     0    0 :::443            :::*            LISTEN     1892/sshd
[root@neko-lnx-gw ~]#
※AWSの場合はセキュリティーグループでport 443接続許可設定が必要。

puttyの設定

## 社内proxyサーバ(認証有り)に対する設定

## Portを22から443に変更

以上でport 443 を利用してSSHの通信が可能となります。


こちらの情報が何かのお役に立てましたら幸いです。サイト継続のご協力お願いいたします。m(_ _)m

2014年3月18日火曜日

LinuxのftpコマンドでディレクトリをFTP転送する方法

LinuxのftpコマンドでディレクトリをFTP転送することはできません。
転送したいファイルをあらかじめzip化したファイルを作成して転送する方法を記載します。

転送元サーバホスト名: dcf-web
転送元サーバOS: RHEL6.4 (64-bit)
転送元ディレクトリ: /tmp/ftp/
転送対象ファイル: fonts.zip sound.zip

転送先サーバホスト名: dcf-bak
転送先サーバIP: 192.168.47.50
転送先サーバOS: RHEL6.4 (64-bit)
転送先ディレクトリ: /backup/ftp/dcf-web/

OS: RedHat EL 6.4(64-bit)
vsFTPd: 2.2.2


■転送先サーバでFTPプロセスが起動していること

[root@dcf-bak ~]# /etc/init.d/vsftpd status
vsftpd (pid 19316) を実行中...
[root@dcf-bak ~]#
※送信元サーバのvsftpdプロセスは停止していてもOK。

■転送元ディレクトリ確認

※転送対象ディレクトリに /etc/fonts/ と /etc/sound/ を選んだ理由は特になし。
[root@dcf-web ~]# ll -d /etc/fonts/ /etc/sound/
drwxr-xr-x. 4 root root 4096  5月 29 06:25 2013 /etc/fonts/
drwxr-xr-x. 3 root root 4096  5月 29 06:27 2013 /etc/sound/
[root@dcf-web ~]#

■FTP転送用データ準備

転送対象ディレクトリをzipコマンドでアーカイブファイルを作成。
[root@dcf-web ~]# mkdir /tmp/ftp
[root@dcf-web ~]# zip -r /tmp/ftp/fonts.zip /etc/fonts/
  adding: etc/fonts/ (stored 0%)
  adding: etc/fonts/fonts.dtd (deflated 70%)
  adding: etc/fonts/conf.avail/ (stored 0%)
  adding: etc/fonts/conf.avail/10-sub-pixel-rgb.conf (deflated 27%)
(省略)
[root@dcf-web ~]# zip -r /tmp/ftp/sound.zip /etc/sound/
  adding: etc/sound/ (stored 0%)
  adding: etc/sound/events/ (stored 0%)
  adding: etc/sound/events/gtk-events-2.soundlist (deflated 60%)
  adding: etc/sound/events/gnome-2.soundlist (deflated 69%)
[root@dcf-web ~]#
[root@dcf-web ~]# ll /tmp/ftp/
合計 76
-rw-r--r-- 1 root root 53699  3月 18 15:49 2014 fonts.zip
-rw-r--r-- 1 root root 16499  3月 18 15:49 2014 sound.zip
[root@dcf-web ~]#

■ftpコマンド(解説付き)

[root@dcf-web ~]# ftp -ivn 192.168.47.50
Connected to 192.168.47.50 (192.168.47.50).
220 (vsFTPd 2.2.2)
オプション
 -i: 複数のファイルの転送中にプロンプトを出さないようにする。
 -v: リモートサーバからの全てのレスポンスを詳細表示する。
 -n: 自動ログインさせない。ログインにアカウントとパスワードを要求する。

ftp> user ftpuser secret
331 Please specify the password.
230 Login successful.
アカウント: ftpuser
パスワード: secret

ftp> lcd /tmp/ftp/
Local directory now /tmp/ftp
転送元サーバのディレクトリを移動。

ftp> cd /backup/ftp/dcf-web/
250 Directory successfully changed.
転送先サーバのディレクトリを移動。

ftp> bin
200 Switching to Binary mode.
バイナリモードに変更。

ftp> mput *.zip
local: fonts.zip remote: fonts.zip
227 Entering Passive Mode (192,168,47,50,28,169).
150 Ok to send data.
226 Transfer complete.
53699 bytes sent in 0.000782 secs (68668.80 Kbytes/sec)
local: sound.zip remote: sound.zip
227 Entering Passive Mode (192,168,47,50,254,125).
150 Ok to send data.
226 Transfer complete.
16499 bytes sent in 3.1e-05 secs (532225.82 Kbytes/sec)
zipファイルを転送

ftp> ls
227 Entering Passive Mode (192,168,47,50,104,238).
150 Here comes the directory listing.
-rw-r--r--    1 1120     1100        53699 Mar 18 06:57 fonts.zip
-rw-r--r--    1 1120     1100        16499 Mar 18 06:57 sound.zip
226 Directory send OK.
転送先のファイルリストを表示。

ftp> quit
221 Goodbye.
[root@dcf-web ~]#
FTPモード終了。

■転送先サーバでの確認

[root@dcf-bak ~]# ll /backup/ftp/dcf-web/
合計 76
-rw-r--r-- 1 ftpuser sshgrp 53699  3月 18 15:57 2014 fonts.zip
-rw-r--r-- 1 ftpuser sshgrp 16499  3月 18 15:57 2014 sound.zip
[root@dcf-bak ~]#

■転送先サーバで解凍してみる

解凍先ディレクトリに /root/work/ftp/ を指定。
[root@dcf-bak ~]# unzip /backup/ftp/dcf-web/fonts.zip -d /root/work/ftp/
Archive:  /backup/ftp/dcf-web/fonts.zip
   creating: /root/work/ftp/etc/fonts/
  inflating: /root/work/ftp/etc/fonts/fonts.dtd
   creating: /root/work/ftp/etc/fonts/conf.avail/
  inflating: /root/work/ftp/etc/fonts/conf.avail/10-sub-pixel-rgb.conf
(省略)
[root@dcf-bak ~]# unzip /backup/ftp/dcf-web/sound.zip -d /root/work/ftp/
Archive:  /backup/ftp/dcf-web/sound.zip
   creating: /root/work/ftp/etc/sound/
   creating: /root/work/ftp/etc/sound/events/
  inflating: /root/work/ftp/etc/sound/events/gtk-events-2.soundlist
  inflating: /root/work/ftp/etc/sound/events/gnome-2.soundlist
[root@dcf-bak ~]#
[root@dcf-bak ~]# ll /root/work/ftp/etc/
合計 8
drwxr-xr-x 4 root root 4096  5月 29 06:25 2013 fonts
drwxr-xr-x 3 root root 4096  5月 29 06:27 2013 sound
[root@dcf-bak ~]#
転送元サーバと同じタイムスタンプのディレクトリが作成された。

■FTP転送シェルスクリプト

#!/bin/sh
# 複数ファイルをFTP転送するシェルスクリプト
# 転送対象ファイルはあらかじめzip化し、*.zipとすること
# 転送元: LOCAL
# 転送先: REMOTE

LOCAL_DIR="/tmp/ftp"
REMOTE_HOST="192.168.47.50"
REMOTE_USER="ftpuser"
REMOTE_PASS="secret"
REMOTE_DIR="/backup/ftp/dcf-web"
LOG="ftp.log"

ftp -ivn ${REMOTE_HOST} << END > ${LOG}
user ${REMOTE_USER} ${REMOTE_PASS}
lcd ${LOCAL_DIR}
cd ${REMOTE_DIR}
bin
mput *.zip
quit
END

exit 0

■FTP転送実行とログ確認

[root@dcf-web work]# ./ftp.sh
[root@dcf-web work]# cat ftp.log
Connected to 192.168.47.50 (192.168.47.50).
220 (vsFTPd 2.2.2)
331 Please specify the password.
230 Login successful.
Local directory now /tmp/ftp
250 Directory successfully changed.
200 Switching to Binary mode.
local: fonts.zip remote: fonts.zip
227 Entering Passive Mode (192,168,47,50,175,113).
150 Ok to send data.
226 Transfer complete.
53699 bytes sent in 0.0005 secs (107397.99 Kbytes/sec)
local: sound.zip remote: sound.zip
227 Entering Passive Mode (192,168,47,50,171,39).
150 Ok to send data.
226 Transfer complete.
16499 bytes sent in 3.5e-05 secs (471400.00 Kbytes/sec)
221 Goodbye.
[root@dcf-web work]#
※転送先に同名ファイルが存在すると上書きする。

こちらの情報が何かのお役に立てましたら幸いです。サイト継続のご協力ありがとうございます。m(_ _)m

2014年3月16日日曜日

Webサイトリニューアル時によくあるURL変更への対処法

Webサイトリニューアル等でURLが変更になった場合、(DNS切替後も)検索エンジンの結果はしばらくは
旧URLを表示する可能性が高いため、旧URLでアクセスされても新URLへRedirectする設定が必要と
なります。

Apacheのmod_rewrite機能を利用してURLの変更内容に応じてRedirect設定する方法を記載します。
正規表現の利用が可能です。

OS: RedHat EL 6.4(64-bit)
Apache: 2.2.15


1) ディレクトリ変更

旧URL → 新URL
/products → /services
    RewriteRule ^/products/(.*)\.html$ /services/$1.html [R=301,L]
(.*)は0文字以上の文字列にマッチする正規表現。$1に代入される。
例)
http://redirect-test.com/products/aaa/index.html → http://redirect-test.com/services/aaa/index.html
http://redirect-test.com/products/bbb/index.html → http://redirect-test.com/services/bbb/index.html


2) 階層変更(深くなる場合)

/info → /about/info
    RewriteRule ^/info/(.*)\.html$ /about/info/$1.html [R=301,L]
例)
http://redirect-test.com/info/index.html → http://redirect-test.com/about/info/index.html
http://redirect-test.com/info/guide.html → http://redirect-test.com/about/info/guide.html


3) ファイルパス変更(正規表現使用せず)

/info/map.html → /main/map/index.html
/info/img/map.gif → /main/map/img/map.gif
    RewriteRule ^/info/map.html$ /main/map/index.html [R=301,L]
例)
http://redirect-test.com/info/map.html → http://redirect-test.com/main/map/index.html
※RewriteRule設定は上の行から評価されるので2)の設定より先に記載する必要がある。
※画像(http://redirect-test.com/info/img/map.gif)は直接リンクされることは少ないので一般的にはリダイレクト不要。


4) 階層変更(浅くなる場合)

/main/csr → /csr
    RewriteRule ^/main/csr/(.*)$ /csr/$1 [R=301,L]
例)
http://redirect-test.com/main/csr/index.html → http://redirect-test.com/csr/index.html


5) ディレクトリ統合

/download/doc → /about/library
/download/pdf → /about/library
    RewriteRule ^/download/(doc|pdf)/(.*)$ /about/library/$2 [R=301,L]
(doc|pdf)⇒$1、(.*)⇒$2に代入される。$1を使用しない記述方法も可能。
例)
http://redirect-test.com/download/doc/catalog.doc → http://redirect-test.com/about/library/catalog.doc
http://redirect-test.com/download/pdf/catalog.pdf → http://redirect-test.com/about/library/catalog.pdf


6) 中間ディレクトリ追加

/news/201*****.html → /news/201*/201*****.html
    RewriteRule ^/news/2011([0-9][0-9][0-9][0-9])\.html$ /news/2011/2011$1.html [R=301,L]
    RewriteRule ^/news/2012([0-9]{4})\.html$ /news/2012/2012$1.html [R=301,L]
    RewriteRule ^/news/2013(\d{4})\.html$ /news/2013/2013$1.html [R=301,L]
([0-9][0-9][0-9][0-9])と([0-9]{4})と(\d{4})は同じ処理内容となる。
例)
http://redirect-test.com/news/20110912.html → http://redirect-test.com/news/2011/20110912.html
http://redirect-test.com/news/20120307.html → http://redirect-test.com/news/2012/20120307.html
http://redirect-test.com/news/20130423.html → http://redirect-test.com/news/2013/20130423.html
※年別にディレクトリでまとめる場合など


リダイレクトループに要注意!!

上記の6)の設定として安易に下記のようにRewriteRuleを設定すると、リダイレクトループが発生してしまいます。
    RewriteRule ^/news/(.*)\.html$ /news/2013/$1.html [R=301,L]

くれぐれも気をつけましょう。

■テスト用Webサイトコンテンツの確認

[root@rhel-web ~]# find /var/www/html/ -type f
/var/www/html/csr/index.html
/var/www/html/about/info/guide.html
/var/www/html/about/info/index.html
/var/www/html/about/library/catalog.doc
/var/www/html/about/library/catalog.pdf
/var/www/html/index.html
/var/www/html/main/map/img/map.gif
/var/www/html/main/map/index.html
/var/www/html/news/2012/20120830.html
/var/www/html/news/2012/20120307.html
/var/www/html/news/2012/20120715.html
/var/www/html/news/2012/20121129.html
/var/www/html/news/2013/20130423.html
/var/www/html/news/2013/20130613.html
/var/www/html/news/2011/20111026.html
/var/www/html/news/2011/20110912.html
/var/www/html/news/2011/20111127.html
/var/www/html/services/bbb/index.html
/var/www/html/services/services.html
/var/www/html/services/aaa/index.html
[root@rhel-web ~]#
※DocumentRootは/var/www/html です。

■mod_rewriteを有効にする

[root@rhel-web ~]# grep -n mod_rewrite /etc/httpd/conf/httpd.conf
190:LoadModule rewrite_module modules/mod_rewrite.so
[root@rhel-web ~]#
httpd.confの190行目あたり。上記行がコメントアウトされていないこと。(環境により行数は異なる)

■redirect.conf

httpd.confに記述してもよいが、リダイレクト設定を別ファイル(redirect.conf)にまとめる。
[root@rhel-web ~]# cat /etc/httpd/conf.d/redirect.conf
    RewriteEngine on
    RewriteRule ^/products/(.*)\.html$ /services/$1.html [R=301,L]
    RewriteRule ^/info/map.html$ /main/map/index.html [R=301,L]
    RewriteRule ^/info/(.*)\.html$ /about/info/$1.html [R=301,L]
    RewriteRule ^/main/csr/(.*)$ /csr/$1 [R=301,L]
    RewriteRule ^/download/(doc|pdf)/(.*)$ /about/library/$2 [R=301,L]
    RewriteRule ^/news/2011([0-9][0-9][0-9][0-9])\.html$ /news/2011/2011$1.html [R=301,L]
    RewriteRule ^/news/2012([0-9]{4})\.html$ /news/2012/2012$1.html [R=301,L]
    RewriteRule ^/news/2013([0-9]{4})\.html$ /news/2013/2013$1.html [R=301,L]
[root@rhel-web ~]#

★(参考)旧URLの表示はそのままでディレクトリ階層だけ変更したい場合

この場合、上述のredirect.confファイルはincludeさせない。
[root@rhel-web ~]# cat /etc/httpd/conf.d/alias.conf
    Alias /products /var/www/html/services
    Alias /info/map.html /var/www/html/main/map/index.html
    Alias /info/img/map.gif /var/www/html/main/map/img/map.gif
    Alias /info /var/www/html/about/info
    Alias /main/csr /var/www/html/csr
    Alias /download/doc /var/www/html/about/library
    Alias /download/pdf /var/www/html/about/library
    AliasMatch ^/news/2011([0-9]{4})\.html$ /var/www/html/news/2011/2011$1.html
    AliasMatch ^/news/2012([0-9]{4})\.html$ /var/www/html/news/2012/2012$1.html
    AliasMatch ^/news/2013([0-9]{4})\.html$ /var/www/html/news/2013/2013$1.html
[root@rhel-web ~]#
※redirect.confとalias.confを両方includeさせた場合は、redirect.confの設定が優先されました。


redirect.confとalias.confは別名でもかまいません。この情報がお役にたてれば幸いです。