2012年12月22日土曜日

findとgrepコマンドを組み合わせて全文検索


複数ファイルの中身をまとめて検索するコマンドの組み合わせです。findコマンドの
結果をxargsを利用してgrepコマンドに渡し、キーワードとマッチしたファイルおよび
該当行を出力させることが可能です。

情報が古くなった等でWebページを削除する場合、そのページにリンクしている他の
ページを探し出してリンク切れを防止したい時にも使えそうです。

OS: CentOS 6.3(64-bit)
find: 4.4.2
grep: 2.6.3


■サンプルデータを準備

検索対象のHTMLファイル数を確認
[root@cent63 sample_data]# find . -type f | grep .html$ | wc -l 1127

■適当なキーワードで全文検索

キーワード「charset」にマッチしたしたファイル名と、その行数を出力
grepの「-n」オプションで該当行を出力させることができます。
[root@cent63 sample_data]# find . -type f | grep .html$ | xargs grep -n "charset" ./planning/file07_01_01_00095.html:5:<meta http-equiv="Content-Type" content="text/html; charset=UTF-8"> ./planning/keikan01_001032.html:5:<meta http-equiv="Content-Type" content="text/html; charset=UTF-8"> ./planning/index10_14.html:5:<meta http-equiv="Content-Type" content="text/html; charset=UTF-8"> ./planning/file08_02_00033.html:5:<meta http-equiv="Content-Type" content="text/html; charset=UTF-8"> ./planning/file07_00001.html:5:<meta http-equiv="Content-Type" content="text/html; charset=UTF-8"> ./planning/gikai01_001013.html:5:<meta http-equiv="Content-Type" content="text/html; charset=UTF-8"> (以下省略)

もちろん日本語でも検索可能(対象のcharsetがUTF-8であれば)
[root@cent63 sample_data]# time find . -type f | grep .html$ | xargs grep -n "まちづくり" | wc -l 1810 real 0m0.093s user 0m0.052s sys 0m0.039s [root@cent63 sample_data]#
検索対象が1000ファイルくらいあっても1秒以下で検索可能でした。

■他のファイルからリンクされているかを調査

とりあえず対象ファイル数を調べた後、そのリストを表示させる。
[root@cent63 sample_data]# find . -type f | grep .html$ | xargs grep file08_00023.html | wc -l 6 [root@cent63 sample_data]# find . -type f | grep .html$ | xargs grep -l file08_00023.html ./planning/file08_00023.html ./planning/index08.html ./planning/index.html ./planning/file08_00015.html [root@cent63 sample_data]#

リンク切れ修正対象個所を表示
[root@cent63 sample_data]# find . -type f | grep .html$ | xargs grep -n file08_00023.html ./planning/file08_00023.html:84:<p><a href="/index.html">緑区ホーム</a> > <a href="/planning/index.html">区政情報</a> > <a href="/planning/index08.html">緑区議会</a> > <a href="/planning/file08_00023.html">インターネット中継</a> > 区議会のインターネット中継について</p> ./planning/file08_00023.html:243: <input name="email" type="hidden"> <input name="code" type="hidden" value="110100"> <input name="pgid" type="hidden" value="000005064"> ./planning/index08.html:132:<li class="arrow"><a href="/planning/file08_00023.html">予算特別委員会(7月11日)の録画中継を公開しました</a>[2012年7月19日]</li> ./planning/index08.html:142:<li class="parent"><a href="/planning/file08_05_00016.html">区議会からのお知らせ</a></li><li class="parent"><a href="/planning/index08_07.html">議会日程</a></li><li class="parent"><a href="/planning/file08_00023.html">インターネット中継</a></li><li class="child clearfix"> ./planning/index.html:153:<dl><dt class="dir1"><a href="/planning/file08_00023.html">インターネット中継</a></dt></dl> ./planning/file08_00015.html:134:<li class="arrow"><a href="/planning/file08_00023.html">インターネット中継</a><p>本会議と予算・決算特別委員会は、インターネット中継(生中継・録画中継)をしています。</p></li> [root@cent63 sample_data]#
※表示の都合上タグを"<"と">"で記載。

以上です。何かのお役にたてれば幸いです。

2012年12月4日火曜日

PerlのCGIでよくお目見えするInternal Server Error 解決法


PerlのCGIでフォームからpostでデータ取得するサンプルです。
とりあえずhttpdをインストールするあたりから記載していますが、
必要なところから参考にしていただければ。

Amazon Linux の場合、CGI.pmがないのでインストールする手順も記載していますが、
CentOSならおそらくデフォルトインストールされているのでその手順は不要です。

Internal Server Error を発生させその解決法も併せて記載しています。

■構成情報
・OS: Amazon Linux AMI release 2012.09(64bit)
・Perl: 5.10.1


■httpdインストール
[root@ip-10-77-30-12 ~]# yum -y install httpd
(中略)
===========================================================================
 Package              Arch       Version              Repository      Size
===========================================================================
Installing:
 httpd                x86_64     2.2.23-1.25.amzn1    amzn-updates   1.2 M
Installing for dependencies:
 apr                  x86_64     1.4.6-1.10.amzn1     amzn-main      110 k
 apr-util             x86_64     1.4.1-4.13.amzn1     amzn-main       87 k
 apr-util-ldap        x86_64     1.4.1-4.13.amzn1     amzn-main       17 k
 generic-logos        noarch     16.0.0-1.4.amzn1     amzn-main      588 k
 httpd-tools          x86_64     2.2.23-1.25.amzn1    amzn-updates    75 k

Transaction Summary
===========================================================================
(省略)

■CGI動作設定
[root@ip-10-77-30-12 ~]# cd /etc/httpd/conf/
[root@ip-10-77-30-12 conf]# cp -p httpd.conf httpd.conf.org
[root@ip-10-77-30-12 conf]# vi httpd.conf
[root@ip-10-77-30-12 conf]# diff httpd.conf httpd.conf.org
797c797
< AddHandler cgi-script .cgi
---
> #AddHandler cgi-script .cgi
[root@ip-10-77-30-12 conf]#

■サンプルhtml(radio.html)作成
htmlプログラムは表示上の都合のため画像でご勘弁を。

■サンプルcgi(radio.cgi)プログラム作成
[root@ip-10-77-30-12 ~]# vi /var/www/cgi-bin/radio.cgi
[root@ip-10-77-30-12 ~]# cat /var/www/cgi-bin/radio.cgi
#!/usr/bin/perl

use CGI;
$form_data = new CGI;

$goods = $form_data->param('goods');

print "Content-type: text/html\n\n";
print "\n";
print "$goods が購入されました。\n";
print "\n";
[root@ip-10-77-30-12 ~]#

■cgiプログラムテスト実行
[root@ip-10-77-30-12 ~]# perl /var/www/cgi-bin/radio.cgi
Can't locate CGI.pm in @INC (@INC contains: /usr/local/lib64/perl5 /usr/local/share/perl5 /usr/lib64/perl5/vendor_perl /usr/share/perl5/vendor_perl /usr/lib64/perl5 /usr/share/perl5 .) at /var/www/cgi-bin/radio.cgi line 3.
BEGIN failed--compilation aborted at /var/www/cgi-bin/radio.cgi line 3.
[root@ip-10-77-30-12 ~]#
エラー発生。
perlモジュールとしてCGI.pmがインストールされているか調査
[root@ip-10-77-30-12 ~]# find `perl -e 'print "@INC"'` -name '*.pm' -print | grep CGI
find: `/usr/local/lib64/perl5': No such file or directory
find: `/usr/local/share/perl5': No such file or directory
[root@ip-10-77-30-12 ~]#
ないのね…。

■CGI.pmインストール
[root@ip-10-77-30-12 ~]# yum -y install perl-CGI
(中略)
 Package        Arch         Version               Repository     Size
=======================================================================
Installing:
 perl-CGI       x86_64       3.51-127.15.amzn1     amzn-main     216 k

Transaction Summary
=======================================================================
Install       1 Package(s)

Total download size: 216 k
Installed size: 434 k
Downloading Packages:
perl-CGI-3.51-127.15.amzn1.x86_64.rpm                | 216 kB     00:00
Running rpm_check_debug
Running Transaction Test
Transaction Test Succeeded
Running Transaction
  Installing : perl-CGI-3.51-127.15.amzn1.x86_64                    1/1
  Verifying  : perl-CGI-3.51-127.15.amzn1.x86_64                    1/1

Installed:
  perl-CGI.x86_64 0:3.51-127.15.amzn1

Complete!
[root@ip-10-77-30-12 ~]#

■cgiプログラム再テスト
[root@ip-10-77-30-12 ~]# perl /var/www/cgi-bin/radio.cgi
Content-type: text/html

<body>
 が購入されました。
</body>
[root@ip-10-77-30-12 ~]#
エラーは解消。

■ブラウザで動作確認
CGIを実行させると…、
Internal Server Error キター!(T-T)
Internal Server Error
The server encountered an internal error or misconfiguration and was unable to complete your request.

Please contact the server administrator, root@localhost and inform them of the time the error occurred, and anything you might have done that may have caused the error.

More information about this error may be available in the server error log.

------------------------------------------------------------------------

Apache/2.2.23 (Amazon) Server at 54.xxx.xxx.xxx Port 80
原因はradio.cgiファイルに実行権がないためです。

■実行権追加
[root@ip-10-77-30-12 ~]# chmod 755 /var/www/cgi-bin/radio.cgi
もう一度ブラウザから同じようにCGIを実行させると・・・、
上記のように正しく表示されました。

■ Content-type: text/htmlも大事
下記のように「Content-type: text/html」を出力し忘れたcgiプログラムを作成すると、
[root@ip-10-77-30-12 ~]# vi /var/www/cgi-bin/radio.cgi
[root@ip-10-77-30-12 ~]# cat /var/www/cgi-bin/radio.cgi
#!/usr/bin/perl

use CGI;
$form_data = new CGI;

$goods = $form_data->param('goods');

print "\n";
print "$goods が購入されました。\n";
print "\n";
[root@ip-10-77-30-12 ~]#
期待通り?Internal Server Errorが出現しますのでお忘れなく。

2012年12月2日日曜日

CSVファイルを2次元配列に読み込むperlサンプル


自動販売機の在庫管理を例としてCSVファイルを2次元配列に読み込むperlサンプルです。
まずは行ごとに1次元配列(@csv_array)に読み込み、各行の要素は一度(@line)配列に保持し、
split関数を使用して2次元配列(@line_data)に読み込んでいます。

配列に読み込んだ後の処理は適当です。

配列をCSVファイルに出力する準備として2次元配列(@line_data)をjoin関数を使用して
カンマ区切りの要素とした1次元配列(@line_consolidate)に整形した後に
CSVファイルに出力しています。

■構成情報
・OS: Amazon Linux AMI release 2012.09(64bit)
・Perl: 5.10.1


■読み込むCSVファイル(goods.csv)
商品名,価格,在庫 ファンタ,100,28 キリンレモン,110,24 ポカリスエット,150,31 十六茶,130,18 アクエリアス,140,26 午後の紅茶,160,17 伊右衛門,140,19

■Perlプログラム(inoutcsv.pl)
#!/usr/bin/perl # csvファイルの内容を配列に読み込み、 # 配列の内容をcsvファイルに出力するサンプル ### 読み込みファイル $INPUT = "./goods.csv"; ### 出力ファイル $OUTPUT = "./goods.csv"; ### 配列の中身を初期化 my @csv_array = (); my @line = (); my @line_data = (); my @line_consolidate = (); ### csvファイルの中身を配列に読み込む open (FH, "$INPUT") or die "$!"; @csv_array = ; close (FH); # 要素を各配列に格納 print "要素を配列に格納\n"; print "----------------------\n"; my $i = 0; while ($i <= $#csv_array) { chomp ($csv_array[$i]); @line = split (/,/, $csv_array[$i]); my $j = 0; while ($j <= $#line) { $line_data[$i][$j] = $line[$j]; print "$i行$j番目の要素: $line_data[$i][$j]\n"; $j ++; } $i ++; } print "----------------------\n\n"; ### 商品購入処理 # 何らかの処理がされないと面白くないのでランダムに在庫を減らしています。 # 1行目はヘッダ行なので出力されないように制御。 my $dec = int(rand($#csv_array -1)) + 1; $line_data[$dec][2] = $line_data[$dec][2] -1; print "処理対象行: $dec $line_data[$dec][0]の在庫更新: $line_data[$dec][2]\n\n"; ### csvファイル出力用に配列を整形 print "csvに出力する内容を確認\n"; print "----------------------\n"; $i = 0; while ($i <= $#csv_array) { $line_consolidate[$i] = join(',', @{$line_data[$i]}) . "\n"; print "$line_consolidate[$i]"; $i ++; } print "----------------------\n"; # 配列をファイルへ出力 open (FH, ">$OUTPUT") or die "$!"; print FH @line_consolidate; close (FH); #// 終了 exit(0);

■実行結果確認
$ ./inoutcsv.pl 要素を配列に格納 ---------------------- 0行0番目の要素: 商品名 0行1番目の要素: 価格 0行2番目の要素: 在庫 1行0番目の要素: ファンタ 1行1番目の要素: 100 1行2番目の要素: 28 2行0番目の要素: キリンレモン 2行1番目の要素: 110 2行2番目の要素: 24 3行0番目の要素: ポカリスエット 3行1番目の要素: 150 3行2番目の要素: 31 4行0番目の要素: 十六茶 4行1番目の要素: 130 4行2番目の要素: 18 5行0番目の要素: アクエリアス 5行1番目の要素: 140 5行2番目の要素: 26 6行0番目の要素: 午後の紅茶 6行1番目の要素: 160 6行2番目の要素: 17 7行0番目の要素: 伊右衛門 7行1番目の要素: 140 7行2番目の要素: 19 ---------------------- 処理対象行: 5 アクエリアスの在庫更新: 25 csvに出力する内容を確認 ---------------------- 商品名,価格,在庫 ファンタ,100,28 キリンレモン,110,24 ポカリスエット,150,31 十六茶,130,18 アクエリアス,140,25 午後の紅茶,160,17 伊右衛門,140,19 ----------------------

■出力されたCSVファイル(goods.csv)を確認
$ cat goods.csv 商品名,価格,在庫 ファンタ,100,28 キリンレモン,110,24 ポカリスエット,150,31 十六茶,130,18 アクエリアス,140,25 午後の紅茶,160,17 伊右衛門,140,19
※アクエリアスの在庫が26→25に更新されCSVファイルに出力された。

2012年12月1日土曜日

AWS(EC2) Amazon Linux 初期環境設定


Amazon Linux 構築後にとりあえずやっておいた方がよさそうな初期環境設定です。
もちろんケースバイケースですが、
rootパスワード設定、OSセキュリティ設定解除、TimeZone変更 etc...
今のところ毎回やっているので個人的防備録的にまとめておきます。

■構成情報
・OS: Amazon Linux AMI release 2012.09(64bit)


■SSHログイン(Putty使う場合のおさらい)
EIP割り当て後、Puttyの 接続 > SSH > 認証 > 認証のためのプライベートKeyファイルに xxxxx.ppk を設定後、接続
Using username "ec2-user". Authenticating with public key "imported-openssh-key" __| __|_ ) _| ( / Amazon Linux AMI ___|\___|___| https://aws.amazon.com/amazon-linux-ami/2012.09-release-notes/ [ec2-user@ip-10-77-30-12 ~]$

■rootパスワード設定
[ec2-user@ip-10-77-30-12 ~]$ sudo passwd Changing password for user root. New password: BAD PASSWORD: it is based on a dictionary word Retype new password: passwd: all authentication tokens updated successfully. [ec2-user@ip-10-77-30-12 ~]$ su - Password: [root@ip-10-77-30-12 ~]#

■AMIバージョン確認
[root@ip-10-77-30-12 ~]# cat /etc/system-release Amazon Linux AMI release 2012.09 [root@ip-10-77-30-12 ~]#

■OSセキュリティ設定解除
[root@ip-10-77-30-12 ~]# chkconfig --list iptables iptables 0:off 1:off 2:on 3:on 4:on 5:on 6:off [root@ip-10-77-30-12 ~]# chkconfig --list ip6tables ip6tables 0:off 1:off 2:on 3:on 4:on 5:on 6:off [root@ip-10-77-30-12 ~]# [root@ip-10-77-30-12 ~]# chkconfig iptables off [root@ip-10-77-30-12 ~]# chkconfig ip6tables off [root@ip-10-77-30-12 ~]# [root@ip-10-77-30-12 ~]# chkconfig --list iptables iptables 0:off 1:off 2:off 3:off 4:off 5:off 6:off [root@ip-10-77-30-12 ~]# chkconfig --list ip6tables ip6tables 0:off 1:off 2:off 3:off 4:off 5:off 6:off [root@ip-10-77-30-12 ~]#
※以前は、/etc/sysconfig/selinux の設定をSELINUX=disabledとしていたが、そのファイルが存在しない。

■TimeZone変更
[root@ip-10-77-30-12 ~]# date; cp /usr/share/zoneinfo/Japan /etc/localtime; date Thu Jan 10 15:50:15 UTC 2013 cp: overwrite `/etc/localtime'? y Fri Jan 11 00:50:18 JST 2013 [root@ip-10-77-30-12 ~]#

■root volume増設分を認識させる
EC2作成時、root volumeに20GBを設定したはずだが、デフォルトの8GB分しか認識されていない。下記コマンドで対応する。
[root@ip-10-77-30-12 ~]# df -hT; resize2fs /dev/xvda1; df -hT Filesystem Type Size Used Avail Use% Mounted on /dev/xvda1 ext4 7.9G 836M 7.0G 11% / tmpfs tmpfs 298M 0 298M 0% /dev/shm resize2fs 1.42 (29-Nov-2011) Filesystem at /dev/xvda1 is mounted on /; on-line resizing required old_desc_blocks = 1, new_desc_blocks = 1 Performing an on-line resize of /dev/xvda1 to 4194304 (4k) blocks. The filesystem on /dev/xvda1 is now 4194304 blocks long. Filesystem Type Size Used Avail Use% Mounted on /dev/xvda1 ext4 16G 840M 15G 6% / tmpfs tmpfs 298M 0 298M 0% /dev/shm [root@ip-10-77-30-12 ~]#

■OS再起動
[root@ip-10-77-30-12 ~]# reboot
※VPC上のEC2は再起動してもローカルIPは変わらないし、EIPが外れないので便利。
※このタイミングで一度AMI作成しておくのもありかも。

2012年11月18日日曜日

Excel2007(Excel2010) オブジェクトの選択 矢印はどこ行った?

かなり今さらネタですが、Excel2007(Excel2010)でオブジェクトの選択 矢印が見つけ辛く、
イラッと来た時の対処法を思い出したのでなんとなくメモしておきます。
--------------------------------------------------------
ホームタブ > 編集グループ > 検索と選択▼ > オブジェクトの選択
--------------------------------------------------------
以上!見つけ辛いことこの上なし。


ってせっかくなので画像も張っておきます。そのほうがわかりやすいし…。
それにしても検索メニューグループにこれ含める?
多分すぐ忘れそうなので、クイックアクセスツールバーに追加しておきます。
「オブジェクトの選択」にカーソルを合わせ右クリックするとクイックアクセスツールバーに追加できます。

2012年11月7日水曜日

Linuxのzipコマンドでパスワード付ファイル作成


このご時世、メールに添付するファイルはパスワード付zip化することが必須のようです。
さらに、そのパスワードは別メールで送付する。ってそれにどんな意味があるのか不明ですが…。
それはさておき、サーバから自動送信されるメールの添付ファイルもパスワード付にすることが
できるんじゃないかと調べたところ、やっぱり出来ました。そりゃそうだよね。

■構成情報
・OS:      CentOS6.3(64bit)
・zip:     3.0(OSバンドル)


■パスワード付zipファイル作成

[root@cent63 ~]# zip -P secret -r pass.zip /var/www/html
  adding: var/www/html/ (stored 0%)
  adding: var/www/html/wget/ (stored 0%)
  adding: var/www/html/wget/index.css (deflated 31%)
  adding: var/www/html/wget/zunou.html (deflated 66%)
  adding: var/www/html/wget/link_pass.js (deflated 69%)
(省略)
まさか説明いらんと思いますが、パスワードは「secret」で、圧縮対象は「/var/www/html」です。
ディレクトリごと圧縮するので「-r」オプションを指定しています。

■中身を確認

[root@cent63 ~]# unzip -Z pass.zip
Archive:  pass.zip
Zip file size: 18989 bytes, number of entries: 23
drwxr-xr-x  3.0 unx        0 bx stor 13-Jan-06 22:19 var/www/html/
drwxr-xr-x  3.0 unx        0 bx stor 13-Jan-06 22:19 var/www/html/wget/
-rw-r--r--  3.0 unx      214 TX defN 03-Jan-08 02:17 var/www/html/wget/index.css
-rw-r--r--  3.0 unx     6230 TX defN 13-Jan-06 22:19 var/www/html/wget/zunou.html
-rw-r--r--  3.0 unx     1476 TX defN 08-Mar-23 18:13 var/www/html/wget/link_pass.js
(中略)
-rw-r--r--  3.0 unx     5356 TX defN 13-Jan-06 22:19 var/www/html/wget/index_link.cgi
23 files, 23503 bytes uncompressed, 13967 bytes compressed:  40.6%
[root@cent63 ~]#
⇒下記コマンドでも同等の結果が得られます。
[root@cent63 ~]# zipinfo pass.zip

■パスワード付zipファイル解凍

[root@cent63 ~]# unzip -P secret -d /tmp/ pass.zip
Archive:  pass.zip
   creating: /tmp/var/www/html/
   creating: /tmp/var/www/html/wget/
  inflating: /tmp/var/www/html/wget/index.css
  inflating: /tmp/var/www/html/wget/zunou.html
  inflating: /tmp/var/www/html/wget/link_pass.js
(省略)

■すでに同名ファイルが存在する場合は確認あり

[root@cent63 ~]# unzip -P secret -d / pass.zip
Archive:  pass.zip
replace /var/www/html/wget/index.css? [y]es, [n]o, [A]ll, [N]one, [r]ename:

■解凍パスワードを間違えた場合

[root@cent63 ~]# unzip -P himitsu pass.zip
Archive:  pass.zip
   creating: var/www/html/
   creating: var/www/html/wget/
   skipping: var/www/html/wget/index.css  incorrect password
   skipping: var/www/html/wget/zunou.html  incorrect password
   skipping: var/www/html/wget/link_pass.js  incorrect password
(省略)

ファイルは解凍されないが、ディレクトリが作成されてしまう…。どうなのこの仕様?!

2012年10月14日日曜日

vmstatやtopコマンドに時間を表示する方法


定期的に結果を出力するコマンドに時間を表示させる方法です。
パフォーマンステストの状況確認を行う場合に便利かも。

OS: CentOS 6.3(64-bit)
vmstat: 3.2.8
top: 3.2.8


■vmstatに時間を表示させる
[root@cent63 ~]# vmstat 1 3 | awk '{print strftime("%Y/%m/%d %H:%M:%S"), $0}' 2012/10/14 21:45:58 procs -----------memory---------- ---swap-- -----io---- --system-- -----cpu----- 2012/10/14 21:45:58 r b swpd free buff cache si so bi bo in cs us sy id wa st 2012/10/14 21:45:58 1 0 4832 99536 115484 398552 0 0 0 1 9 3 0 0 100 0 0 2012/10/14 21:45:59 0 0 4832 99520 115484 398552 0 0 0 0 48 85 0 1 99 0 0 2012/10/14 21:46:00 0 0 4832 99520 115484 398552 0 0 0 0 51 82 1 0 99 0 0 [root@cent63 ~]#
perlを使う方法もあります。
[root@cent63 ~]# vmstat 1 3 | perl -MPOSIX -pe 'BEGIN{$|=1} print strftime q{%Y/%m/%d %H:%M:%S }, localtime' 2012/10/14 21:46:08 procs -----------memory---------- ---swap-- -----io---- --system-- -----cpu----- 2012/10/14 21:46:08 r b swpd free buff cache si so bi bo in cs us sy id wa st 2012/10/14 21:46:08 1 0 4832 99536 115484 398552 0 0 0 1 9 3 0 0 100 0 0 2012/10/14 21:46:09 0 0 4832 97412 115496 398980 0 0 440 0 170 175 5 3 72 20 0 2012/10/14 21:46:10 0 0 4832 97412 115496 398980 0 0 0 0 50 85 0 0 100 0 0 [root@cent63 ~]#

■topに時間を表示させる
[root@cent63 ~]# top -n 1 -b | head -5 | awk '{print strftime("%Y/%m/%d %H:%M:%S"), $0}' 2012/10/14 21:48:17 top - 21:48:17 up 43 days, 3 min, 2 users, load average: 0.00, 0.00, 0.00 2012/10/14 21:48:17 Tasks: 160 total, 1 running, 159 sleeping, 0 stopped, 0 zombie 2012/10/14 21:48:17 Cpu(s): 0.1%us, 0.1%sy, 0.0%ni, 99.8%id, 0.0%wa, 0.0%hi, 0.0%si, 0.0%st 2012/10/14 21:48:17 Mem: 1020644k total, 922124k used, 98520k free, 115500k buffers 2012/10/14 21:48:17 Swap: 2064376k total, 4832k used, 2059544k free, 398980k cached [root@cent63 ~]#

いろいろと応用が利くかも…。またしても小ネタですみません。

2012年10月13日土曜日

grepコマンドでコメント行と空白行を非表示にする


grepコマンドを利用してでコメント行と空白行を非表示にする方法です。
httpd.confやsmb.conf等の設定ファイルはやたらとコメント文が多いので
それらを非表示にしてズバリ設定内容だけ確認したい場合に便利です。

OS: CentOS 6.3(64-bit)
grep: 2.6.3


■コメント行と空白行を非表示
[root@cent63 ~]# grep -v "^#\|^$" /etc/httpd/conf/httpd.conf ServerTokens OS ServerRoot "/etc/httpd" PidFile run/httpd.pid Timeout 60 KeepAlive Off MaxKeepAliveRequests 100 KeepAliveTimeout 15 (以下省略)
「#」で始まるコメント行を非表示 → 「^#」
空行を非表示 → 「^$」

■コメント前にタブがあっても非表示にする
[root@cent63 ~]# grep -v "^[^t]*#\|^$" /etc/httpd/conf/httpd.conf ServerTokens OS ServerRoot "/etc/httpd" PidFile run/httpd.pid Timeout 60 KeepAlive Off MaxKeepAliveRequests 100 KeepAliveTimeout 15 (以下省略)
これだと前述となんら変わらないように見えるので、出力行数で確認
[root@cent63 ~]# grep -v "^#\|^$" /etc/httpd/conf/httpd.conf | wc -l 238 [root@cent63 ~]# grep -v "^[^t]*#\|^$" /etc/httpd/conf/httpd.conf | wc -l 225 [root@cent63 ~]#
確かにタブの後に#がある行も非表示となった。

■smb.confの有効行だけ表示するにはもう一工夫が必要
[root@cent63 ~]# grep -v "^[^t]$\|^[^t]*#\|^$\|^#\|^;" /etc/samba/smb.conf [global] workgroup = MYGROUP server string = Samba Server Version %v log file = /var/log/samba/log.%m max log size = 50 security = user passdb backend = tdbsam load printers = yes cups options = raw [homes] comment = Home Directories browseable = no writable = yes [printers] comment = All Printers path = /var/spool/samba browseable = no guest ok = no writable = no printable = yes [root@cent63 ~]#

以上です。小ネタですみません。

2012年9月6日木曜日

CentOS 6.3 wgetでローカルにサイトをコピー

他のサイトを参ローカル環境にコピーするにはwgetという便利なコマンドがあります。
オプションなしで実行するとレイアウト崩れや画像抜けが発生するので適当なオプション
およびその役割をピックアップしてみます。

■構成情報
・OS:      CentOS6.3(64bit)
・wget:    1.12(OSバンドル)


■頭脳指数サイトをのトップページをwget
[root@cent63 ~]# wget -x -p -nH -k -P /var/www/html/wget -a wget.log http://tanyao.dynalias.net
[root@cent63 ~]#
2~3秒もかからないくらいで完了します。

■オプション概要
-x,  --force-directories       ⇒ディレクトリを強制的に作る
-p,  --page-requisites          ⇒HTML を表示するのに必要な全ての画像等も取得する
-nH, --no-host-directories     ⇒ホスト名のディレクトリを作らない
-k,  --convert-links              ⇒HTML や CSS 中のリンクをローカルを指すように変更する
-P,  --directory-prefix=PREFIX  ⇒ファイルを PREFIX/ 以下に保存する
-a,  --append-output=FILE      ⇒メッセージを FILE に追記する

■取得内容確認
[root@cent63 ~]# ll /var/www/html/wget/
合計 32
-rw-r--r-- 1 root root  214  1月  8 02:17 2003 index.css
-rw-r--r-- 1 root root  234  1月  6 22:19 2013 index.html
drwxr-xr-x 2 root root 4096  1月  6 22:19 2013 index_img
-rw-r--r-- 1 root root 5356  1月  6 22:19 2013 index_link.cgi
-rw-r--r-- 1 root root 1476  3月 23 18:13 2008 link_pass.js
-rw-r--r-- 1 root root 6230  1月  6 22:19 2013 zunou.html
[root@cent63 ~]# du -sh /var/www/html/wget/
96K     /var/www/html/wget/
[root@cent63 ~]# find /var/www/html/wget/ | wc -l
22
[root@cent63 ~]#
ブラウザでアクセスすると同一ページが表示されました。
http://192.168.xxx.146/wget/


以下、wgetのオプション説明
◆スタートアップ
  -V,  --version           バージョン情報を表示して終了する
  -h,  --help              このヘルプを表示する
  -b,  --background        スタート後にバックグラウンドに移行する
  -e,  --execute=COMMAND   `.wgetrc'形式のコマンドを実行する

◆ログと入力ファイル
  -o,  --output-file=FILE    ログを FILE に出力する
  -a,  --append-output=FILE  メッセージを FILE に追記する
  -d,  --debug               デバッグ情報を表示する
  -q,  --quiet               何も出力しない
  -v,  --verbose             冗長な出力をする (デフォルト)
  -nv, --no-verbose          冗長ではなくする
  -i,  --input-file=FILE     FILE の中に指定された URL をダウンロードする
  -F,  --force-html          入力ファイルを HTML として扱う
  -B,  --base=URL            HTML で入力されたファイル(-i -F)のリンクを指定した URL の相対 URL として扱う

◆ダウンロード
  -t,  --tries=NUMBER            リトライ回数の上限を指定 (0 は無制限).
       --retry-connrefused       接続を拒否されてもリトライする
  -O,  --output-document=FILE    FILE に文書を書きこむ
  -nc, --no-clobber              存在しているファイルをダウンロードで上書きしない
  -c,  --continue                部分的にダウンロードしたファイルの続きから始める
       --progress=TYPE           進行表示ゲージの種類を TYPE に指定する
  -N,  --timestamping            ローカルにあるファイルよりも新しいファイルだけ取得する
  -S,  --server-response         サーバの応答を表示する
       --spider                  何もダウンロードしない
  -T,  --timeout=SECONDS         全てのタイムアウトを SECONDS 秒に設定する
       --dns-timeout=SECS        DNS 問い合わせのタイムアウトを SECS 秒に設定する
       --connect-timeout=SECS    接続タイムアウトを SECS 秒に設定する
       --read-timeout=SECS       読み込みタイムアウトを SECS 秒に設定する
  -w,  --wait=SECONDS            ダウンロード毎に SECONDS 秒待つ
       --waitretry=SECONDS       リトライ毎に 1 0SECONDS 秒待つ
       --random-wait             ダウンロード毎に 0 02*WAIT 秒待つ
       --no-proxy                プロクシを使わない
  -Q,  --quota=NUMBER            ダウンロードするバイト数の上限を指定する
       --bind-address=ADDRESS    ローカルアドレスとして ADDRESS (ホスト名か IP) を使う
       --limit-rate=RATE         ダウンロード速度を RATE に制限する
       --no-dns-cache            DNS の問い合わせ結果をキャッシュしない
       --restrict-file-names=OS  OS が許しているファイル名に制限する
       --ignore-case             ファイル名/ディレクトリ名の比較で大文字小文字を無視する
  -4,  --inet4-only              IPv4 だけを使う
  -6,  --inet6-only              IPv6 だけを使う
       --prefer-family=FAMILY    指定したファミリ(IPv6, IPv4, none)で最初に接続する
       --user=USER               ftp, http のユーザ名を指定する
       --password=PASS           ftp, http のパスワードを指定する
       --ask-password            パスワードを別途入力する
       --no-iri                  IRI サポートを使わない
       --local-encoding=ENC      指定した ENC を IRI のローカルエンコーディングにする
       --remote-encoding=ENC     指定した ENC をデフォルトのリモートエンコーディングにする

◆ディレクトリ
  -nd, --no-directories           ディレクトリを作らない
  -x,  --force-directories        ディレクトリを強制的に作る
  -nH, --no-host-directories      ホスト名のディレクトリを作らない
       --protocol-directories     プロトコル名のディレクトリを作る
  -P,  --directory-prefix=PREFIX  ファイルを PREFIX/ 以下に保存する
       --cut-dirs=NUMBER          リモートディレクトリ名の NUMBER 階層分を無視する

◆HTTP オプション
       --http-user=USER        http ユーザ名として USER を使う
       --http-password=PASS    http パスワードとして PASS を使う
       --no-cache              サーバがキャッシュしたデータを許可しない
       --default-page=NAME     デフォルトのページ名を NAME に変更します。通常は `index.html' です
  -E,  --adjust-extension        HTML/CSS 文書は適切な拡張子で保存する
       --ignore-length         `Content-Length' ヘッダを無視する
       --header=STRING         送信するヘッダに STRING を追加する
       --max-redirect          ページで許可する最大転送回数
       --proxy-user=USER       プロクシユーザ名として USER を使う
       --proxy-password=PASS   プロクシパスワードとして PASS を使う
       --referer=URL           Referer を URL に設定する
       --save-headers          HTTP のヘッダをファイルに保存する
  -U,  --user-agent=AGENT      User-Agent として Wget/VERSION ではなく AGENT を使う
       --no-http-keep-alive    HTTP の keep-alive (持続的接続) 機能を使わない
       --no-cookies            クッキーを使わない
       --load-cookies=FILE     クッキーを FILE から読みこむ
       --save-cookies=FILE     クッキーを FILE に保存する
       --keep-session-cookies  セッションだけで用いるクッキーを保持する
       --post-data=STRING      POST メソッドを用いて STRING を送信する
       --post-file=FILE        POST メソッドを用いて FILE の中味を送信する
       --content-disposition   Content-Disposition ヘッダがあればローカルのファイル名として用いる (実験的)
       --auth-no-challenge     サーバからのチャレンジを待たずに、Basic認証の情報を送信します。

◆HTTPS (SSL/TLS) オプション
       --secure-protocol=PR     セキュアプロトコルを選択する (auto, SSLv2, SSLv3, TLSv1)
       --no-check-certificate   サーバ証明書を検証しない
       --certificate=FILE       クライアント証明書として FILE を使う
       --certificate-type=TYPE  クライアント証明書の種類を TYPE (PEM, DER) に設定する
       --private-key=FILE       秘密鍵として FILE を使う
       --private-key-type=TYPE  秘密鍵の種類を TYPE (PEM, DER) に設定する
       --ca-certificate=FILE    CA 証明書として FILE を使う
       --ca-directory=DIR       CA のハッシュリストが保持されているディレクトリを指定する
       --random-file=FILE       SSL PRNG の初期化データに使うファイルを指定する
       --egd-file=FILE          EGD ソケットとして FILE を使う

◆FTP オプション
       --ftp-user=USER         ftp ユーザとして USER を使う
       --ftp-password=PASS     ftp パスワードとして PASS を使う
       --no-remove-listing     `.listing' ファイルを削除しない
       --no-glob               FTP ファイル名のグロブを無効にする
       --no-passive-ftp        "passive" 転送モードを使わない
       --retr-symlinks         再帰取得中に、シンボリックリンクでリンクされた先のファイルを取得する

◆再帰ダウンロード
  -r,  --recursive          再帰ダウンロードを行う
  -l,  --level=NUMBER       再帰時の階層の最大の深さを NUMBER に設定する (0 で無制限)
       --delete-after       ダウンロード終了後、ダウンロードしたファイルを削除する
  -k,  --convert-links      HTML や CSS 中のリンクをローカルを指すように変更する
  -K,  --backup-converted   リンク変換前のファイルを .orig として保存する
  -m,  --mirror             -N -r -l 0 --no-remove-listing の省略形
  -p,  --page-requisites    HTML を表示するのに必要な全ての画像等も取得する
       --strict-comments    HTML 中のコメントの処理を厳密にする

◆再帰ダウンロード時のフィルタ
  -A,  --accept=LIST               ダウンロードする拡張子をコンマ区切りで指定する
  -R,  --reject=LIST               ダウンロードしない拡張子をコンマ区切りで指定する
  -D,  --domains=LIST              ダウンロードするドメインをコンマ区切りで指定する
       --exclude-domains=LIST      ダウンロードしないドメインをコンマ区切りで指定する
       --follow-ftp                HTML 文書中の FTP リンクも取得対象にする
       --follow-tags=LIST          取得対象にするタグ名をコンマ区切りで指定する
       --ignore-tags=LIST          取得対象にしないタグ名をコンマ区切りで指定する
  -H,  --span-hosts                再帰中に別のホストもダウンロード対象にする
  -L,  --relative                  相対リンクだけ取得対象にする
  -I,  --include-directories=LIST  取得対象にするディレクトリを指定する
  -X,  --exclude-directories=LIST  取得対象にしないディレクトリを指定する
  -np, --no-parent                 親ディレクトリを取得対象にしない

2012年8月8日水曜日

CentOS 6.3 主なバンドルソフトウェアのバージョン

CentOS6.3の主なバンドルソフトウェア(インストールパッケージ)のバージョンを紐解いてみたいと思います。
ぶっちゃけrpmコマンド結果をgrepしているだけです。
■kernel
[root@cent63 ~]# uname -r 2.6.32-279.el6.x86_64

■apache
[root@cent63 ~]# rpm -qa | grep httpd httpd-tools-2.2.15-15.el6.centos.1.x86_64 httpd-2.2.15-15.el6.centos.1.x86_64 httpd-manual-2.2.15-15.el6.centos.1.noarch

■perl
[root@cent63 ~]# rpm -q perl perl-5.10.1-127.el6.x86_64

■php
[root@cent63 ~]# rpm -q php php-5.3.3-3.el6_2.8.x86_64

■java
[root@cent63 ~]# java -version java version "1.6.0_24" OpenJDK Runtime Environment (IcedTea6 1.11.1) (rhel-1.45.1.11.1.el6-x86_64) OpenJDK 64-Bit Server VM (build 20.0-b12, mixed mode)

■mysql
[root@cent63 ~]# rpm -qa | grep mysql mysql-libs-5.1.61-4.el6.x86_64 mysql-5.1.61-4.el6.x86_64 mysql-connector-odbc-5.1.5r1144-7.el6.x86_64 mysql-server-5.1.61-4.el6.x86_64

■samba
[root@cent63 ~]# rpm -qa | grep samba samba-winbind-clients-3.5.10-125.el6.x86_64 samba-common-3.5.10-125.el6.x86_64 samba-client-3.5.10-125.el6.x86_64 samba-3.5.10-125.el6.x86_64 samba4-libs-4.0.0-23.alpha11.el6.x86_64

■NFS
[root@cent63 ~]# rpm -qa | grep nfs nfs-utils-lib-1.1.5-4.el6.x86_64 nfs-utils-1.2.3-26.el6.x86_64 nfs4-acl-tools-0.3.3-6.el6.x86_64

■FTP
[root@cent63 ~]# rpm -q vsftpd vsftpd-2.2.2-11.el6.x86_64

■Postfix
[root@cent63 ~]# rpm -q postfix postfix-2.6.6-2.2.el6_1.x86_64

■wget
[root@cent63 ~]# rpm -q wget wget-1.12-1.4.el6.x86_64

CentOS6.2と比べるとそ気持ちバージョンアップしているパッケージも。

こちらの情報がお役に立ちましたら、お手数をおかけして恐縮ですが広告クリックのご協力賜りたいです。m(_ _)m

2012年8月7日火曜日

CentOS 6.3 インストールパッケージ Basic Server編

2012年7月にCentOS6.3がリリースされた。サーバタイプ「Minimal」に引き続き、「Basic Server」を選択した場合どのようなパッケージがインストールされるのかを確認してみる。

【High Availability】
 □ High Availability
 □ High Availability の管理

【Load Balancer】
 □ Load Balancer

【Resilient Storage】
 □ Resilient Storage

【Scalable Filesystem】
 □ Scalable Filesystem

【Webサービス】
 □ PHP サポート
 □ TurboGears アプリケーションフレームワーク
 □ Web サーバー
 □ Web サーブレットエンジン

【アプリケーション】
 □ Emacs
 □ TeX のサポート
 □ インターネットアプリケーション
 □ インターネットブラウザ
 □ オフィススイートと生産性
 □ グラフィックツール
 □ 技術文書

【サーバー】
 □ CIFS ファイルサーバー
 □ FTP サーバー
 □ NFS ファイルサーバ
 ■ サーバープラットフォーム
 □ システム管理ツール
 □ ディレクトリサーバー 
 □ ネットワークインフラストラクチャサーバー
 □ ネットワークストレージサーバー
 □ バックアップサーバー
 □ プリントサーバー
 □ 識別管理サーバー
 □ 電子メールサーバー

【システム管理】
 □ SNMP サポート
 □ WBEM サポート
 □ システム管理
 □ システム管理 Messaging Server のサポート
 □ メッセージング接続クライアントのサポート

【デスクトップ】
 □ KDEデスクトップ
 □ X Window System
 □ グラフィカル管理ツール
 □ デスクトップ
 □ デスクトップのデバッグとパフォーマンスツール
 □ デスクトッププラットフォーム
 □ フォント
 □ リモートデスクトップ接続クライアント
 □ レガシー X Windows システムの互換性
 □ 入力メソッド
 □ 汎用デスクトップ (GNOMEデスクトップ)

【データベース】
 □ MySQL データベースサーバー
 □ MySQL データベース接続クライアント
 □ PostgreSQL データベースサーバー
 □ PostgreSQL データベース接続クライアント

【ベースシステム】
 □ FCoE ストレージ接続クライアント
 □ Infiniband のサポート
 ■ Java プラットフォーム
 ■ Perl のサポート
 □ Ruby Support
 □ iSCSI ストレージ接続クライアント
 □ クライアント管理ツール ←デフォルトチェックではなくなった
 ■ コンソールインターネットツール
 □ ストレージ可用性ツール
 □ スマートカードのサポート
 □ セキュリティツール
 □ ダイヤルアップネットワークサポート
 ■ ディレクトリ接続クライアント
 ■ デバッグツール
 □ ネットワーキングツール
 ■ ネットワークファイルシステムクライアント
 ■ ハードウェア監視ユーティリティ
 □ バックアップクライアント
 ■ パフォーマンスツール
 ■ ベース
 □ メインフレームアクセス
 □ レガシー UNIX の互換性
 □ 互換性ライブラリ
 □ 印刷クライアント
 ■ 大規模システムのパフォーマンス
 □ 数学/科学系および並列計算

【仮想化】
 □ 仮想化
 □ 仮想化クライアント
 □ 仮想化ツール
 □ 仮想化プラットフォーム

【言語】
 ■ 日本語のサポート
 ※ 他は省略

【開発】
 □ Eclipse
 □ その他の開発
 □ サーバープラットフォーム開発
 □ デスクトッププラットフォーム開発
 □ 開発ツール

---------------------------------------
 □:インストールしない
 ■:インストールする
CentOS6.2と比較すると、【ベースシステム】の「クライアント管理ツール」がデフォルトチェックではなくなった程度の変更だ。

2012年8月6日月曜日

CentOS 6.3 インストールパッケージ Minimal編

2012年7月にCentOS6.3がリリースされた。CentOS6.2との違いを確認したところでどうなのと思いつつインストール。
まずはサーバタイプ「Minimal」を選択してどのようにパッケージの選択肢が表示されるかを記載してみる。

【High Availability】
 □ High Availability
 □ High Availability の管理

【Load Balancer】
 □ Load Balancer

【Resilient Storage】
 □ Resilient Storage

【Scalable Filesystem】
 □ Scalable Filesystem

【Webサービス】
 □ PHP サポート
 □ TurboGears アプリケーションフレームワーク
 □ Web サーバー
 □ Web サーブレットエンジン

【アプリケーション】
 □ Emacs
 □ TeX のサポート
 □ インターネットアプリケーション
 □ インターネットブラウザ
 □ オフィススイートと生産性
 □ グラフィックツール
 □ 技術文書

【サーバー】
 □ CIFS ファイルサーバー
 □ FTP サーバー
 □ Identity Management Server ←廃止
 □ NFS ファイルサーバ
 □ サーバープラットフォーム
 □ システム管理ツール
 □ ディレクトリサーバー 
 □ ネットワークインフラストラクチャサーバー
 □ ネットワークストレージサーバー
 □ バックアップサーバー
 □ プリントサーバー
 □ 識別管理サーバー ←新設
 □ 電子メールサーバー

【システム管理】
 □ SNMP サポート
 □ WBEM サポート
 □ システム管理
 □ システム管理 Messaging Server のサポート
 □ メッセージング接続クライアントのサポート

【デスクトップ】
 □ KDEデスクトップ
 □ X Window System
 □ グラフィカル管理ツール
 □ デスクトップ
 □ デスクトップのデバッグとパフォーマンスツール
 □ デスクトッププラットフォーム
 □ フォント
 □ リモートデスクトップ接続クライアント
 □ レガシー X Windows システムの互換性
 □ 入力メソッド
 □ 汎用デスクトップ (GNOMEデスクトップ)

【データベース】
 □ MySQL データベースサーバー
 □ MySQL データベース接続クライアント
 □ PostgreSQL データベースサーバー
 □ PostgreSQL データベース接続クライアント

【ベースシステム】
 □ FCoE ストレージ接続クライアント
 □ Infiniband のサポート
 □ Java プラットフォーム
 □ Perl のサポート
 □ Ruby Support
 □ iSCSI ストレージ接続クライアント
 □ クライアント管理ツール
 □ コンソールインターネットツール
 □ ストレージ可用性ツール
 □ スマートカードのサポート
 □ セキュリティツール
 □ ダイヤルアップネットワークサポート
 □ ディレクトリ接続クライアント
 □ デバッグツール
 □ ネットワーキングツール
 □ ネットワークファイルシステムクライアント
 □ ハードウェア監視ユーティリティ
 □ バックアップクライアント
 □ パフォーマンスツール
 □ ベース
 □ メインフレームアクセス
 □ レガシー UNIX の互換性
 □ 互換性ライブラリ
 □ 印刷クライアント
 □ 大規模システムのパフォーマンス
 □ 数学/科学系および並列計算

【仮想化】
 □ 仮想化
 □ 仮想化クライアント
 □ 仮想化ツール
 □ 仮想化プラットフォーム

【言語】
 ■ 日本語のサポート
 ※ 他は省略

【開発】
 □ Eclipse
 □ その他の開発
 □ サーバープラットフォーム開発
 □ デスクトッププラットフォーム開発
 □ 開発ツール

---------------------------------------
 □:インストールしない
 ■:インストールする


サーバタイプ「Minimal」を選択するとデフォルトでは本当に何もチェックされない。日本語のサポートのみ。必要最小限のパッケージのみインストールされるようだ。当たり前だが。
ほとんど変更点はなさそうだが、
【サーバー】の「Identity Management Server」が廃止され「識別管理サーバー」が追加された。
Windows Server の ActiveDirectoryを意識しているのだろうか…?

続いてOSの状況を簡単に確認してみた。詳細は下記。
※インストール時にネットワークの設定を行えばsshでのアクセス可能。

■OSバージョン確認
[root@cent63 ~]# cat /etc/redhat-release
CentOS release 6.3 (Final)
[root@cent63 ~]# uname -r
2.6.32-279.el6.x86_64
[root@cent63 ~]#

■インストールパッケージ(Minimal)の状況
[root@cent63 ~]# rpm -qa | wc -l
217
[root@cent63 ~]# rpm -qa | sort
MAKEDEV-3.24-6.el6.x86_64
acl-2.2.49-6.el6.x86_64
aic94xx-firmware-30-2.el6.noarch
atmel-firmware-1.3-7.el6.noarch
attr-2.4.44-7.el6.x86_64
audit-2.2-2.el6.x86_64
audit-libs-2.2-2.el6.x86_64
authconfig-6.1.12-10.el6.x86_64
b43-openfwwf-5.2-4.el6.noarch
basesystem-10.0-4.el6.noarch
bash-4.1.2-9.el6_2.x86_64
bfa-firmware-3.0.0.0-1.el6.noarch
binutils-2.20.51.0.2-5.34.el6.x86_64
bzip2-1.0.5-7.el6_0.x86_64
bzip2-libs-1.0.5-7.el6_0.x86_64
ca-certificates-2010.63-3.el6_1.5.noarch
centos-release-6-3.el6.centos.9.x86_64
checkpolicy-2.0.22-1.el6.x86_64
chkconfig-1.3.49.3-2.el6.x86_64
coreutils-8.4-19.el6.x86_64
coreutils-libs-8.4-19.el6.x86_64
cpio-2.10-10.el6.x86_64
cracklib-2.8.16-4.el6.x86_64
cracklib-dicts-2.8.16-4.el6.x86_64
cronie-1.4.4-7.el6.x86_64
cronie-anacron-1.4.4-7.el6.x86_64
crontabs-1.10-33.el6.noarch
curl-7.19.7-26.el6_2.4.x86_64
cyrus-sasl-2.1.23-13.el6.x86_64
cyrus-sasl-lib-2.1.23-13.el6.x86_64
dash-0.5.5.1-3.1.el6.x86_64
db4-4.7.25-17.el6.x86_64
db4-utils-4.7.25-17.el6.x86_64
dbus-glib-0.86-5.el6.x86_64
dbus-libs-1.2.24-5.el6_1.x86_64
device-mapper-1.02.74-10.el6.x86_64
device-mapper-event-1.02.74-10.el6.x86_64
device-mapper-event-libs-1.02.74-10.el6.x86_64
device-mapper-libs-1.02.74-10.el6.x86_64
dhclient-4.1.1-31.P1.el6.x86_64
dhcp-common-4.1.1-31.P1.el6.x86_64
diffutils-2.8.1-28.el6.x86_64
dracut-004-283.el6.noarch
dracut-kernel-004-283.el6.noarch
e2fsprogs-1.41.12-12.el6.x86_64
e2fsprogs-libs-1.41.12-12.el6.x86_64
efibootmgr-0.5.4-10.el6.x86_64
elfutils-libelf-0.152-1.el6.x86_64
ethtool-2.6.33-0.3.el6.x86_64
expat-2.0.1-11.el6_2.x86_64
file-5.04-13.el6.x86_64
file-libs-5.04-13.el6.x86_64
filesystem-2.4.30-3.el6.x86_64
findutils-4.4.2-6.el6.x86_64
fipscheck-1.2.0-7.el6.x86_64
fipscheck-lib-1.2.0-7.el6.x86_64
fontpackages-filesystem-1.41-1.1.el6.noarch
gamin-0.1.10-9.el6.x86_64
gawk-3.1.7-9.el6.x86_64
gdbm-1.8.0-36.el6.x86_64
glib2-2.22.5-7.el6.x86_64
glibc-2.12-1.80.el6.x86_64
glibc-common-2.12-1.80.el6.x86_64
gmp-4.3.1-7.el6_2.2.x86_64
gnupg2-2.0.14-4.el6.x86_64
gpgme-1.1.8-3.el6.x86_64
grep-2.6.3-3.el6.x86_64
groff-1.18.1.4-21.el6.x86_64
grub-0.97-77.el6.x86_64
grubby-7.0.15-3.el6.x86_64
gzip-1.3.12-18.el6.x86_64
hwdata-0.233-7.8.el6.noarch
info-4.13a-8.el6.x86_64
initscripts-9.03.31-2.el6.centos.x86_64
ipa-gothic-fonts-003.02-4.2.el6.noarch
ipa-mincho-fonts-003.02-3.1.el6.noarch
ipa-pgothic-fonts-003.02-4.1.el6.noarch
ipa-pmincho-fonts-003.02-3.1.el6.noarch
iproute-2.6.32-20.el6.x86_64
iptables-1.4.7-5.1.el6_2.x86_64
iptables-ipv6-1.4.7-5.1.el6_2.x86_64
iputils-20071127-16.el6.x86_64
ipw2100-firmware-1.3-11.el6.noarch
ipw2200-firmware-3.1-4.el6.noarch
ivtv-firmware-20080701-20.2.noarch
iwl100-firmware-39.31.5.1-1.el6.noarch
iwl1000-firmware-39.31.5.1-1.el6.noarch
iwl3945-firmware-15.32.2.9-4.el6.noarch
iwl4965-firmware-228.61.2.24-2.1.el6.noarch
iwl5000-firmware-8.83.5.1_1-1.el6_1.1.noarch
iwl5150-firmware-8.24.2.2-1.el6.noarch
iwl6000-firmware-9.221.4.1-1.el6.noarch
iwl6000g2a-firmware-17.168.5.3-1.el6.noarch
iwl6050-firmware-41.28.5.1-2.el6.noarch
kbd-1.15-11.el6.x86_64
kbd-misc-1.15-11.el6.noarch
kernel-2.6.32-279.el6.x86_64
kernel-firmware-2.6.32-279.el6.noarch
keyutils-libs-1.4-4.el6.x86_64
krb5-libs-1.9-33.el6.x86_64
less-436-10.el6.x86_64
libacl-2.2.49-6.el6.x86_64
libattr-2.4.44-7.el6.x86_64
libblkid-2.17.2-12.7.el6.x86_64
libcap-2.16-5.5.el6.x86_64
libcap-ng-0.6.4-3.el6_0.1.x86_64
libcom_err-1.41.12-12.el6.x86_64
libcurl-7.19.7-26.el6_2.4.x86_64
libdrm-2.4.25-2.el6.x86_64
libertas-usb8388-firmware-5.110.22.p23-3.1.el6.noarch
libffi-3.0.5-3.2.el6.x86_64
libgcc-4.4.6-4.el6.x86_64
libgcrypt-1.4.5-9.el6_2.2.x86_64
libgpg-error-1.7-4.el6.x86_64
libidn-1.18-2.el6.x86_64
libnih-1.0.1-7.el6.x86_64
libselinux-2.0.94-5.3.el6.x86_64
libselinux-utils-2.0.94-5.3.el6.x86_64
libsemanage-2.0.43-4.1.el6.x86_64
libsepol-2.0.41-4.el6.x86_64
libss-1.41.12-12.el6.x86_64
libssh2-1.2.2-7.el6_2.3.x86_64
libstdc++-4.4.6-4.el6.x86_64
libudev-147-2.41.el6.x86_64
libusb-0.1.12-23.el6.x86_64
libuser-0.56.13-5.el6.x86_64
libutempter-1.1.5-4.1.el6.x86_64
libuuid-2.17.2-12.7.el6.x86_64
libxml2-2.7.6-4.el6_2.4.x86_64
logrotate-3.7.8-15.el6.x86_64
lua-5.1.4-4.1.el6.x86_64
lvm2-2.02.95-10.el6.x86_64
lvm2-libs-2.02.95-10.el6.x86_64
m4-1.4.13-5.el6.x86_64
mingetty-1.08-5.el6.x86_64
module-init-tools-3.9-20.el6.x86_64
mysql-libs-5.1.61-4.el6.x86_64
ncurses-5.7-3.20090208.el6.x86_64
ncurses-base-5.7-3.20090208.el6.x86_64
ncurses-libs-5.7-3.20090208.el6.x86_64
net-tools-1.60-110.el6_2.x86_64
newt-0.52.11-3.el6.x86_64
newt-python-0.52.11-3.el6.x86_64
nspr-4.9-1.el6.x86_64
nss-3.13.3-6.el6.x86_64
nss-softokn-3.12.9-11.el6.x86_64
nss-softokn-freebl-3.12.9-11.el6.x86_64
nss-sysinit-3.13.3-6.el6.x86_64
nss-tools-3.13.3-6.el6.x86_64
nss-util-3.13.3-2.el6.x86_64
openldap-2.4.23-26.el6.x86_64
openssh-5.3p1-81.el6.x86_64
openssh-server-5.3p1-81.el6.x86_64
openssl-1.0.0-20.el6_2.5.x86_64
pam-1.1.1-10.el6_2.1.x86_64
passwd-0.77-4.el6_2.2.x86_64
pciutils-libs-3.1.4-11.el6.x86_64
pcre-7.8-4.el6.x86_64
pinentry-0.7.6-6.el6.x86_64
plymouth-0.8.3-24.el6.centos.x86_64
plymouth-core-libs-0.8.3-24.el6.centos.x86_64
plymouth-scripts-0.8.3-24.el6.centos.x86_64
policycoreutils-2.0.83-19.24.el6.x86_64
popt-1.13-7.el6.x86_64
postfix-2.6.6-2.2.el6_1.x86_64
procps-3.2.8-23.el6.x86_64
psmisc-22.6-15.el6_0.1.x86_64
pth-2.0.7-9.3.el6.x86_64
pygpgme-0.1-18.20090824bzr68.el6.x86_64
python-2.6.6-29.el6_2.2.x86_64
python-iniparse-0.3.1-2.1.el6.noarch
python-libs-2.6.6-29.el6_2.2.x86_64
python-pycurl-7.19.0-8.el6.x86_64
python-urlgrabber-3.9.1-8.el6.noarch
ql2100-firmware-1.19.38-3.1.el6.noarch
ql2200-firmware-2.02.08-3.1.el6.noarch
ql23xx-firmware-3.03.27-3.1.el6.noarch
ql2400-firmware-5.06.05-1.el6.noarch
ql2500-firmware-5.06.05-1.el6.noarch
readline-6.0-4.el6.x86_64
redhat-logos-60.0.14-11.el6.centos.noarch
rootfiles-8.1-6.1.el6.noarch
rpm-4.8.0-27.el6.x86_64
rpm-libs-4.8.0-27.el6.x86_64
rpm-python-4.8.0-27.el6.x86_64
rsyslog-5.8.10-2.el6.x86_64
rt61pci-firmware-1.2-7.el6.noarch
rt73usb-firmware-1.8-7.el6.noarch
sed-4.2.1-10.el6.x86_64
selinux-policy-3.7.19-154.el6.noarch
selinux-policy-targeted-3.7.19-154.el6.noarch
setup-2.8.14-16.el6.noarch
shadow-utils-4.1.4.2-13.el6.x86_64
slang-2.2.1-1.el6.x86_64
sqlite-3.6.20-1.el6.x86_64
sudo-1.7.4p5-11.el6.x86_64
system-config-firewall-base-1.2.27-5.el6.noarch
sysvinit-tools-2.87-4.dsf.el6.x86_64
tar-1.23-7.el6.x86_64
tcp_wrappers-libs-7.6-57.el6.x86_64
tzdata-2012c-1.el6.noarch
udev-147-2.41.el6.x86_64
upstart-0.6.5-12.el6.x86_64
ustr-1.0.4-9.1.el6.x86_64
util-linux-ng-2.17.2-12.7.el6.x86_64
vim-minimal-7.2.411-1.8.el6.x86_64
vlgothic-fonts-20091202-2.el6.noarch
vlgothic-fonts-common-20091202-2.el6.noarch
vlgothic-p-fonts-20091202-2.el6.noarch
which-2.19-6.el6.x86_64
xorg-x11-drv-ati-firmware-6.14.2-9.el6.noarch
xz-libs-4.999.9-0.3.beta.20091007git.el6.x86_64
yum-3.2.29-30.el6.centos.noarch
yum-metadata-parser-1.1.2-16.el6.x86_64
yum-plugin-fastestmirror-1.1.30-14.el6.noarch
zd1211-firmware-1.4-4.el6.noarch
zlib-1.2.3-27.el6.x86_64
[root@cent63 ~]#

■runlevel別のサービス起動設定
[root@cent63 ~]# chkconfig --list
auditd          0:off   1:off   2:on    3:on    4:on    5:on    6:off
crond           0:off   1:off   2:on    3:on    4:on    5:on    6:off
ip6tables       0:off   1:off   2:on    3:on    4:on    5:on    6:off
iptables        0:off   1:off   2:on    3:on    4:on    5:on    6:off
lvm2-monitor    0:off   1:on    2:on    3:on    4:on    5:on    6:off
netconsole      0:off   1:off   2:off   3:off   4:off   5:off   6:off
netfs           0:off   1:off   2:off   3:on    4:on    5:on    6:off
network         0:off   1:off   2:on    3:on    4:on    5:on    6:off
postfix         0:off   1:off   2:on    3:on    4:on    5:on    6:off
rdisc           0:off   1:off   2:off   3:off   4:off   5:off   6:off
restorecond     0:off   1:off   2:off   3:off   4:off   5:off   6:off
rsyslog         0:off   1:off   2:on    3:on    4:on    5:on    6:off
saslauthd       0:off   1:off   2:off   3:off   4:off   5:off   6:off
sshd            0:off   1:off   2:on    3:on    4:on    5:on    6:off
udev-post       0:off   1:on    2:on    3:on    4:on    5:on    6:off
[root@cent63 ~]#

■ディスク使用状況
[root@cent63 ~]# df -hT
Filesystem    Type    Size  Used Avail Use% マウント位置
/dev/mapper/vg_cent63-lv_root
              ext4     18G  740M   16G   5% /
tmpfs        tmpfs    499M     0  499M   0% /dev/shm
/dev/sda1     ext4    485M   32M  429M   7% /boot
[root@cent63 ~]#

2012年6月17日日曜日

AWS(EC2) /varにEBSをマウントする場合は要注意

Linux系のEC2インスタンスを作成し、/varに50GBくらいの領域を割当てたいから
新規にEBSを作成して、Attacheして/etc/fstabに追記して、再起動。
そしてそのEC2インスタンスにSSHで接続しようとしたら・・・。
アクセス拒否に遇えるかも。(T-T)


■原因
既存の/varの下にあったファイルがなくなってしまったからです。


■対策
[root@ip-10-0-0-20 ~]# cp -pr /var /tmp/
上記等のコマンドで/tmp等に退避しておき、

EBSを/varにマウントして
[root@ip-10-0-0-20 ~]# echo "/dev/sdi  /var  ext4   defaults   0  0" >> /etc/fstab
[root@ip-10-0-0-20 ~]# mount -a
[root@ip-10-0-0-20 ~]# mv /tmp/var/* /var/
上記等のコマンドで元に戻しておけばrebootしてもほぼ大丈夫。


■ほぼ大丈夫?とは
[root@ip-10-0-0-20 ~]# cp -pr /var /tmp/
やった後に、EBSを/varにマウントしてさらに、
MySQLインストール、Apache、PHPインストールしちゃって
[root@ip-10-0-0-20 ~]# mv /tmp/var/* /var/
やるとアウトです。

なんでかって? /varの状況変わってるから。あたりまえやん。

なので、EBSを/varにマウント直前に/varを退避し、
マウント直後に戻すのがよいでしょう。

嵌るよ。嵌るかも。フツー嵌らんか…。すみません、以上です。

2012年5月5日土曜日

AWS(EC2) SSH公開鍵設定

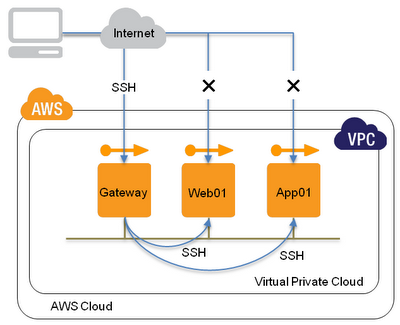
AWSでセキュリティを高めるために踏み台(Gateway)サーバを設け、内部のサーバには踏み台経由でしかSSHアクセスさせない構成を取ることが考えられます。(ってかSecurity Groupでするんやけど。) その際、ローカルサブネット間でSSH通信を行うための設定をまとめました。そうです。何をいまさらです。踏み台サーバで秘密鍵と公開鍵を作成して公開鍵を内部サーバにぶち込んで終わりです。

■構成概要

GatewayサーバIP:10.0.8.250
Web01サーバIP:10.0.8.10


■Gatewayサーバにて秘密鍵(id_rsa)と公開鍵(id_rsa.pub)の生成
[ec2-user@ip-10-0-8-250 ~]$ ssh-keygen -t rsa
Generating public/private rsa key pair.
Enter file in which to save the key (/home/ec2-user/.ssh/id_rsa):
Enter passphrase (empty for no passphrase):
Enter same passphrase again:
Your identification has been saved in /home/ec2-user/.ssh/id_rsa.
Your public key has been saved in /home/ec2-user/.ssh/id_rsa.pub.
The key fingerprint is:
b8:2f:b5:4b:6d:5f:e4:bd:9a:f4:e2:f2:85:17:76:d1 ec2-user@ip-10-0-8-250
The key's randomart image is:
+--[ RSA 2048]----+
|                 |
|                 |
|                 |
|         .   .   |
|      . o S  o E |
|       .  +  +   |
|    .   . O O .  |
|       . *.@ =   |
|        ..+=*    |
+-----------------+
[ec2-user@ip-10-0-8-250 ~]$ ll .ssh/
total 12
-rw------- 1 ec2-user ec2-user  400 May  2 03:18 authorized_keys
-rw------- 1 ec2-user ec2-user 1743 May  2 07:28 id_rsa
-rw-r--r-- 1 ec2-user ec2-user  406 May  2 07:28 id_rsa.pub
[ec2-user@ip-10-0-8-250 ~]$ cat .ssh/id_rsa.pub
ssh-rsa AAAAAAB3NzaC1yc2EAAA(中略)j3Nhm5RH9doQTZ/8Q== ec2-user@ip-10-0-8-250
[ec2-user@ip-10-0-8-250 ~]$
※公開鍵のパスワード忘れんように。


■公開鍵をWeb01サーバの.ssh/authorized_keysに追加
※初期のみSecurityGroupでSSH許可
※Gatewayサーバで作成したid_rsa.pubをFTP等で送るのめんどくさいんでクリップボード経由で作成。だからvi。
[ec2-user@ip-10-0-8-10 ~]$ vi id_rsa.pub
[ec2-user@ip-10-0-8-10 ~]$ cat id_rsa.pub >> .ssh/authorized_keys


■GatewayサーバからWeb01サーバに接続
[ec2-user@ip-10-0-8-250 ~]$ ssh 10.0.8.10
The authenticity of host '10.0.8.10 (10.0.8.10)' can't be established.
RSA key fingerprint is 25:23:55:1b:e7:34:8c:d8:c8:43:ef:31:0e:84:c8:6a.
Are you sure you want to continue connecting (yes/no)? yes
Warning: Permanently added '10.0.8.10' (RSA) to the list of known hosts.
Enter passphrase for key '/home/ec2-user/.ssh/id_rsa': ←公開鍵のパスワード
Last login: Sat May  2 07:26:04 2012 from pc1.slb-unet.ocn.ne.jp

       __|  __|_  )
       _|  (     /   Amazon Linux AMI
      ___|\___|___|

See /usr/share/doc/system-release/ for latest release notes.
There are 11 security update(s) out of 22 total update(s) available
Run "sudo yum update" to apply all updates.
[ec2-user@ip-10-0-8-10 ~]$

接続成功! --以上。--

2012年5月3日木曜日

AWS ec2_api_toolsインストール

ec2_api_toolsはEC2をコマンドラインで管理するためのツールです。
使用するためにはx509証明書等の準備が必要なためその辺りの手順をまとめてみました。

■環境情報
・Operating system: Amazon Linux等 
・ec2_api_tools: 1.5.4.0 2012-05-01


■秘密鍵作成
[root@tanyao-aws02 ~]# mkdir -p /opt/ec2-api-tools/X.509/user01
[root@tanyao-aws02 ~]# cd /opt/ec2-api-tools/X.509/user01
[root@tanyao-aws02 user01]# openssl genrsa -out iam.key 2048
Generating RSA private key, 2048 bit long modulus
......................................................................................+++
..........................................+++
e is 65537 (0x10001)
[root@tanyao-aws02 user01]#


■秘密鍵からCSR (Certificate Signing Request: 証明書署名要求)を作成
[root@tanyao-aws02 user01]# openssl req -new -key iam.key -out iam.csr
You are about to be asked to enter information that will be incorporated
into your certificate request.
What you are about to enter is what is called a Distinguished Name or a DN.
There are quite a few fields but you can leave some blank
For some fields there will be a default value,
If you enter '.', the field will be left blank.
-----
Country Name (2 letter code) [GB]:
State or Province Name (full name) [Berkshire]:
Locality Name (eg, city) [Newbury]:
Organization Name (eg, company) [My Company Ltd]:
Organizational Unit Name (eg, section) []:
Common Name (eg, your name or your server's hostname) []:
Email Address []:

Please enter the following 'extra' attributes
to be sent with your certificate request
A challenge password []:
An optional company name []:
[root@tanyao-aws02 user01]#
※何も入力せずすべてEnter


■証明書作成
[root@tanyao-aws02 user01]# openssl x509 -req -in iam.csr -signkey iam.key -out iam.pem
Signature ok
subject=/C=GB/ST=Berkshire/L=Newbury/O=My Company Ltd
Getting Private key
[root@tanyao-aws02 user01]# ll
total 12
-rw-r--r-- 1 root root  968 May 02 16:09 iam.csr
-rw-r--r-- 1 root root 1675 May 02 16:08 iam.key
-rw-r--r-- 1 root root 1127 May 02 16:10 iam.pem
[root@tanyao-aws02 user01]# cat iam.pem
-----BEGIN CERTIFICATE-----
MIIDFDCCAfwCCQDhPLbzkt2PyDAN6kouoroshi0BAQUFADBMMQswCQYDVQQGEwJH
QjESMBAGA1UECBMJQmVya3NoaXJlMRAwDgYDVQQHEwdOZXdidXJ5MRcwFQYDVQQK
(中略)
MbxkzKVcxBtQf20dtHh/lEpdep5gO8PrZXTpGGb90q2fhg6wZYakDpvw0jyMxVjz
bcCVZLs6obbstrBIErhRn5qas443rjF52
-----END CERTIFICATE-----
[root@tanyao-aws02 user01]#


■証明書登録
IAM > Users > ユーザ選択 > Security Credentials > Signing Certificates
Certificate ID: NAGW***********ZTCOYEQD7GETW2VEC76


■秘密鍵と証明書のファイル名にCertificate IDを使用すれば管理しやすい
[root@tanyao-aws02 user01]# mv iam.csr csr-NAGW***********ZTCOYEQD7GETW2VEC76.pem
[root@tanyao-aws02 user01]# mv iam.key pk-NAGW***********ZTCOYEQD7GETW2VEC76.pem
[root@tanyao-aws02 user01]# mv iam.pem cert-NAGW***********ZTCOYEQD7GETW2VEC76.pem


■Amazon EC2 API Tools準備
⇒JDKインストール
[root@tanyao-aws02 ~]# yum install java-1.6.0-openjdk
[root@tanyao-aws02 ~]# java -version
java version "1.6.0_22"
OpenJDK Runtime Environment (IcedTea6 1.10.6) (rhel-1.25.1.10.6.el5_8-x86_64)
OpenJDK 64-Bit Server VM (build 20.0-b11, mixed mode)
[root@tanyao-aws02 ~]#

⇒Amazon EC2 API Tools取得
[root@tanyao-aws02 ~]# cd /opt/installer/
[root@tanyao-aws02 installer]# wget http://s3.amazonaws.com/ec2-downloads/ec2-api-tools.zip
(中略)
2012-05-02 19:50:38 (1.89 MB/s) - `ec2-api-tools.zip' saved [13926491/13926491]

[root@tanyao-aws02 installer]#

⇒解凍&配置
[root@tanyao-aws02 installer]# unzip ec2-api-tools.zip
[root@tanyao-aws02 installer]# cp -pr ec2-api-tools-1.5.4.0/* /opt/ec2-api-tools/
[root@tanyao-aws02 installer]# ll /opt/ec2-api-tools/
total 100
drwxr-xr-x 2 root root 32768 May 02 03:35 bin
drwxr-xr-x 2 root root  4096 May 02 03:35 lib
-rw-r--r-- 1 root root  4852 May 02 01:59 license.txt
-rw-r--r-- 1 root root   539 May 02 01:59 notice.txt
-rw-r--r-- 1 root root 46468 May 02 01:59 THIRDPARTYLICENSE.TXT
drwxr-xr-x 3 root root  4096 May 02 19:45 X.509
[root@tanyao-aws02 installer]#

⇒環境変数設定
[root@tanyao-aws02 ~]# export JAVA_HOME=/usr/lib/jvm/java-1.6.0-openjdk-1.6.0.0.x86_64/jre
[root@tanyao-aws02 ~]# export EC2_HOME=/opt/ec2-api-tools
[root@tanyao-aws02 ~]# export PATH=$PATH:$EC2_HOME/bin
[root@tanyao-aws02 ~]# export EC2_PRIVATE_KEY=$EC2_HOME/X.509/user01/pk-NAGW***********ZTCOYEQD7GETW2VEC76.pem
[root@tanyao-aws02 ~]# export EC2_CERT=$EC2_HOME/X.509/user01/cert-NAGW***********ZTCOYEQD7GETW2VEC76.pem
[root@tanyao-aws02 ~]# ec2ver
1.5.4.0 2012-05-01
[root@tanyao-aws02 ~]# ec2-describe-regions
REGION  eu-west-1       ec2.eu-west-1.amazonaws.com
REGION  sa-east-1       ec2.sa-east-1.amazonaws.com
REGION  us-east-1       ec2.us-east-1.amazonaws.com
REGION  ap-northeast-1  ec2.ap-northeast-1.amazonaws.com
REGION  us-west-2       ec2.us-west-2.amazonaws.com
REGION  us-west-1       ec2.us-west-1.amazonaws.com
REGION  ap-southeast-1  ec2.ap-southeast-1.amazonaws.com
[root@tanyao-aws02 ~]#

2012年4月22日日曜日

Windows Server 2008 R2 にGladinet Cloudインストール時の注意点

Gladinet CloudはWindows上でS3等をマウントできる便利なツールです。ただし、Windows Server 2008 R2にインストールする場合は、そのままでは失敗するので対処法をまとめておきます。

■構成情報
・Operating system: Windows Server 2008 R2 
・Gladinet Cloud: Free Starter Edition - Version 4.0.874


■インストール時のエラー
GladinetSetup_4.0.874_x64.msiをダブルクリックしてウィザードに従って次へ次へと進んでいくと、
---------------------------------------------
Gladinet failed to map driver. Error Code:67
---------------------------------------------
なエラーにぶち当たる。

Gladinet CloudはWebClientサービスを利用しますが、Windows Server 2008 R2のデフォルトではそれがないために発生している。

■WebClientインストール
するには、「デスクトップ エクスペリエンス」機能をインストールする必要がある。
スタート > 管理ツール > サーバー マネージャ > 機能 > 機能の追加

デスクトップ エクスペリエンスにチェック > 次へ > インストール > OS再起動

スタート > 管理ツール > サービス

WebClientを自動起動するように変更。(起動していない場合は開始)

これで、Gladinet Cloudのインストール準備完了!


■おまけ:Gladinet CloudでS3をマウントするドライブレターを変更するには
Management Consoleのメニュー切替 > Advanced > Settings Managerタブ
Cloud Drive > Drive Letterの値を変更

Gladinet Cloudを一度停止して起動すれば変更されている! はず。

2012年4月17日火曜日

AWS EC2インスタンスのルートボリュームのサイズ拡張

Quick Start等のAMIからEC2インスタンスを作成した場合、ルートボリュームの
デフォルトのサイズが割と小さいので、これを拡張したいと思った時の手順です。

■対象EC2
Amazon Linux等のLinux系OS
ルートボリュームを6GB→12GBに拡張


■Management Consoleでの作業
① rootボリュームを拡張したいEC2インスタンスを停止。
② rootボリュームのEBSからCreate Snapshotを実行。
③ Create Volumeで拡張したいボリュームサイズ(GB)を入力し②で作成したSnapshotを選択。
④ rootボリュームのEBSをDetach Volumeする。
⑤ ③で作成したEBSを/dev/sda1にAttach Volumeする。
⑥ EC2インスタンス起動。


■OS上での作業
resize2fsを行えば拡張した領域が見えるようになる。
[root@ip-10-0-1-10 ~]# df -h; resize2fs /dev/sda1; df -h
Filesystem            Size  Used Avail Use% Mounted on
/dev/sda1             5.7G  2.0G  3.6G  36% /
none                  850M     0  850M   0% /dev/shm
resize2fs 1.39 (29-May-2006)
Filesystem at /dev/sda1 is mounted on /; on-line resizing required
Performing an on-line resize of /dev/sda1 to 3145728 (4k) blocks.
The filesystem on /dev/sda1 is now 3145728 blocks long.

Filesystem            Size  Used Avail Use% Mounted on
/dev/sda1              12G  2.0G  9.7G  18% /
none                  850M     0  850M   0% /dev/shm
[root@ip-10-0-1-10 ~]#

2012年4月13日金曜日

CentOS 5.5 Webmin インストール等々

Webminは言わずと知れたブラウザからLinuxOSの各種設定を行うツールです。
インストール方法および、簡単な初期設定をまとめてみました。

■構成情報
・Operating system CentOS Linux 5.5 
・Webmin version 1.580 


■リポジトリ設定(webminはデフォルトリポジトリに登録されていないので)
[root@web01 ~]# vi /etc/yum.repos.d/webmin.repo
[root@web01 ~]# cat /etc/yum.repos.d/webmin.repo
[Webmin]
name=Webmin Distribution Neutral
#baseurl=http://download.webmin.com/download/yum
mirrorlist=http://download.webmin.com/download/yum/mirrorlist
enabled=1
[root@web01 ~]# 

■jcameron-key.ascのインポート
[root@web01 ~]# wget http://www.webmin.com/jcameron-key.asc
(中略)
HTTP による接続要求を送信しました、応答を待っています... 200 OK
長さ: 1320 (1.3K) [text/plain]
`jcameron-key.asc' に保存中

100%[=====================================>] 1,320     --.-K/s 時間 0s

2012-04-12 23:58:57 (69.9 MB/s) - `jcameron-key.asc' へ保存完了 [1320/1320]

[root@web01 ~]# rpm --import jcameron-key.asc
[root@web01 ~]#

■yumでインストール
[root@web01 ~]# yum install webmin
(中略)
======================================================================
 Package                 Arch        Version      Repository     Size
======================================================================
Installing:
 webmin                  noarch      1.580-1      Webmin         16 M

Transaction Summary
======================================================================
Install       1 Package(s)
Upgrade       0 Package(s)

Total download size: 16 M
Is this ok [y/N]: y
Downloading Packages:
webmin-1.580-1.noarch.rpm                            |  16 MB     00:08
Running rpm_check_debug
Running Transaction Test
Finished Transaction Test
Transaction Test Succeeded
Running Transaction
Operating system is CentOS Linux
  Installing     : webmin                                           1/1
Webmin install complete. You can now login to https://web01:10000/
as root with your root password.

Installed:
  webmin.noarch 0:1.580-1

Complete!
[root@web01 ~]#

■デフォルトのポート番号を変更するには
[root@web01 ~]# vi /etc/webmin/miniserv.conf
[root@web01 ~]# grep -n -e port -e listen /etc/webmin/miniserv.conf
1:port=4649
16:listen=4649
[root@web01 ~]# /etc/init.d/webmin restart
Stopping Webmin server in /usr/libexec/webmin
Starting Webmin server in /usr/libexec/webmin
Pre-loaded WebminCore
[root@web01 ~]#
ブラウザにてhttps://192.168.xxx.110:4649/ にアクセス。
※AWSの場合はセキュリティーグループでポートの解放を忘れずに。
■日本語化 左側メニューの、Webmin → Change Language and Theme Webmin UI Language を Japanese (JA_JP.UTF-8)に変更して Make Changesボタンをクリック。
■Text Loginのコンソールエリアを少し大きくする [root@web01 ~]# vi /usr/libexec/webmin/ajaxterm/ajaxterm/ajaxterm.html [root@web01 ~]# grep -n Terminal /usr/libexec/webmin/ajaxterm/ajaxterm/ajaxterm.html 12: t=ajaxterm.Terminal("term",94,30); [root@web01 ~]# /etc/init.d/webmin restart Stopping Webmin server in /usr/libexec/webmin Starting Webmin server in /usr/libexec/webmin Pre-loaded WebminCore [root@web01 ~]#
※これ以上大きくするとスクロールバーが表示されてしまう。

2012年2月24日金曜日

Redmineデータバックアップスクリプト


Redmineのデータをバックアップするスクリプトの例です。
概要は、Redmineで使用しているデータベースをダンプし、
添付ファイルをアーカイブしてダンプファイルとともに別
領域にコピーします。

バージョン1.3.1で動作確認済みです。


■仕様
バックアップ対象:
 MySQLのデータベース、db_redmineのダンプ
 /opt/redmine1.3.1 ディレクトリ全体をアーカイブ
 ※本来は添付ファイルだけでよいので/opt/redmine1.3.1/publicを対象とすればよい。

バックアップ開始時刻:午前3時33分
 /etc/crontabに登録しています。

バックアップ世代:10世代
 10日以上前のバックアップは自動削除されます。
 構築直後のデータサイズは全部で約10MB以下です。

バックアップ先:別Linuxサーバの/home/backup/redmine
 ※筐体の異なる物理サーバ上のVMの領域をNFSマウントします。


■マウントポイント作成
[root@redmine ~]# mkdir -p /opt/bk_redmine/backup


■バックアップスクリプト
[root@redmine ~]# cat /opt/bk_redmine/bk_redmine.sh
#!/bin/sh
#######################################################################
# << 機能概要 >>
# Redmineのデータを別サーバのマウント領域にバックアップする
#
# << 前提 >>
# /opt/bk_redmine/backup ディレクトリが存在すること
# /opt/bk_redmine/bk_redmine.sh としてこのファイルが存在すること
#
# <<変更履歴>>
# Version  変更日      変更者        変更内容
# --------+-----------+-------------+----------------------------------
#     1.0  2012/02/21  tanyao        新規作成
#######################################################################

BASE_DIR=/opt/bk_redmine
MOUNT_POINT=$BASE_DIR/backup
LOG_FILE=$0.log

echo "`date \"+%Y%m%d %H:%M:%S\"` INFO: bk_redmine start." >> $LOG_FILE

# mount settings
mount -t nfs 192.168.xxx.195:/home/backup/redmine $MOUNT_POINT

mount_chk=`mount | grep 192.168.xxx.195 | wc -l`
if [ $mount_chk -ge 1 ]; then
    echo "`date \"+%Y%m%d %H:%M:%S\"` INFO: mount check OK." >> $LOG_FILE
else
    echo "`date \"+%Y%m%d %H:%M:%S\"` ERROR: mount check error." >> $LOG_FILE
    echo "" >> $LOG_FILE
    exit 1
fi

# Backup DataBase
/usr/bin/mysqldump -u root db_redmine > $MOUNT_POINT/db_redmine_`date +%Y%m%d`.dbf

# Backup files
cd /opt/
tar -zcf $MOUNT_POINT/redmine-1.3.1_`date +%Y%m%d`.tar.gz redmine-1.3.1
cd -

# 10日以前のバックアップは削除
find $MOUNT_POINT -mtime +10 -iregex ".*\.dbf$\|.*\.gz$" > $BASE_DIR/delete.list
for i in `cat $BASE_DIR/delete.list`
do
    rm -rf $i
    echo "`date \"+%Y%m%d %H:%M:%S\"` INFO: $i is deleted." >> $LOG_FILE
done

# unmount
umount $MOUNT_POINT

echo "`date \"+%Y%m%d %H:%M:%S\"` INFO: Backup of Redmine data has been completed." >> $LOG_FILE
echo "" >> $LOG_FILE

exit 0
[root@redmine ~]#

■動作確認(cron実行させるため直近の時刻を設定)
[root@redmine ~]# grep -i redmine /etc/crontab
# Backup of Redmine
31 13  *  *  * root /opt/bk_redmine/bk_redmine.sh
[root@redmine ~]#

[root@redmine ~]# tail -f /opt/bk_redmine/bk_redmine.sh.log
20120221 13:31:01 INFO: bk_redmine start.
20120221 13:31:01 INFO: mount check OK.
20120221 13:31:04 INFO: /opt/bk_redmine/backup/db_redmine_20120105.dbf is deleted.
20120221 13:31:04 INFO: /opt/bk_redmine/backup/db_redmine_20120107.dbf is deleted.
20120221 13:31:04 INFO: Backup of Redmine data has been completed.


バックアップ先サーバ(バックアップ前)
[root@bksrv02 redmine]# ll
合計 12204
-rw-r--r--  1 root root   770214  1月  5 11:11 db_redmine_20120105.dbf
-rw-r--r--  1 root root   770214  1月  7 11:11 db_redmine_20120107.dbf
-rw-r--r--  1 root root   770214  2月 15 11:11 db_redmine_20120215.dbf
-rw-r--r--  1 root root 10144029  2月 21 10:19 redmine-1.3.1_20120221.tar.gz
[root@bksrv02 redmine]#

バックアップ先サーバ(バックアップ後)
[root@bksrv02 redmine]# ll
合計 11468
-rw-r--r--  1 root root   770214  2月 15 11:11 db_redmine_20120215.dbf
-rw-r--r--  1 root root   786275  2月 21 13:31 db_redmine_20120221.dbf
-rw-r--r--  1 root root 10154630  2月 21 13:31 redmine-1.3.1_20120221.tar.gz
[root@bksrv02 redmine]#

→10日以前のバックアップは削除される。同名のバックアップファイルがあったとしても上書きされる。

2012年2月16日木曜日

CentOS6.2 Redmine1.3.1構築メモ(3)

CentOS6.2にRedmine1.3.1を構築する手順をまとめてみました。
 Step1. パッケージおよびインストーラの準備
 Step2. MySQLの準備
 Step3. Ruby Enterprise Edition インストール
 Step4. Redmine インストール
 Step5. ApacheにPassenger組込み

■構成情報
・OS:        CentOS6.2(64bit)
・MySQL:     5.1.52(OSバンドル)
・Ruby:      1.8.7(Ruby Enterprise Editionを利用)
 ・rack:    1.1.2
 ・rake:    0.9.2
 ・i18n:    0.4.2
・gem:       1.6.2
・Apache:    2.2.15(OSバンドル)
・Passenger: 3.0.11
・Redmine:   1.3.1


Step5. ApacheにPassenger組込み
■Passengerのインストール
[root@redmine ~]# gem install passenger --no-rdoc --no-ri
Fetching: fastthread-1.0.7.gem (100%)
Building native extensions.  This could take a while...
Fetching: daemon_controller-1.0.0.gem (100%)
Fetching: passenger-3.0.11.gem (100%)
Successfully installed fastthread-1.0.7
Successfully installed daemon_controller-1.0.0
Successfully installed passenger-3.0.11
3 gems installed
[root@redmine ~]#


■PassengerのApache用モジュールのインストール
[root@redmine ~]# passenger-install-apache2-module
Welcome to the Phusion Passenger Apache 2 module installer, v3.0.11.

This installer will guide you through the entire installation process. It
shouldn't take more than 3 minutes in total.

Here's what you can expect from the installation process:

 1. The Apache 2 module will be installed for you.
 2. You'll learn how to configure Apache.
 3. You'll learn how to deploy a Ruby on Rails application.

Don't worry if anything goes wrong. This installer will advise you on how to
solve any problems.

Press Enter to continue, or Ctrl-C to abort.


--------------------------------------------

Checking for required software...

 * GNU C++ compiler... found at /usr/bin/g++
 * Curl development headers with SSL support... found
 * OpenSSL development headers... found
 * Zlib development headers... found
 * Ruby development headers... found
 * OpenSSL support for Ruby... found
 * RubyGems... found
 * Rake... found at /usr/local/bin/rake
 * rack... found
 * Apache 2... found at /usr/sbin/httpd
 * Apache 2 development headers... found at /usr/sbin/apxs
 * Apache Portable Runtime (APR) development headers... found at /usr/bin/apr-1-config
 * Apache Portable Runtime Utility (APU) development headers... found at /usr/bin/apu-1-config

--------------------------------------------
Compiling and installing Apache 2 module...
(中略)

--------------------------------------------
The Apache 2 module was successfully installed.

Please edit your Apache configuration file, and add these lines:

   LoadModule passenger_module /usr/local/lib/ruby/gems/1.8/gems/passenger-3.0.11/ext/apache2/mod_passenger.so
   PassengerRoot /usr/local/lib/ruby/gems/1.8/gems/passenger-3.0.11
   PassengerRuby /usr/local/bin/ruby

After you restart Apache, you are ready to deploy any number of Ruby on Rails
applications on Apache, without any further Ruby on Rails-specific
configuration!

Press ENTER to continue.


--------------------------------------------
Deploying a Ruby on Rails application: an example

Suppose you have a Rails application in /somewhere. Add a virtual host to your
Apache configuration file and set its DocumentRoot to /somewhere/public:

   
      ServerName www.yourhost.com
      DocumentRoot /somewhere/public    # <-- be sure to point to 'public'!
      
         AllowOverride all              # <-- relax Apache security settings
         Options -MultiViews            # <-- MultiViews must be turned off


And that's it! You may also want to check the Users Guide for security and
optimization tips, troubleshooting and other useful information:

  /usr/local/lib/ruby/gems/1.8/gems/passenger-3.0.11/doc/Users guide Apache.html

Enjoy Phusion Passenger, a product of Phusion (www.phusion.nl) :-)
http://www.modrails.com/

Phusion Passenger is a trademark of Hongli Lai & Ninh Bui.
[root@redmine ~]#


■Apacheの設定
⇒worker MPMに切り替える
[root@redmine ~]# vi /etc/sysconfig/httpd
[root@redmine ~]# grep httpd.worker /etc/sysconfig/httpd
#HTTPD=/usr/sbin/httpd.worker
HTTPD=/usr/sbin/httpd.worker ←追記

⇒passnger.conf作成
[root@redmine ~]# vi /etc/httpd/conf.d/passnger.conf
[root@redmine ~]# cat /etc/httpd/conf.d/passnger.conf
# output of "passenger-install-apache2-module"
LoadModule passenger_module /usr/local/lib/ruby/gems/1.8/gems/passenger-3.0.11/ext/apache2/mod_passenger.so
PassengerRoot /usr/local/lib/ruby/gems/1.8/gems/passenger-3.0.11
PassengerRuby /usr/local/bin/ruby

# rails settings
RailsBaseURI /redmine

# Passengerが追加するHTTPヘッダを削除するための設定
Header always unset "X-Powered-By"
Header always unset "X-Rack-Cache"
Header always unset "X-Content-Digest"
Header always unset "X-Runtime"

# 必要に応じてPassengerのチューニングのための設定を追加。
PassengerMaxPoolSize 20
PassengerMaxInstancesPerApp 4
PassengerPoolIdleTime 3600
PassengerUseGlobalQueue on
PassengerHighPerformance on
PassengerStatThrottleRate 10
RailsSpawnMethod smart
RailsAppSpawnerIdleTime 86400
RailsFrameworkSpawnerIdleTime 0
[root@redmine ~]#

⇒Apache自動起動設定
[root@redmine ~]# chkconfig httpd on; chkconfig --list httpd
httpd           0:off   1:off   2:on    3:on    4:on    5:on    6:off
[root@redmine ~]#

⇒Redmineディレクトリの所有者変更
[root@redmine ~]# chown -R apache: /opt/redmine-1.3.1

⇒サブディレクトリでRedmineを実行(シンボリックリンク作成)
[root@redmine ~]# ln -s /opt/redmine-1.3.1/public /var/www/html/redmine

⇒/etc/hosts修正
[root@redmine ~]# vi /etc/hosts
[root@redmine ~]# cat /etc/hosts
127.0.0.1   localhost localhost.localdomain localhost4 localhost4.localdomain4
#::1         localhost localhost.localdomain localhost6 localhost6.localdomain6
192.168.xxx.234   redmine.kuitan.net redmine
[root@redmine ~]#


⇒Apacheを起動
[root@redmine ~]# /etc/init.d/httpd configtest
Syntax OK
[root@redmine ~]# /etc/init.d/httpd graceful
httpd not running, trying to start
[root@redmine ~]# /etc/init.d/httpd status
httpd.worker (pid  16808) を実行中...
[root@redmine ~]#


⇒ブラウザからアクセス
http://192.168.xxx.234/redmine
ログイン:admin/admin

★終了ーーー


■作業完了後のディスク使用状況
[root@redmine ~]# df -m
Filesystem           1M-ブロック    使用   使用可 使用% マウント位置
/dev/mapper/vg_redmine-lv_root
                          4607      3666       708  84% /
tmpfs                      751         1       751   1% /dev/shm
/dev/sda1                  485        33       428   7% /boot
[root@redmine ~]#


■初期状態のDBおよび添付ファイルをバックアップ
[root@redmine ~]# mkdir redmine_bk
[root@redmine ~]# mysqldump -u root db_redmine > /root/redmine_bk/db_redmine_initial.dbf
[root@redmine ~]# cd /opt/redmine-1.3.1/files/
[root@redmine files]# tar -zcf /root/redmine_bk/files_initial.tar.gz *
→初期状態ではfilesディレクトリにはdelete.meファイルしかないので実質的には不要。

[root@redmine ~]# ll /root/redmine_bk/
合計 60
-rw-r--r-- 1 root root 55227  2月  8 18:47 2012 db_redmine_initial.dbf
-rw-r--r-- 1 root root   151  2月  8 18:48 2012 files_initial.tar.gz
[root@redmine ~]#

2012年2月15日水曜日

CentOS6.2 Redmine1.3.1構築メモ(2)

CentOS6.2にRedmine1.3.1を構築する手順をまとめてみました。
 Step1. パッケージおよびインストーラの準備
 Step2. MySQLの準備
 Step3. Ruby Enterprise Edition インストール
 Step4. Redmine インストール
 Step5. ApacheにPassenger組込み

■構成情報
・OS:        CentOS6.2(64bit)
・MySQL:     5.1.52(OSバンドル)
・Ruby:      1.8.7(Ruby Enterprise Editionを利用)
 ・rack:    1.1.2
 ・rake:    0.9.2
 ・i18n:    0.4.2
・gem:       1.6.2
・Apache:    2.2.15(OSバンドル)
・Passenger: 3.0.11
・Redmine:   1.3.1


Step3. Ruby Enterprise Edition インストール
■OSバンドルのRuby有無確認
[root@redmine ~]# rpm -qa | grep ruby
[root@redmine ~]#
→既存Rubyは存在しないのでOK!


■プロキシ環境対応
[root@redmine ~]# export HTTP_PROXY=http://tanyao:xxxxxxx@proxy.kuitan.net:8080


■インストール
⇒インストール前確認
[root@redmine ~]# ll /usr/local/
合計 40
drwxr-xr-x. 2 root root 4096  9月 23 20:50 2011 bin
drwxr-xr-x. 2 root root 4096  9月 23 20:50 2011 etc
drwxr-xr-x. 2 root root 4096  9月 23 20:50 2011 games
drwxr-xr-x. 2 root root 4096  9月 23 20:50 2011 include
drwxr-xr-x. 2 root root 4096  9月 23 20:50 2011 lib
drwxr-xr-x. 3 root root 4096  2月  7 02:22 2012 lib64
drwxr-xr-x. 2 root root 4096  9月 23 20:50 2011 libexec
drwxr-xr-x. 2 root root 4096  9月 23 20:50 2011 sbin
drwxr-xr-x. 6 root root 4096  2月  7 02:22 2012 share
drwxr-xr-x. 2 root root 4096  9月 23 20:50 2011 src
[root@redmine ~]#

⇒解凍&インストール
[root@redmine src]# tar -zxf ruby-enterprise-1.8.7-2012.01.tar.gz
[root@redmine src]# cd ruby-enterprise-1.8.7-2012.01
[root@redmine ruby-enterprise-1.8.7-2012.01]# ./installer --dont-install-useful-gems --no-dev-docs
Welcome to the Ruby Enterprise Edition installer
This installer will help you install Ruby Enterprise Edition 1.8.7-2012.01.
Don't worry, none of your system files will be touched if you don't want them
to, so there is no risk that things will screw up.

You can expect this from the installation process:

  1. Ruby Enterprise Edition will be compiled and optimized for speed for this
     system.
  2. Ruby on Rails will be installed for Ruby Enterprise Edition.
  3. You will learn how to tell Phusion Passenger to use Ruby Enterprise
     Edition instead of regular Ruby.

Press Enter to continue, or Ctrl-C to abort.

Checking for required software...

 * Non-broken C compiler... found at /usr/bin/gcc
 * Non-broken C++ compiler... found at /usr/bin/g++
 * The 'make' tool... found at /usr/bin/make
 * The 'patch' tool... found at /usr/bin/patch
 * Zlib development headers... found
 * OpenSSL development headers... found
 * GNU Readline development headers... found
--------------------------------------------
Target directory

Where would you like to install Ruby Enterprise Edition to?
(All Ruby Enterprise Edition files will be put inside that directory.)

[/opt/ruby-enterprise-1.8.7-2012.01] : /usr/local
--------------------------------------------
Compiling and optimizing the memory allocator for Ruby Enterprise Edition
In the mean time, feel free to grab a cup of coffee.
(中略 約2分)

Ruby Enterprise Edition is successfully installed!
If want to use Phusion Passenger (http://www.modrails.com) in combination
with Ruby Enterprise Edition, then you must reinstall Phusion Passenger against
Ruby Enterprise Edition, as follows:

  /usr/local/bin/passenger-install-apache2-module

Make sure you don't forget to paste the Apache configuration directives that
the installer gives you.


If you ever want to uninstall Ruby Enterprise Edition, simply remove this
directory:

  /usr/local

If you have any questions, feel free to visit our website:

  http://www.rubyenterpriseedition.com

Enjoy Ruby Enterprise Edition, a product of Phusion (www.phusion.nl) :-)
[root@redmine ruby-enterprise-1.8.7-2012.01]#

⇒インストール後
[root@redmine ~]# ll /usr/local/
合計 40
drwxr-xr-x. 2 root root 4096  2月  8 11:38 2012 bin
drwxr-xr-x. 2 root root 4096  9月 23 20:50 2011 etc
drwxr-xr-x. 2 root root 4096  9月 23 20:50 2011 games
drwxr-xr-x. 2 root root 4096  9月 23 20:50 2011 include
drwxr-xr-x. 3 root root 4096  2月  8 11:38 2012 lib
drwxr-xr-x. 3 root root 4096  2月  7 02:22 2012 lib64
drwxr-xr-x. 2 root root 4096  9月 23 20:50 2011 libexec
drwxr-xr-x. 2 root root 4096  9月 23 20:50 2011 sbin
drwxr-xr-x. 6 root root 4096  2月  7 02:22 2012 share
drwxr-xr-x. 2 root root 4096  9月 23 20:50 2011 src
[root@redmine ~]#

⇒バージョン確認
[root@redmine ~]# ruby -v
ruby 1.8.7 (2011-12-28 MBARI 8/0x6770 on patchlevel 357) [x86_64-linux], MBARI 0x6770, Ruby Enterprise Edition 2012.01


■gemパッケージのインストール
⇒Rack 1.1.2のインストール
[root@redmine ~]# gem install rack -v=1.1.2 --no-rdoc --no-ri
Fetching: rack-1.1.2.gem (100%)
Successfully installed rack-1.1.2
1 gem installed

⇒rake 0.9.2のインストール
[root@redmine ~]# gem install rake -v=0.9.2 --no-rdoc --no-ri
Fetching: rake-0.9.2.gem (100%)
Successfully installed rake-0.9.2
1 gem installed

⇒i18n 0.4.2のインストール
[root@redmine ~]# gem install i18n -v=0.4.2 --no-rdoc --no-ri
Fetching: i18n-0.4.2.gem (100%)
Successfully installed i18n-0.4.2
1 gem installed

⇒RMagickのインストール
[root@redmine ~]# gem install rmagick --no-rdoc --no-ri
Fetching: rmagick-2.13.1.gem (100%)
Building native extensions.  This could take a while...
Successfully installed rmagick-2.13.1
1 gem installed

⇒RDocのインストール
[root@redmine ~]# gem install rdoc --no-ri --no-rdoc
Fetching: json-1.6.5.gem (100%)
Building native extensions.  This could take a while...
Fetching: rdoc-3.12.gem (100%)
Depending on your version of ruby, you may need to install ruby rdoc/ri data:

<= 1.8.6 : unsupported
 = 1.8.7 : gem install rdoc-data; rdoc-data --install
 = 1.9.1 : gem install rdoc-data; rdoc-data --install
>= 1.9.2 : nothing to do! Yay!
Successfully installed json-1.6.5
Successfully installed rdoc-3.12
2 gems installed

⇒Ruby用MySQLドライバのインストール
[root@redmine ~]# gem install mysql --no-rdoc --no-ri
Fetching: mysql-2.8.1.gem (100%)
Building native extensions.  This could take a while...
Successfully installed mysql-2.8.1
1 gem installed

⇒確認
[root@redmine ~]# gem list

*** LOCAL GEMS ***

i18n (0.4.2)
json (1.6.5)
mysql (2.8.1)
rack (1.1.2)
rake (0.9.2)
rdoc (3.12)
rmagick (2.13.1)
[root@redmine ~]#


Step4. Redmine インストール
■インストール(解凍するだけ)
⇒/optに解凍
[root@redmine src]# tar -zxf redmine-1.3.1.tar.gz -C /opt/


■Redmine関連ファイル設定
⇒database.yml作成
[root@redmine src]# cd /opt/redmine-1.3.1/
[root@redmine redmine-1.3.1]# vi config/database.yml
[root@redmine redmine-1.3.1]# cat config/database.yml
production:
  adapter: mysql
  database: db_redmine
  host: localhost
  username: user_redmine
  password: ienaiyo
  encoding: utf8
[root@redmine redmine-1.3.1]#

⇒configuration.ymlの設定
[root@redmine redmine-1.3.1]# cp config/configuration.yml.example config/configuration.yml
[root@redmine redmine-1.3.1]# vi config/configuration.yml
[root@redmine redmine-1.3.1]# tail -11 config/configuration.yml
production:
  email_delivery:
    delivery_method: :smtp
    smtp_settings:
      address: "localhost"
      port: 25
      domain: 'kuitan.net'

# specific configuration options for development environment
# that overrides the default ones
development:
[root@redmine redmine-1.3.1]#

⇒Redmineの初期設定とデータベースのテーブル作成
[root@redmine redmine-1.3.1]# rake generate_session_store
NOTE: Gem.source_index is deprecated, use Specification. It will be removed on or after 2011-11-01.
Gem.source_index called from /opt/redmine-1.3.1/config/../vendor/rails/railties/lib/rails/gem_dependency.rb:21.
NOTE: Gem::SourceIndex#initialize is deprecated with no replacement. It will be removed on or after 2011-11-01.
Gem::SourceIndex#initialize called from /opt/redmine-1.3.1/config/../vendor/rails/railties/lib/rails/vendor_gem_source_index.rb:100.
NOTE: Gem::SourceIndex#add_spec is deprecated, use Specification.add_spec. It will be removed on or after 2011-11-01.
Gem::SourceIndex#add_spec called from /usr/local/lib/ruby/site_ruby/1.8/rubygems/source_index.rb:91.
(中略)
[root@redmine redmine-1.3.1]#

[root@redmine redmine-1.3.1]# rake db:migrate RAILS_ENV=production
NOTE: Gem.source_index is deprecated, use Specification. It will be removed on or after 2011-11-01.
Gem.source_index called from /opt/redmine-1.3.1/config/../vendor/rails/railties/lib/rails/gem_dependency.rb:21.
NOTE: Gem::SourceIndex#initialize is deprecated with no replacement. It will be removed on or after 2011-11-01.
Gem::SourceIndex#initialize called from /opt/redmine-1.3.1/config/../vendor/rails/railties/lib/rails/vendor_gem_source_index.rb:100.
NOTE: Gem::SourceIndex#add_spec is deprecated, use Specification.add_spec. It will be removed on or after 2011-11-01.
Gem::SourceIndex#add_spec called from /usr/local/lib/ruby/site_ruby/1.8/rubygems/source_index.rb:91.
(中略)
Missing these required gems:
  rubytree  >= 0

You're running:
  ruby 1.8.7.357 at /usr/local/bin/ruby
  rubygems 1.8.15 at /usr/local/lib/ruby/gems/1.8, /root/.gem/ruby/1.8

Run `rake gems:install` to install the missing gems.
[root@redmine redmine-1.3.1]#

[root@redmine redmine-1.3.1]# gem -v
1.8.15
→gemのバージョンが高すぎることが問題のようだ。

⇒gemのバージョンを1.7.1にダウングレード
[root@redmine ~]# gem update --system 1.7.1
Updating rubygems-update
Fetching: rubygems-update-1.7.1.gem (100%)
Successfully installed rubygems-update-1.7.1
Installing RubyGems 1.7.1
RubyGems 1.7.1 installed

=== 1.7.1 / 2011-03-32

* 1 bug fix:
  * Fixed missing file in Manifest.txt.  (Also a bug in hoe was fixed where
    `rake check_manifest` showing a diff would not exit with an error.)


-----------------------------------------------------------------

RubyGems installed the following executables:
        /usr/local/bin/gem

RubyGems system software updated
[root@redmine ~]# gem -v
1.7.1
[root@redmine ~]#

[root@redmine redmine-1.3.1]# rake generate_session_store
NOTE: SourceIndex.new(hash) is deprecated; From /opt/redmine-1.3.1/config/../vendor/rails/railties/lib/rails/vendor_gem_source_index.rb:100:in `new'.
[root@redmine redmine-1.3.1]#
1.7.1でも無理(T-T) 残念…。

⇒1.6.2で再々チャレンジ。
[root@redmine ~]# gem update --system 1.6.2
Updating rubygems-update
Fetching: rubygems-update-1.6.2.gem (100%)
Successfully installed rubygems-update-1.6.2
Installing RubyGems 1.6.2
RubyGems 1.6.2 installed

=== 1.6.2 / 2011-03-08

Bug Fixes:

* require of an activated gem could cause activation conflicts.  Fixes
  Bug #29056 by Dave Verwer.
* `gem outdated` now works with up-to-date prerelease gems.


-----------------------------------------------------------------

RubyGems installed the following executables:
        /usr/local/bin/gem

RubyGems system software updated
[root@redmine ~]# gem -v
1.6.2
[root@redmine ~]#

[root@redmine ~]# rake generate_session_store
[root@redmine ~]#
→成功したっ!!

[root@redmine redmine-1.3.1]# rake db:migrate RAILS_ENV=production
==  Setup: migrating =====================================================
-- create_table("attachments", {:force=>true})
   -> 0.0841s
-- create_table("auth_sources", {:force=>true})
(中略)

-- add_index(:changeset_parents, [:parent_id], {:name=>:changeset_parents_parent_ids, :unique=>false})
   -> 0.1499s
==  CreateChangesetParents: migrated (0.3711s) ===========================

[root@redmine redmine-1.3.1]#
→スキーマ作成完了。

2012年2月14日火曜日

CentOS6.2 Redmine1.3.1構築メモ(1)

CentOS6.2にRedmine1.3.1を構築する手順をまとめてみました。
 Step1. パッケージおよびインストーラの準備
 Step2. MySQLの準備
 Step3. Ruby Enterprise Edition インストール
 Step4. Redmine インストール
 Step5. ApacheにPassenger組込み

■構成情報
・OS:        CentOS6.2(64bit)
・MySQL:     5.1.52(OSバンドル)
・Ruby:      1.8.7(Ruby Enterprise Editionを利用)
 ・rack:    1.1.2
 ・rake:    0.9.2
 ・i18n:    0.4.2
・gem:       1.6.2
・Apache:    2.2.15(OSバンドル)
・Passenger: 3.0.11
・Redmine:   1.3.1


Step1. パッケージおよびインストーラの準備
■Firewall、SELinuxを無効化
[root@redmine ~]# chkconfig iptables off
[root@redmine ~]# chkconfig ip6tables off
[root@redmine ~]# vi /etc/sysconfig/selinux
SELINUX=enforcing
↓ # 変更
SELINUX=disabled

⇒再起動後に確認
[root@redmine ~]# getenforce
Disabled


■作業前ディスク使用状況確認
[root@redmine ~]# df -m
Filesystem           1M-ブロック    使用   使用可 使用% マウント位置
/dev/mapper/vg_redmine-lv_root
                          4607      3253      1120  75% /
tmpfs                      751         1       751   1% /dev/shm
/dev/sda1                  485        33       428   7% /boot
/dev/sr0                  4219      4219         0 100% /media/CentOS_6.2_Final


■インストールメディアからパッケージインストール設定(基本的にはこちらから)
[root@redmine ~]# vi /etc/yum.repos.d/dvdmedia.repo
[root@redmine ~]# cat /etc/yum.repos.d/dvdmedia.repo
[dvdmedia]
name=CentOS-6.2-x86_64-DVD1
baseurl=file:///media/CentOS_6.2_Final/
enabled=0
gpgcheck=1
gpgkey=file:///media/CentOS_6.2_Final/RPM-GPG-KEY-CentOS-6
[root@redmine ~]#


■yumのproxy越え設定(インストールメディアにない場合は最新バージョンを採用)
[root@redmine ~]# vi /etc/yum.conf
[root@redmine ~]# tail -5 /etc/yum.conf
# PUT YOUR REPOS HERE OR IN separate files named file.repo
# in /etc/yum.repos.d

# Add Proxy
proxy=http://tanyao:xxxxxxxx@proxy.kuitan.net:8080/
[root@redmine ~]#
⇒最下行に上記2行を追記


■関連パッケージの確認
[root@redmine ~]# rpm -q openssl-devel readline-devel zlib-devel curl-devel
パッケージ openssl-devel はインストールされていません。
パッケージ readline-devel はインストールされていません。
パッケージ zlib-devel はインストールされていません。
パッケージ curl-devel はインストールされていません。
[root@redmine ~]# rpm -q mysql mysql-server mysql-devel
mysql-5.1.52-1.el6_0.1.x86_64
mysql-server-5.1.52-1.el6_0.1.x86_64
パッケージ mysql-devel はインストールされていません。
[root@redmine ~]# rpm -q httpd httpd-devel
httpd-2.2.15-15.el6.centos.x86_64
パッケージ httpd-devel はインストールされていません。
[root@redmine ~]# rpm -q ImageMagick ImageMagick-devel
パッケージ ImageMagick はインストールされていません。
パッケージ ImageMagick-devel はインストールされていません。
[root@redmine ~]#

⇒念のため開発ツール関係のパッケージも
[root@redmine ~]# yum --disablerepo=\* --enablerepo=dvdmedia groupinstall "Development Tools"
Loaded plugins: fastestmirror, refresh-packagekit, security
Loading mirror speeds from cached hostfile
dvdmedia                                                     | 4.0 kB     00:00 ...
dvdmedia/primary_db                                          | 4.5 MB     00:00 ...
(中略)

No packages in any requested group available to install or update
[root@redmine ~]#


■関連パッケージのインストール
⇒openssl-devel
[root@redmine ~]# yum --disablerepo=\* --enablerepo=dvdmedia install openssl-devel
(中略)
Installed:
  openssl-devel.x86_64 0:1.0.0-20.el6

Dependency Installed:
  keyutils-libs-devel.x86_64 0:1.4-3.el6         krb5-devel.x86_64 0:1.9-22.el6
  libcom_err-devel.x86_64 0:1.41.12-11.el6       libselinux-devel.x86_64 0:2.0.94-5.2.el6
  libsepol-devel.x86_64 0:2.0.41-4.el6           zlib-devel.x86_64 0:1.2.3-27.el6

Complete!
[root@redmine ~]#
→zlib-develも同時にインストールされた。

⇒readline-devel
[root@redmine ~]# yum --disablerepo=\* --enablerepo=dvdmedia install readline-devel
(中略)
Installed:
  readline-devel.x86_64 0:6.0-3.el6

Dependency Installed:
  ncurses-devel.x86_64 0:5.7-3.20090208.el6

Complete!
[root@redmine ~]#

⇒curl-devel
[root@redmine ~]# yum --disablerepo=\* --enablerepo=dvdmedia install curl-devel
(中略)
Installed:
  libcurl-devel.x86_64 0:7.19.7-26.el6_1.2

Dependency Installed:
  libidn-devel.x86_64 0:1.18-2.el6

Complete!
[root@redmine ~]#

⇒mysql-devel
[root@redmine ~]# yum --disablerepo=\* --enablerepo=dvdmedia install mysql-devel
(中略)
Installed:
  mysql-devel.x86_64 0:5.1.52-1.el6_0.1

Complete!
[root@redmine ~]#

⇒httpd-devel
[root@redmine ~]# yum --disablerepo=\* --enablerepo=dvdmedia install httpd-devel
(中略)
Installed:
  httpd-devel.x86_64 0:2.2.15-15.el6.centos

Dependency Installed:
  apr-devel.x86_64 0:1.3.9-3.el6_1.2    apr-util-devel.x86_64 0:1.3.9-3.el6_0.1 cyrus-sasl-devel.x86_64 0:2.1.23-13.el6
  db4-cxx.x86_64 0:4.7.25-16.el6        db4-devel.x86_64 0:4.7.25-16.el6        expat-devel.x86_64 0:2.0.1-9.1.el6
  openldap-devel.x86_64 0:2.4.23-20.el6

Complete!
[root@redmine ~]#

⇒ImageMagick
[root@redmine ~]# yum --disablerepo=\* --enablerepo=dvdmedia install ImageMagick
(中略)
Installed:
  ImageMagick.x86_64 0:6.5.4.7-5.el6

Dependency Installed:
  libwmf-lite.x86_64 0:0.2.8.4-22.el6.centos

Complete!
[root@redmine ~]#

⇒ImageMagick-devel(依存パッケージがインストールメディアに全部は無い)
[root@redmine ~]# yum install ImageMagick-devel
(中略)

Installed:
  ImageMagick-devel.x86_64 0:6.5.4.7-5.el6

Dependency Installed:
  bzip2-devel.x86_64 0:1.0.5-7.el6_0                  freetype-devel.x86_64 0:2.3.11-6.el6_1.8
  ghostscript-devel.x86_64 0:8.70-11.el6_1.2          jasper-devel.x86_64 0:1.900.1-15.el6_1.1
  lcms-devel.x86_64 0:1.19-1.el6                      libICE-devel.x86_64 0:1.0.6-1.el6
  libSM-devel.x86_64 0:1.1.0-7.1.el6                  libX11-devel.x86_64 0:1.3-2.el6
  libXau-devel.x86_64 0:1.0.5-1.el6                   libXdmcp-devel.x86_64 0:1.0.3-1.el6
  libXext-devel.x86_64 0:1.1-3.el6                    libXt-devel.x86_64 0:1.0.7-1.el6
  libjpeg-devel.x86_64 0:6b-46.el6                    libtiff-devel.x86_64 0:3.9.4-1.el6_0.3
  libxcb-devel.x86_64 0:1.5-1.el6                     xorg-x11-proto-devel.noarch 0:7.6-13.el6

Dependency Updated:
  freetype.x86_64 0:2.3.11-6.el6_1.8                  jasper-libs.x86_64 0:1.900.1-15.el6_1.1

Complete!
[root@redmine ~]#


■インストーラダウンロード
⇒Ruby Enterprise Edition
サイト: http://www.rubyenterpriseedition.com/download.html
ファイル: ruby-enterprise-1.8.7-2012.01.tar.gz(約7.5MB)

⇒Redmine1.3
サイト: http://rubyforge.org/frs/?group_id=1850
ファイル: redmine-1.3.1.tar.gz(約5.7MB)

⇒インストーラ格納用ディレクトリを作成しFTP等でサーバにUP
[root@redmine ~]# mkdir /root/src
[root@redmine ~]# ll /root/src/
合計 13632
-rwxr--r-- 1 root root 6034718  2月  7 18:41 2012 redmine-1.3.1.tar.gz
-rwxr--r-- 1 root root 7918155  2月  7 18:41 2012 ruby-enterprise-1.8.7-2012.01.tar.gz
[root@redmine ~]#


Step2. MySQLの準備
■データベース初期化
[root@redmine ~]# /etc/init.d/mysqld start
MySQL データベースを初期化中:  WARNING: The host 'redmine' could not be looked up with resolveip.
This probably means that your libc libraries are not 100 % compatible
(中略)

Please report any problems with the /usr/bin/mysqlbug script!

                                                           [  OK  ]
mysqld を起動中:                                           [  OK  ]
[root@redmine ~]#
[root@redmine ~]# mysqlshow
+--------------------+
|     Databases      |
+--------------------+
| information_schema |
| mysql              |
| test               |
+--------------------+
[root@redmine ~]#


■自動起動設定
[root@redmine ~]# chkconfig mysqld on
[root@redmine ~]# chkconfig --list mysqld
mysqld          0:off   1:off   2:on    3:on    4:on    5:on    6:off
[root@redmine ~]#


■MySQLのデフォルトキャラクタセットをutf8に設定
[root@redmine ~]# cp -p /etc/my.cnf /etc/my.cnf.20110625
[root@redmine ~]# vi /etc/my.cnf
[root@redmine ~]# cat /etc/my.cnf
[mysqld]
datadir=/var/lib/mysql
socket=/var/lib/mysql/mysql.sock
user=mysql
# Disabling symbolic-links is recommended to prevent assorted security risks
symbolic-links=0

# for redmine        ←追記
character-set-server=utf8 ←追記

[mysqld_safe]
log-error=/var/log/mysqld.log
pid-file=/var/run/mysqld/mysqld.pid

# for redmine         ←追記
[mysql]            ←追記
default-character-set=utf8 ←追記
[root@redmine ~]#

⇒再起動して設定反映
[root@redmine ~]# /etc/init.d/mysqld restart
mysqld を停止中:                                           [  OK  ]
mysqld を起動中:                                           [  OK  ]

⇒キャラクタセット設定確認
[root@redmine ~]# mysql -u root -e "show variables like 'character_set%';"
+--------------------------+----------------------------+
| Variable_name            | Value                      |
+--------------------------+----------------------------+
| character_set_client     | utf8                       |
| character_set_connection | utf8                       |
| character_set_database   | utf8                       |
| character_set_filesystem | binary                     |
| character_set_results    | utf8                       |
| character_set_server     | utf8                       |
| character_set_system     | utf8                       |
| character_sets_dir       | /usr/share/mysql/charsets/ |
+--------------------------+----------------------------+
[root@redmine ~]#


■Redmine用データベース準備
⇒匿名ユーザー削除
[root@redmine ~]# mysql -u root

mysql> use mysql
Database changed
mysql> delete from user where user = '';
Query OK, 2 rows affected (0.00 sec)

mysql>  flush privileges;
Query OK, 0 rows affected (0.00 sec)

⇒Redmine用データベースとユーザーの作成
mysql> create database db_redmine default character set utf8;
Query OK, 1 row affected (0.00 sec)

mysql> grant all on db_redmine.* to user_redmine identified by 'ienaiyo';
Query OK, 0 rows affected (0.00 sec)

mysql> flush privileges;
Query OK, 0 rows affected (0.01 sec)

mysql> quit
Bye
[root@redmine ~]#