2014年8月10日日曜日

AWS上のLinuxにリモートデスクトップ接続

xrdpを利用してAWS上のLinuxサーバにリモートデスクトップ接続する手順をまとめます。
接続元PCはWindows7を利用しました。標準のリモートデスクトップ接続クライアントで接続できるため
とても便利ですが、ベースがVNCのため微妙に描画が遅く感じられることは否めません。
今回利用したAMIのLinuxのデフォルト言語は英語ですが、日本語化する手順も記載します。

OS: RHEL 6.5 (64-bit)
xrdp: 0.5.0
リモートデスクトップ接続クライアント: 6.3.9600


■EC2準備
Quick Startにある下記のAMIからEC2を作成しました。
Red Hat Enterprise Linux 6.5 (PV) - ami-e9aee0e8 (64-bit) / ami-cfbff1ce (32-bit)


■初期ログイン&rootパスワード変更
Using username "ec2-user".
Authenticating with public key "imported-openssh-key"
[ec2-user@ip-10-86-30-138 ~]$ cat /etc/redhat-release
Red Hat Enterprise Linux Server release 6.5 (Santiago)
[ec2-user@ip-10-86-30-138 ~]$ sudo passwd
Changing password for user root.
New password:
BAD PASSWORD: it is based on a dictionary word
Retype new password:
passwd: all authentication tokens updated successfully.
[ec2-user@ip-10-86-30-138 ~]$
## ec2-userのパスワードも設定
[root@ip-10-86-30-138 ~]# passwd ec2-user


■SELinux/iptables無効化
[ec2-user@ip-10-86-30-138 ~]$ su -
Password:
[root@ip-10-86-30-138 ~]# vi /etc/selinux/config
[root@ip-10-86-30-138 ~]# grep disabled /etc/selinux/config
#     disabled - No SELinux policy is loaded.
SELINUX=disabled
[root@ip-10-86-30-138 ~]# chkconfig iptables off; chkconfig --list iptables
iptables        0:off   1:off   2:off   3:off   4:off   5:off   6:off
[root@ip-10-86-30-138 ~]# chkconfig ip6tables off; chkconfig --list ip6tables
ip6tables       0:off   1:off   2:off   3:off   4:off   5:off   6:off
[root@ip-10-86-30-138 ~]#
AWS上のEC2へのアクセス制御はとりあえずSecurityGroupで。


■TimeZoneとHostName変更
ここの手順は省略可です。後々の運用を考慮して設定しておきます。
[root@ip-10-86-30-138 ~]# date; cp /usr/share/zoneinfo/Asia/Tokyo /etc/localtime; date
Sun Aug 10 00:15:37 EDT 2014
cp: overwrite `/etc/localtime'? y
Sun Aug 10 13:15:39 JST 2014
[root@ip-10-86-30-138 ~]#
[root@ip-10-86-30-138 ~]# vi /etc/sysconfig/network
[root@ip-10-86-30-138 ~]# grep HOSTNAME /etc/sysconfig/network
# HOSTNAME=ip-10-86-30-138.localdomain
HOSTNAME=rhel65-rdp
[root@ip-10-86-30-138 ~]# reboot


■GnomeGUIインストール
[root@rhel65-rdp ~]# yum groupinstall "X Window System" "GNOME Desktop Environment" "Desktop"
(中略)
Install     273 Package(s)
Upgrade       6 Package(s)
(以下省略)


■vncserverのインストールと起動準備
xrdpはVNCを利用しているようなので。

## VNCインストール
[root@rhel65-rdp ~]# yum install tigervnc-server
(中略)
===============================================================================
 Package           Arch   Version       Repository                        Size
===============================================================================
Installing:
 tigervnc-server   x86_64 1.1.0-8.el6_5 rhui-REGION-rhel-server-releases 1.1 M
Installing for dependencies:
 xorg-x11-fonts-misc
                   noarch 7.2-9.1.el6   rhui-REGION-rhel-server-releases 5.8 M

Transaction Summary
===============================================================================
Install       2 Package(s)
(以下省略)
## VNCサーバ設定
[root@rhel65-rdp ~]# vi /etc/sysconfig/vncservers
[root@rhel65-rdp ~]# tail -3 /etc/sysconfig/vncservers
VNCSERVERS="1:ec2-user 2:root"
VNCSERVERARGS[1]="-geometry 1024x768"
VNCSERVERARGS[2]="-geometry 1024x768"
[root@rhel65-rdp ~]# chkconfig vncserver on; chkconfig --list vncserver
vncserver       0:off   1:off   2:on    3:on    4:on    5:on    6:off
[root@rhel65-rdp ~]#
## VNC接続ユーザパスワード設定
[root@rhel65-rdp ~]# vncpasswd
Password:
Verify:
[root@rhel65-rdp ~]# su - ec2-user
[ec2-user@rhel65-rdp ~]$ vncpasswd
Password:
Verify:
[ec2-user@rhel65-rdp ~]$
## VNCサーバ起動
[root@rhel65-rdp ~]# /etc/init.d/vncserver start
Starting VNC server: 1:ec2-user xauth:  creating new authority file /home/ec2-user/.Xauthority
xauth: (stdin):1:  bad display name "rhel65-rdp:1" in "add" command

New 'rhel65-rdp:1 (ec2-user)' desktop is rhel65-rdp:1

Creating default startup script /home/ec2-user/.vnc/xstartup
Starting applications specified in /home/ec2-user/.vnc/xstartup
Log file is /home/ec2-user/.vnc/rhel65-rdp:1.log

2:root xauth:  creating new authority file /root/.Xauthority
xauth: (stdin):1:  bad display name "rhel65-rdp:2" in "add" command

New 'rhel65-rdp:2 (root)' desktop is rhel65-rdp:2

Creating default startup script /root/.vnc/xstartup
Starting applications specified in /root/.vnc/xstartup
Log file is /root/.vnc/rhel65-rdp:2.log

                                                           [  OK  ]
[root@rhel65-rdp ~]#


■EPELリポジトリのインストール
[root@rhel65-rdp ~]# rpm -ivh http://ftp.riken.jp/Linux/fedora/epel/6/x86_64/epel-release-6-8.noarch.rpm
Retrieving http://ftp.riken.jp/Linux/fedora/epel/6/x86_64/epel-release-6-8.noarch.rpm
warning: /var/tmp/rpm-tmp.D24qpa: Header V3 RSA/SHA256 Signature, key ID 0608b895: NOKEY
Preparing...                ########################################### [100%]
   1:epel-release           ########################################### [100%]
[root@rhel65-rdp ~]#
## yum実行時にEPELリポジトリをデフォルト参照しない設定
[root@rhel65-rdp ~]# sed -i 's/enabled=1/enabled=0/g' /etc/yum.repos.d/epel.repo


■xrdpのインストール
[root@rhel65-rdp ~]# yum --enablerepo=epel install xrdp
(中略)
================================================================================
 Package        Arch             Version                   Repository      Size
================================================================================
Installing:
 xrdp           x86_64           0.5.0-0.13.el6            epel           240 k

Transaction Summary
================================================================================
Install       1 Package(s)
(以下省略)
[root@rhel65-rdp ~]# chkconfig xrdp on; chkconfig --list xrdp
xrdp            0:off   1:off   2:on    3:on    4:on    5:on    6:off
[root@rhel65-rdp ~]#


■日本語キーボード対応
km-e0010411.iniをダウンロードしてシンボリックリンクを作成。
[root@rhel65-rdp ~]# cd /etc/xrdp/
[root@rhel65-rdp xrdp]# wget http://www.mail-archive.com/xrdp-devel@lists.sourceforge.net/msg00263/km-e0010411.ini
[root@rhel65-rdp xrdp]# mv km-e0010411.ini km-0411.ini
[root@rhel65-rdp xrdp]# ln -s km-0411.ini  km-e0010411.ini
[root@rhel65-rdp xrdp]# ln -s km-0411.ini  km-e0200411.ini
[root@rhel65-rdp xrdp]# ln -s km-0411.ini  km-e0210411.ini
[root@rhel65-rdp xrdp]#


■xrdp起動
[root@rhel65-rdp xrdp]# /etc/init.d/xrdp start
Starting xrdp:                                             [  OK  ]
Starting xrdp-sesman:                                      [  OK  ]
[root@rhel65-rdp xrdp]#


■リモートデスクトップ接続
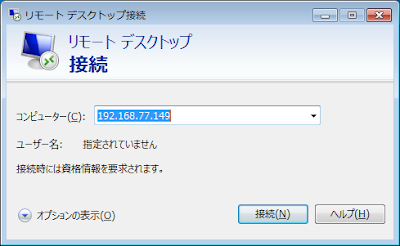
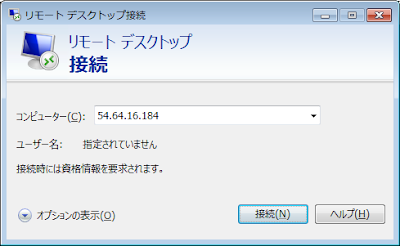
事前にSecurity GroupでPort 3389を開放しておきます。
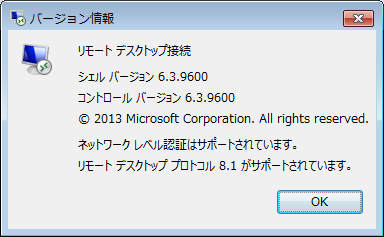
Windows7のRDPクライアントから接続します。バージョンは、6.3.9600です。

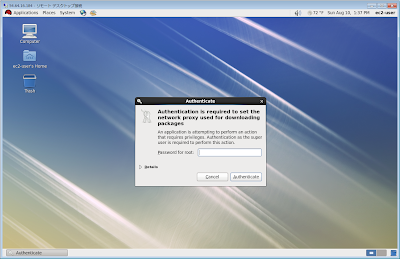
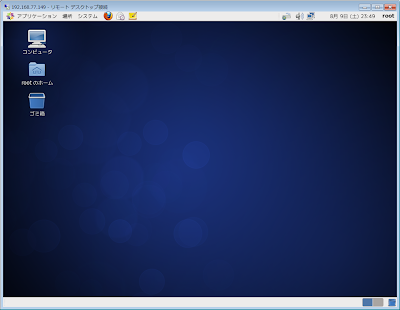
AWS上のLinuxにリモートデスクトップで接続できました。


■GUIを日本語化
せっかくなのでGUIを日本語化してみます。

## 日本語化に必要なパッケージインストール
[root@rhel65-rdp ~]# yum groupinstall "Japanese Support"
(中略)
==================================================================================
 Package            Arch   Version         Repository                        Size
==================================================================================
Installing:
 Red_Hat_Enterprise_Linux-Release_Notes-6-ja-JP
                    noarch 5-1.el6         rhui-REGION-rhel-server-releases  98 k
 ibus-anthy         x86_64 1.2.1-3.el6     rhui-REGION-rhel-server-releases 133 k
 ipa-gothic-fonts   noarch 003.02-4.2.el6  rhui-REGION-rhel-server-releases 3.6 M
 ipa-mincho-fonts   noarch 003.02-3.1.el6  rhui-REGION-rhel-server-releases 5.0 M
 ipa-pgothic-fonts  noarch 003.02-4.1.el6  rhui-REGION-rhel-server-releases 3.6 M
 ipa-pmincho-fonts  noarch 003.02-3.1.el6  rhui-REGION-rhel-server-releases 5.0 M
 man-pages-ja       noarch 20100115-6.el6  rhui-REGION-rhel-server-releases 5.5 M
 vlgothic-fonts     noarch 20091202-2.el6  rhui-REGION-rhel-server-releases 2.2 M
 vlgothic-p-fonts   noarch 20091202-2.el6  rhui-REGION-rhel-server-releases 2.2 M
Installing for dependencies:
 anthy              x86_64 9100h-10.1.el6  rhui-REGION-rhel-server-releases 6.0 M
 ibus               x86_64 1.3.4-6.el6     rhui-REGION-rhel-server-releases 337 k
 ibus-gtk           x86_64 1.3.4-6.el6     rhui-REGION-rhel-server-releases  26 k
 ibus-libs          x86_64 1.3.4-6.el6     rhui-REGION-rhel-server-releases  99 k
 im-chooser         x86_64 1.3.1-3.el6     rhui-REGION-rhel-server-releases 144 k
 imsettings         x86_64 0.108.0-3.6.el6 rhui-REGION-rhel-server-releases 190 k
 imsettings-libs    x86_64 0.108.0-3.6.el6 rhui-REGION-rhel-server-releases 103 k
 kasumi             x86_64 2.5-1.1.el6     rhui-REGION-rhel-server-releases  71 k
 libgxim            x86_64 0.3.3-3.1.el6   rhui-REGION-rhel-server-releases 126 k
 notify-python      x86_64 0.1.1-10.el6    rhui-REGION-rhel-server-releases  26 k
 pyxdg              noarch 0.18-1.el6      rhui-REGION-rhel-server-releases  79 k
 vlgothic-fonts-common
                    noarch 20091202-2.el6  rhui-REGION-rhel-server-releases  16 k

Transaction Summary
==================================================================================
Install      21 Package(s)
(以下省略)
## OSの言語を日本語を設定し再起動
[root@rhel65-rdp ~]# vi /etc/sysconfig/i18n
[root@rhel65-rdp ~]# cp -p /etc/sysconfig/i18n /etc/sysconfig/i18n.org
[root@rhel65-rdp ~]# vi /etc/sysconfig/i18n
[root@rhel65-rdp ~]# cat /etc/sysconfig/i18n
LANG="ja_JP.UTF-8"
SYSFONT="latarcyrheb-sun16"
[root@rhel65-rdp ~]# vi .bash_profile
[root@rhel65-rdp ~]# tail -1 .bash_profile
export LANG=ja_JP.UTF-8
[root@rhel65-rdp ~]#
[root@rhel65-rdp ~]# reboot
## 再びリモートデスクトップ接続

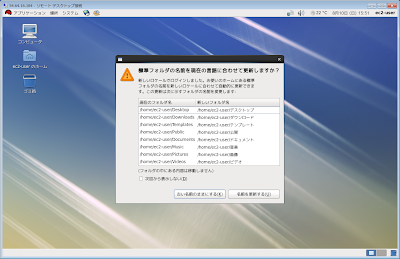
日本語GUI画面が表示されました。


こちらの情報が何かのお役に立てましたら幸いです。サイト継続ご協力のほどお願い致します。m(_ _)m

2014年8月9日土曜日

Linux用RDPクライアント(rdesktop)のインストール

Linux用のリモートデスクトップ接続クライアントとしてrdesktopをインストールする手順をまとめます。
前回Windows7 → CentOS6.5へリモートデスクトップ接続する手順をまとめましたが、今回はその環境を利用してさらに、Windows7 → CentOS6.5 → WindowsVista にリモートデスクトップ接続する検証を行いました。

OS: CentOS 6.5 (64-bit)
rdesktop: 1.7.1


■Linux用RDPクライアント(rdesktop)のインストール
[root@centos65 ~]# yum install rdesktop
(中略)
========================================================================
 Package                Arch       Version             Repository  Size
========================================================================
Installing:
 rdesktop               x86_64     1.7.1-1.el6         base       162 k
Installing for dependencies:
 ctapi-common           x86_64     1.1-6.1.el6         base       6.3 k
 openct                 x86_64     0.6.19-4.el6        base       207 k
 pcsc-lite              x86_64     1.5.2-13.el6_4      base       130 k
 pcsc-lite-libs         x86_64     1.5.2-13.el6_4      base        28 k
 pcsc-lite-openct       x86_64     0.6.19-4.el6        base        14 k

Transaction Summary
========================================================================
Install       6 Package(s)
(以下省略)


■LinuxからWindowsへリモートデスクトップ接続
CentOSのGnome画面上で端末を開き下記コマンドを実行。
[root@centos65 ~]# rdesktop -g 800x600 -a 32 -k ja 192.168.77.6 -u administrator -p xxxxxxxx
## オプションの説明
-g: 画面の解像度
-a: 色深度(bit)
-k: キーボード配列、jaは日本語を指定
-u: Windowsアカウント名
-p: Windowsパスワード

接続成功!!


こちらの情報が何かのお役に立てましたら幸いです。サイト継続ご協力のほどお願い致します。m(_ _)m

2014年8月8日金曜日

CentOS 6 xrdp を利用したリモートデスクトップ接続

xrdpを利用するとWindows端末からLinuxサーバへリモートデスクトップ接続が可能となります。
もちろんLinuxサーバ側にはGUIの準備が必要ですが、Windows端末側ではVNCクライアントが
不要で標準のリモートデスクトップクライアントで接続できるため大変便利です。

OS: CentOS 6.5 (64-bit)
xrdp: 0.5.0


■前提
SELinux、iptablesはあらかじめ無効化しておく。
[root@centos65 ~]# vi /etc/selinux/config
[root@centos65 ~]# grep disabled /etc/selinux/config
#     disabled - No SELinux policy is loaded.
SELINUX=disabled
[root@centos65 ~]# chkconfig iptables off; chkconfig --list iptables
iptables        0:off   1:off   2:off   3:off   4:off   5:off   6:off
[root@centos65 ~]# chkconfig ip6tables off; chkconfig --list ip6tables
ip6tables       0:off   1:off   2:off   3:off   4:off   5:off   6:off
[root@centos65 ~]#
※もちろん、ちゃんと「3389/tcp」のみ解放する設定を行ってもよい。


■EPELリポジトリのインストール
[root@centos65 ~]# rpm -ivh http://ftp.riken.jp/Linux/fedora/epel/6/x86_64/epel-release-6-8.noarch.rpm
http://ftp.riken.jp/Linux/fedora/epel/6/x86_64/epel-release-6-8.noarch.rpm を取得中
警告: /var/tmp/rpm-tmp.CgUe03: ヘッダ V3 RSA/SHA256 Signature, key ID 0608b895: NOKEY
準備中...                ########################################### [100%]
   1:epel-release           ########################################### [100%]
[root@centos65 ~]#

## yum実行時にEPELリポジトリをデフォルト参照しない設定
[root@centos65 ~]# sed -i 's/enabled=1/enabled=0/g' /etc/yum.repos.d/epel.repo


■xrdpのインストール
[root@centos65 ~]# yum --enablerepo=epel install xrdp
(中略)
=========================================================================
 Package              Arch       Version             Repository     Size
=========================================================================
Installing:
 xrdp                 x86_64     0.5.0-0.13.el6      epel          240 k
Installing for dependencies:
 tigervnc-server      x86_64     1.1.0-8.el6_5       updates       1.1 M

Transaction Summary
=========================================================================
Install       2 Package(s)
(以下省略)


■日本語キーボード対応
km-e0010411.iniをダウンロードしてシンボリックリンクを作成。
[root@centos65 ~]# cd /etc/xrdp/
[root@centos65 xrdp]# wget http://www.mail-archive.com/xrdp-devel@lists.sourceforge.net/msg00263/km-e0010411.ini
[root@centos65 xrdp]# mv km-e0010411.ini km-0411.ini
[root@centos65 xrdp]# ln -s km-0411.ini  km-e0010411.ini
[root@centos65 xrdp]# ln -s km-0411.ini  km-e0200411.ini
[root@centos65 xrdp]# ln -s km-0411.ini  km-e0210411.ini


■xrdp起動
[root@centos65 ~]# /etc/init.d/xrdp start
xrdp を起動中:                                             [  OK  ]
xrdp-sesman を起動中:                                      [  OK  ]
[root@centos65 ~]#

## vncserverが連動して自動起動される
[root@centos65 ~]# /etc/init.d/vncserver status
Xvnc (pid 8278 7730 7151 2678 2283) を実行中...
[root@centos65 ~]#
xrdpサービスは、vncserverサービスに依存関係があるようなので、tigervnc-serverもインストールしています。
/etc/sysconfig/vncserversの修正は不要でした。※全行コメントアウトのまま。


■リモートデスクトップ接続
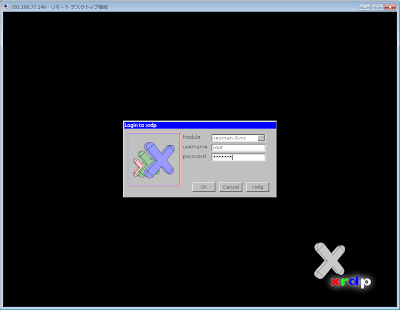
Windows7のRDPクライアントから接続します。バージョンは、6.3.9600です。
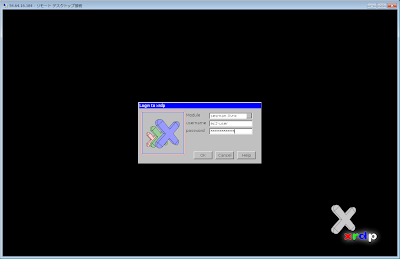


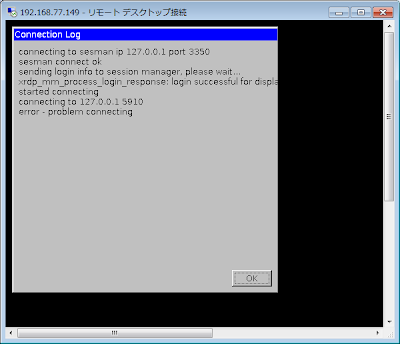
なぜか1回目はログインに失敗します。
エラーダイアログのOKボタンをクリックして再度同じようにログインすると成功。

rootでも他ユーザでも2回目はログイン成功でした。
クリップボード経由でテキストデータのコピペは双方向で可能でした。
ただし、Gnome画面のPrintScreenのコピペはできませんでした。


■パフォーマンス
CentOS6.2で検証した時はRDP接続時にCPU使用率が跳ね上がり、重くて現実的ではなかったが、 今回のCentOS6.5ではそのような現象は発生していないようです。
[root@centos65 ~]# ps aux | grep -e xrdp -e PID | grep -v grep
USER       PID %CPU %MEM    VSZ   RSS TTY      STAT START   TIME COMMAND
root      2281  0.0  0.0  16372   700 pts/0    S    18:34   0:00 /usr/sbin/xrdp-sessvc 2283 2282
root      2286  0.0  0.0 198780  1200 pts/0    Sl   18:34   0:00 xrdp-chansrv
root      2676  0.0  0.0  16372   696 pts/0    S    18:34   0:00 /usr/sbin/xrdp-sessvc 2678 2677
root      2683  0.0  0.0 198780  1196 pts/0    Sl   18:34   0:00 xrdp-chansrv
root      7149  0.0  0.0  16376   568 pts/0    S    19:44   0:00 /usr/sbin/xrdp-sessvc 7151 7150
root      7153  0.0  0.0 198784  1264 pts/0    Sl   19:45   0:00 xrdp-chansrv
root      7728  0.0  0.0  16376   568 pts/0    S    19:58   0:00 /usr/sbin/xrdp-sessvc 7730 7729
root      7732  0.0  0.0 198784  1264 pts/0    Sl   19:58   0:00 xrdp-chansrv
root      8267  0.3  0.4 269208  8404 pts/0    Sl   20:06   0:04 /usr/sbin/xrdp
root      8271  0.0  0.0 128568  1636 pts/0    S    20:06   0:00 /usr/sbin/xrdp-sesman
root      8276  0.0  0.0  16376   568 pts/0    S    20:06   0:00 /usr/sbin/xrdp-sessvc 8278 8277
root      8282  0.0  0.0 198784  1248 pts/0    Sl   20:06   0:00 xrdp-chansrv
[root@centos65 ~]#


こちらの情報が何かのお役に立てましたら幸いです。サイト継続ご協力のほどお願い致します。m(_ _)m

2014年8月2日土曜日

CentOS 7 yumリポジトリにisoファイルを指定

普通にyumコマンドを実行するとインターネット上のリポジトリから最新のモジュールを利用しますが、
CentOS7のインストールisoファイルのパッケージをインストールする手順です。

CentOS7のCD/DVDドライブにマウントしたisoファイルのマウント位置は下記となります。
/run/media/root/CentOS\ 7\ x86_64/

OS: CentOS 7.0 (64-bit)
isoファイル: CentOS-7.0-1406-x86_64-Everything.iso


■isoファイルの中身を確認
[root@centos70-example-com ~]# ll /run/media/root/CentOS\ 7\ x86_64/
total 1399
-rw-r--r--. 1 root root      14 Jul  5 01:01 CentOS_BuildTag
drwxr-xr-x. 3 root root    2048 Jul  5 00:59 EFI
-rw-r--r--. 1 root root     611 Jul  5 01:01 EULA
-rw-r--r--. 1 root root   18009 Jul  5 01:01 GPL
drwxr-xr-x. 2 root root    2048 Jul  5 00:59 LiveOS
drwxr-xr-x. 2 root root 1392640 Jul  5 00:59 Packages
-rw-r--r--. 1 root root    1690 Jul  5 01:01 RPM-GPG-KEY-CentOS-7
-rw-r--r--. 1 root root    1690 Jul  5 01:01 RPM-GPG-KEY-CentOS-Testing-7
-r--r--r--. 1 root root    2883 Jul  5 07:13 TRANS.TBL
drwxr-xr-x. 3 root root    2048 Jul  5 00:59 images
drwxr-xr-x. 2 root root    2048 Jul  5 00:59 isolinux
drwxr-xr-x. 2 root root    4096 Jul  5 01:01 repodata
[root@centos70-example-com ~]#


■yumレポジトリの設定
[root@centos70-example-com ~]# vi /etc/yum.repos.d/CentOS-7.0-x86_64-iso.repo
[root@centos70-example-com ~]# cat /etc/yum.repos.d/CentOS-7.0-x86_64-iso.repo
[centos70_iso]
name=CentOS-7.0-x86_64-iso
baseurl=file:///run/media/root/CentOS\ 7\ x86_64/
enabled=0
gpgcheck=1
gpgkey=file:///run/media/root/CentOS\ 7\ x86_64/RPM-GPG-KEY-CentOS-7
[root@centos70-example-com ~]#
1行目:レポジトリ名(適当に)
2行目:ラベル名(適当に)
3行目:isoファイルのパス
4行目:常に参照する場合は1。0の場合、yumオプションで"--enablerepo="を指定
5行目:GPG認証チェックを有効化する
6行目:GPG-KEYのファイルパスを指定


■インターネット上のリポジトリのhttpdを参照
[root@centos70-example-com ~]# yum info httpd
Loaded plugins: fastestmirror, langpacks
Loading mirror speeds from cached hostfile
 * base: www.ftp.ne.jp
 * extras: www.ftp.ne.jp
 * updates: www.ftp.ne.jp
Available Packages
Name        : httpd
Arch        : x86_64
Version     : 2.4.6
Release     : 18.el7.centos
Size        : 2.7 M
Repo        : updates/7/x86_64
Summary     : Apache HTTP Server
URL         : http://httpd.apache.org/
License     : ASL 2.0
Description : The Apache HTTP Server is a powerful, efficient, and extensible
            : web server.

[root@centos70-example-com ~]#


■isoファイル内のhttpdを参照
[root@centos70-example-com ~]# yum --disablerepo=\* --enablerepo=centos70_iso info httpd
Loaded plugins: fastestmirror, langpacks
Loading mirror speeds from cached hostfile
Available Packages
Name        : httpd
Arch        : x86_64
Version     : 2.4.6
Release     : 17.el7.centos.1
Size        : 2.7 M
Repo        : centos70_iso
Summary     : Apache HTTP Server
URL         : http://httpd.apache.org/
License     : ASL 2.0
Description : The Apache HTTP Server is a powerful, efficient, and extensible
            : web server.

[root@centos70-example-com ~]#
--disablerepo=\* オプションでインターネット上のリポジトリを参照しないようにしています。
Releaseがインターネット上のリポジトリより1つ前のバージョンとなっています。


■isoファイル内のhttpdをyumでインストール
[root@centos70-example-com ~]# yum --disablerepo=\* --enablerepo=centos70_iso install httpd
(中略)
==========================================================================
 Package          Arch        Version                 Repository     Size
==========================================================================
Installing:
 httpd            x86_64      2.4.6-17.el7.centos.1   centos70_iso  2.7 M
Installing for dependencies:
 apr              x86_64      1.4.8-3.el7             centos70_iso  103 k
 apr-util         x86_64      1.5.2-6.el7             centos70_iso   92 k
 httpd-tools      x86_64      2.4.6-17.el7.centos.1   centos70_iso   77 k

Transaction Summary
==========================================================================
Install  1 Package (+3 Dependent packages)

Total download size: 2.9 M
Installed size: 9.9 M
Is this ok [y/d/N]: y
Downloading packages:
--------------------------------------------------------------------------
Total                                      49 MB/s | 2.9 MB  00:00:00
Running transaction check
Running transaction test
Transaction test succeeded
Running transaction
  Installing : apr-1.4.8-3.el7.x86_64                             1/4
  Installing : apr-util-1.5.2-6.el7.x86_64                        2/4
  Installing : httpd-tools-2.4.6-17.el7.centos.1.x86_64           3/4
  Installing : httpd-2.4.6-17.el7.centos.1.x86_64                 4/4
  Verifying  : httpd-2.4.6-17.el7.centos.1.x86_64                 1/4
  Verifying  : apr-util-1.5.2-6.el7.x86_64                        2/4
  Verifying  : apr-1.4.8-3.el7.x86_64                             3/4
  Verifying  : httpd-tools-2.4.6-17.el7.centos.1.x86_64           4/4

Installed:
  httpd.x86_64 0:2.4.6-17.el7.centos.1

Dependency Installed:
  apr.x86_64 0:1.4.8-3.el7  apr-util.x86_64 0:1.5.2-6.el7
  httpd-tools.x86_64 0:2.4.6-17.el7.centos.1

Complete!
[root@centos70-example-com ~]#
依存関係も考慮してインストールされました。

## version確認
[root@centos70-example-com ~]# rpm -q httpd
httpd-2.4.6-17.el7.centos.1.x86_64
[root@centos70-example-com ~]#

## httpd起動
[root@centos70-example-com ~]# systemctl start httpd
[root@centos70-example-com ~]#
※CentOS 7 から起動方法が変更になっています。

こちらの情報が何かのお役に立てましたら幸いです。サイト継続のご協力ありがとうございます。m(_ _)m